Wednesday, 7 November 2018

Thats Torn It

Morning everyone, I hope you are all well. A little bit of fun with this card and a mix of styles too. It would be great for a mans card or for a teenager when you really dont know what else to give them.

You will need:
Xander Art Stencil
Profile Stamp Set  2
Dolphin Stamp Set 1
Torn Paper Stamp By Sheena
Versafine Black Ink Pad
Metro Grey Ink Pad
Colour Blend pencils
 8B Graphite Pencil
Pergamano Blending Pen
Faber Castel Eraser Pencil
Black Card
White Stamping Card

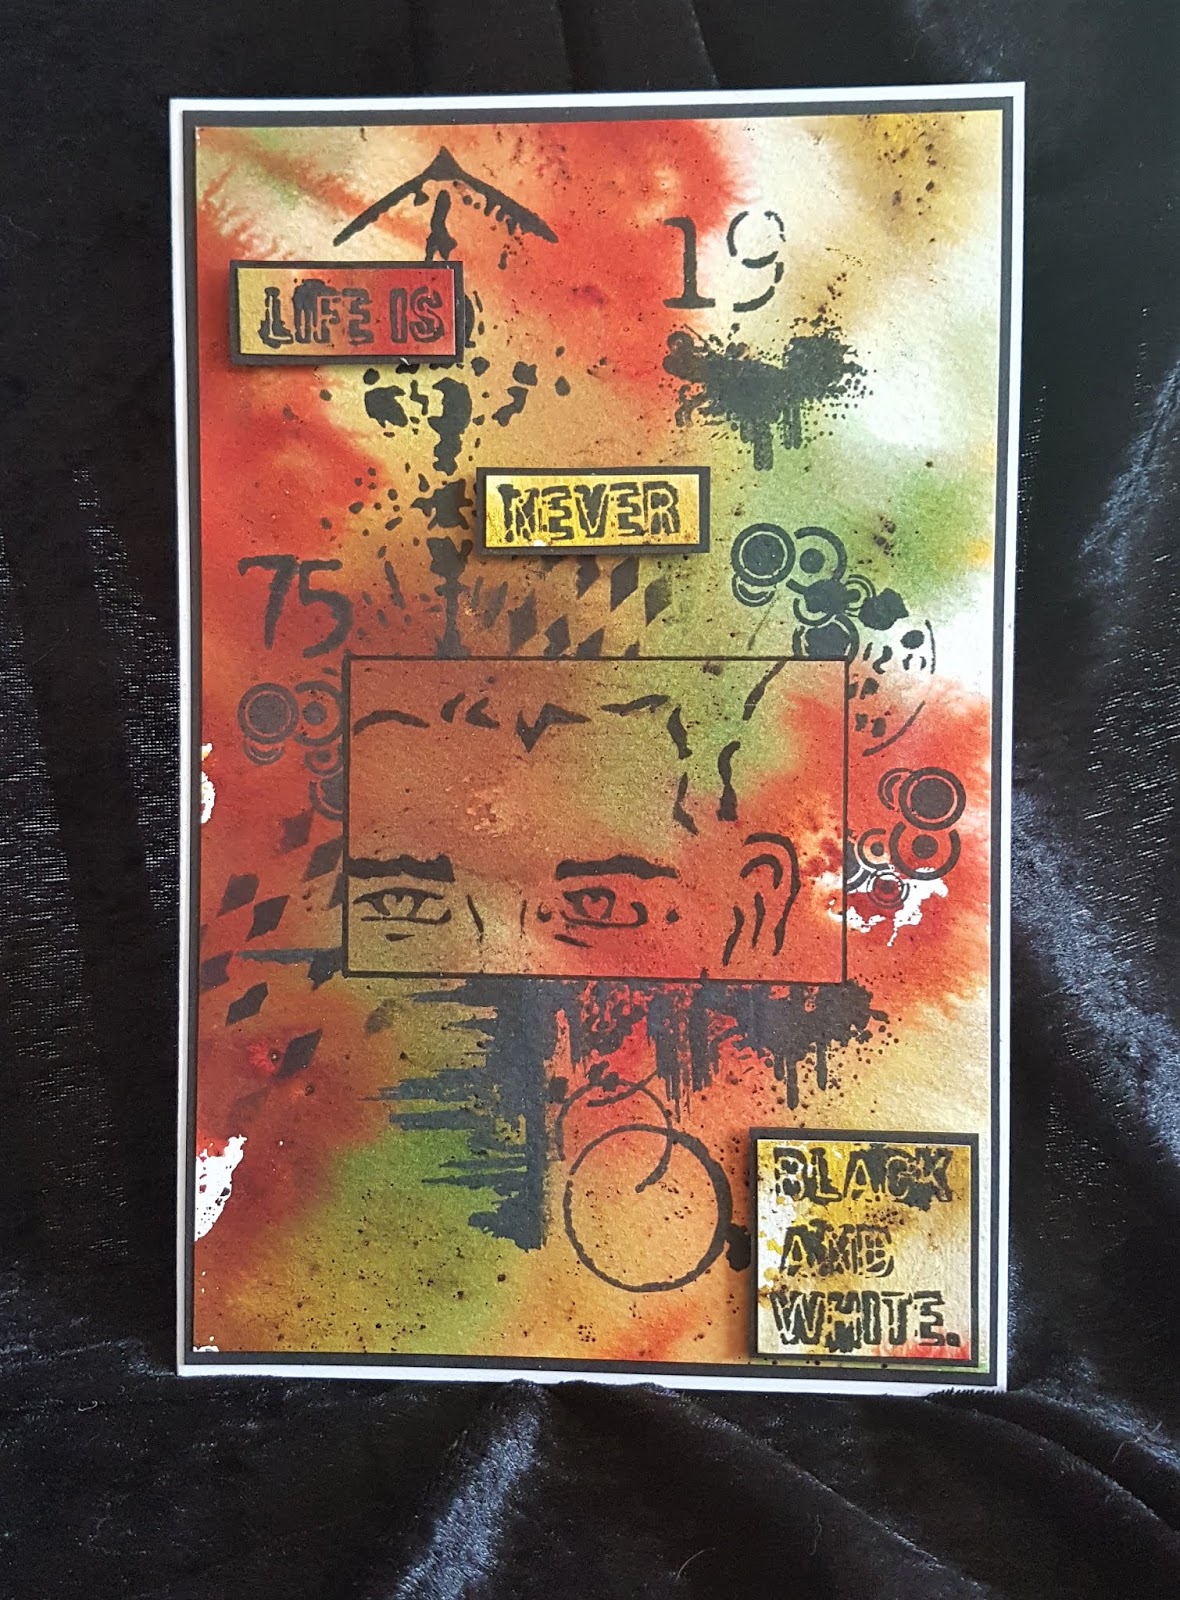
Step 1: Using Metro Grey ink from Tonic, stamp the tron paper stamp, You will also need a mask so stamp it a second time on copier paper, Cut it out and position over your image to mask.

Step 2: Position your stencil and ink through it with Versafine black ink

Step 3: Remove the stencil.

Step 4: Cut out the inside of the torn stamp.

Step 5: Using the stencil, draw around, either the inside, outside or a mixture of both. Roughly go around the lines with the graphite pencil. Add very light shading as shown on the show, using the Pergamano Blender. You really only need to concentrate on the area showing through the card, but I got carried away.

Step 6: Use coloured pencils to add color to the eyes and skin.Position the coloured image behind your torn part and secure with Tacky glue.

Step 7: Trim your piece down and layer onto black card, before mounting onto a white card base. Stamp the 'Everyone Has  A Story' straight onto your card. Then on a separate piece of white card stamp the 'Relax', mount this onto black card and secure to your card with 3D Glue gel.

Thank you so much for joining me today it's been great to share this project with you. I hope you enjoyed the tutorial along with the finished piece. Why not stop by again to see what else I have to share.

Before I go there is one more thing, here is a 30% off voucher to use on your FIRST order (anything) from Hochanda, use code FEY5JBP7. 

As you know I love writing my blog and helping as much as I can, well I would really love for you to add you support by adding me as a favourite blog. All you need to do in that section is choose other and add my blog address nickinbarnsley.blogspot It would be great to get a mention even if I dont come anywhere.

Here is the link to add your support for all of the categories. 

https://www.britishcraftawards.com/


Until Tomorrow, Take care and Happy Crafting.xx


Tuesday, 6 November 2018

Marquetry Dolphin

Morning everyone, Thank for joining me today. This is a project I was very excited about. I have always loved the look of marquetry and I have watched Quentin on Hochanda many times, It was great to actually see the craft on TV. A very good friend gave me some wonderful veneers, so I thought I would try a small card with one of the Dolphins from my new collection. Maybe you might have a go too.

You will need:
Craftascope Dolphin Set 1
Selection of Veneers
Washi Tape
Carbon Paper or Tracedown
Copier Paper
Black Card
White Card
Black Base Card
Tacky Glue
Marquetry Craft Knife

Step 1:Collect all of your veneers together and select the pieces you will use to insert for your image.

Step 2: Choose your background veneer, this is the piece that will form the base and add the inserts to, this measures 4 1/2'' square.

Step 3: Stamp the chosen image, (here the dolphin) onto some copier paper. Tape this in place over your base piece, it will need to remain in place until the whole process is complete. Use the carbon paper in between to trace the first section.

Step 4: Use the knife to cut out this section. Place your chosen veneer behind underneath and cur the shape with your knife being careful not to move. Take your time and make very small cuts. When it is free, insert into the base and secure from behind with tacky glue, cover with tape while drying.

Step 5: Repeat the previous step with each section of you design.

Step 6: When completely dry, lightly sand the surface. I then finished mine with a light polish with teak oil

Step 7: To complete the card mount it onto black card and then white, finally add it to a black base card.

Another thing, here is a 30% off voucher to use on your first order (anything) from Hochanda, use code FEY5JBP7.

As you know I love writing my blog and helping as much as I can, well I would really love for you to add you support by adding me as a favourite blog. All you need to do in that section is choose other and add my blog address nickinbarnsley.blogspot It would be great to get a mention even if I dont come anywhere.

Here is the link to add your support for all of the categories. 

https://www.britishcraftawards.com/


Until Tomorrow, Take care and Happy Crafting.xx

Monday, 5 November 2018

Invisible to the Eye

Morning Friends and Crafters, Thanks for popping by to see what I have to share with you. Today I have a card I made for the launch of my own collection. I do hope you got to see my first show last Thursday, If you didn't see it, it will be available on rewind via the Hochanda website. I really hope I wasn't too bad and you enjoyed it if you did see it.

You will need:
Profile Stamp Collection 2
Selection of Leaf Stamps (Here I have used my own designs)
Pebeo Drawing Gum
Grey Brusho
Infusions Royal Blood
Watercolour Card
Black Card
White Card Base

Step 1: Take a piece of watercolour card 5 1/2 x 8'' and stamp the profile towards the top right of the card.

Step 2: You will need some masks of the leaves you are using, so stamp them onto copier paper. Start building the leaves up around the face and tumbling down the page.

Step 3: Mask the whole stamped area with Pebeo Drawing Gum and leave to dry.

Step 4: Next splat a small amount of Drawing Gum around the page, not too much.

Step 5: On your glass mat mix some grey Brusho with a small amount of water and wash over the background.

Step 6: Lightly sprinkle the Royal Blood Infusions, here and there over your card, then spritz. You dont need much water as you dont want the colour to spread or break.

Step 7: Next create your layer for the main image, Stamp the leaves around the top right and bottom left corners, mask with Drawing gum and was the card withe the grey Brusho as before.

Step 8: Once dry, remove the Drawing gum and colour using your chosen medium, here I have used alcohol markers, which I wouldn't normally do on watercolour card.

Step 9: Remove the Drawing gum from your main piece and colour in 

Step 10: To finish, layer both pieces onto black card, leaving a very narrow border, Mount onto a white card base.

As you know I love writing my blog and helping as much as I can, well I would really love for you to add you support by adding me as a favourite blog. All you need to do in that section is choose other and add my blog address nickinbarnsley.blogspot It would be great to get a mention even if I dont come anywhere.

Here is the link to add your support for all of the categories. 

https://www.britishcraftawards.com/


Until Tomorrow, Take care and Happy Crafting.xx

Sunday, 4 November 2018

Autumn Sunset With 3 Way Overlay Stamps

Morning friends and crafters, Today's card uses the lovely  Autumn 3 Way overlay stamps from Clarity. Barbara launched them on her show on the 28th October. If you missed the show, they will still be available on 'Rewind' via the Hochanda website, do take a look they are always filled with lots of inspiration from the other Design Team members and of course Barbara's demos.

You Will Need:
Letterbox Alphabet Stamps and Mask set
Autumn 3 Way Overlay Stamps (Tree)
Black Archival Ink Pad
Distress Oxides: Squeezed Lemonade, Carved Pumpkin, Aged Mahogany, Blueprint Sketch and Black Soot
White Stamping Card 4 x 4''
White Stamping Card 5 x 5''
Black Card
Tacky Glue


Step 1: On the smaller of the 2 pieces of stamping card, take the infill stamp and use the Aged Mahogany, Carved Pumpkin and Squeezed Lemonade  and stamp to look like the sunset on an autumn evening, when the sun is low in the sky.

Step 2:Use Archival ink to add the outline to really make the tree stand out.

Step 3: For the background infill, I have used Blueprint Sketch but edged the stamp with a little black soot to enhance the frame and draw your eye into the image.

Step 4:To finish your card, blend around the edges with Aged Mahogany, then mount onto black card, leaving a slim border. Repeat this with the larger stamping card which will be your next layer. Mount it on to black card as before, layer both of these onto your base card.

Just a little extra here: If you have not shopped with Hochanda before, here is a voucher code giving you 30% off your first purchase (FEY5JBP7) it can be used for any purchase, feel free to share it.

Great to have your company today. I do hope you have enjoyed the tutorial I have shared along with the finished card. Please pop by again soon to see what else I have to share with you. For now Take care and Happy Crafting.xxx

Saturday, 3 November 2018

1975

Morning Friends and Crafters, I am back with you this morning with some more inspiration using stamps and stencils from my collection. I do hope you got to see my first show on Thursday, if not it will be available on rewind  via the Hochanda website. Today's card could be made in any colour way, to suit any occasion, As it is I think it would make a wonderful card for a man.

You will need:
Xander Media Stencil
Profile Stamp Set 2
Selection of texture stamps (Your Choice) 
Watercolour Card
Black Card
Infusions Rusty Car, Lemonchello, Emerald Isle
Versafine Black Ink
Basic Rectangle Die

Step 1: Start by making a really colourful background for this project. Spritz your card and sprinkle with the infusions. Leave this to dry naturally  as the colours remain much more vibrant. Cut a rectangle from scrap paper and keep the inner and the outer. Position over your card, select the part of the stencil you want to use and  ink through with Versafine black ink. Use a ruler to make a frame around the image.

Step 2: Use the inner part of the rectangle to make of the image. Then using your choice of stencils and stamps to build up your design. Trim  down your design and keep the trimmings.

Step 3: Now use the trimmings to stamp your sentiments with the same ink. Mount these onto black card using Tacky glue.

Step 4: Mount your design onto black card. (Don't forget to gut the card, use basic dies and use for later projects)

Step 5: To finish your card, mount it onto a white or cream base card. Then add your words using Collall 3D glue gel.

Thank you for stopping by today to see what I have to share. I hope you enjoyed the tutorial along with the finished project. I post everyday and I hope you will join me again soon.  

Before I go there is one more thing, here is a 30% off voucher to use on your FIRST order (anything) from Hochanda, use code FEY5JBP7

As you know I love writing my blog and helping as much as I can, well I would really love for you to add you support by adding me as a favourite blog. All you need to do in that section is choose other and add my blog address nickinbarnsley.blogspot It would be great to get a mention even if I dont come anywhere.

Here is the link to add your support for all of the categories. 

https://www.britishcraftawards.com/


Until Tomorrow, Take care and Happy Crafting.xx

Friday, 2 November 2018

Craftascope Another Birthday!!!

Morning Friends and Crafters, Well, I do hope you got to see my show yesterday. What did you think? I would love to know unless it was disastrous of course, then I would rather forget all about it. I am scheduling this post to make sure there is lots of inspiration for you, so for me the show hasn't taken place yet, (Thats funny I feel a bit like Dr Who). I am really looking forward to seeing what you create, so I do hope you will share, it's the most exciting part. This is ever such a simple and fast card to make, great for a blokes card and you can add any joke or sentiment you like in the speech bubble.

You will Need:
Craftascope 'Trent' Media Stencil
Clarity 'Firework' Stencil Club Issue No 42
Basic Tag or Speech Bubble Die
Basic Square Die
Stamping Card
Black Fine Liner 
Black Card
White Card Base 8 x 8''
Selection of Distress Inks
Black Versafine Ink
Copier Paper


Step 1: Cut an aperture in a scrap piece of copier paper, place over your stamping card and ink through. Remove the paper and cut out with a die, about 1/4'' larger to allow for a white border.

Step 2: Use your black fine liner to add a wobbly double line around the card. Use Tacky glue to mount it onto black card.

Step 3: Cut a sheet of stamping card to 7 1/2'' square, and get your stencil ready.

Step 4: Selectively ink through the stencil using a selection of bright distress inks, No need to do the centre as it will be covered. Mount this onto black card. Cut a speech bubble or similar and stamp your chosen sentiment or joke. back with black card and secure to the card with 3D glue gel.

Just a little extra here: If you have not shopped with Hochanda before, here is a voucher code giving you 30% off your first purchase (FEY5JBP7) it can be used for any purchase, feel free to share it.

As you know I love writing my blog and helping as much as I can, well I would really love for you to add you support by adding me as a favourite blog. All you need to do in that section is choose other and add my blog address nickinbarnsley.blogspot It would be great to get a mention even if I dont come anywhere.

Here is the link to add your support for all of the categories. 

https://www.britishcraftawards.com/


Until Tomorrow, Take care and Happy Crafting.xx


Thursday, 1 November 2018

Acrylic Portrait

Morning Friends and Crafters. Well the day has finally arrived, my first show on Hochanda at 4 pm this afternoon. All of the drawing,designing and re drawing has taken me on this exciting journey and what a scary journey it has been at times, I hope you will be rooting for me and praying that I wont end up on the bloopers reel lol. Today I am sharing a tutorial for one of the demonstrations that I hope there will be time for. I have chosen this project as it gives a really strong and punchy look, but it is totally achievable for everyone to create. I have just used one stencil from the collection, any of the words or sentiments from the collection would work, but I chose to leave it, for now anyway.

You will need:
Craftascope 'Trent' Stencil
Distress Crayons Set 3
Indigo Blu Townhouse Teal Acrylic Paint
White Gesso
Cosmic Shimmer Acrylic Paint Orange Popsicle
Pencil
Purple Spritzer
Orange Spritzer
Black Card 12 x 12 9 (Smaller if Preferred)

Ste 1: Create your background with the acrylic paints and a Brayer. Build up your layers to create interest, texture and dimension. (*Top Tip* use rice paper or a piece of Calico to mop up any excess paint, this can be used for future projects. Another idea is to use an ATC size to create later.)

Step 2: Use the Spritzers to create another level of interest. Try letting the colours run either side of where your image will sit, like a sort of frame.

Step 3: Trace through your stencil with a pencil, these have been designed to give at least 3 different faces. By using either the inside line on it's own, the outside line on it's own or a mixture of the 2 lines. Remove the stencil and using the Black Distress Crayon strengthen the image.

Step 4: First using your White Distress Crayon, start by adding the shape and highlights to the face, add some white and rub in with your finger, decide where your light is coming from, here its from the right.

Step 5: Start by adding more shape with the black add the black and rub in with your finger, be sparing with this as it is a strong tone, less is more, continue until you are happy with the image. To finish your project you can add some of the brown and cream Distress Crayons to add texture to the hair.

Thank you so much for taking a look at what I have shared today, I hope you have enjoyed the tutorial and the finished piece. It would be great for you to have a go to see just what you can create. Hope you will join me on Hochanda today at 4 pm or if you have missed it you can see a repeat on Catch up. Another thing, here is a 30% off voucher to use on your first order (anything) from Hochanda, use code FEY5JBP7.

As you know I love writing my blog and helping as much as I can, well I would really love for you to add you support by adding me as a favourite blog. All you need to do in that section is choose other and add my blog address nickinbarnsley.blogspot It would be great to get a mention even if I dont come anywhere.

Here is the link to add your support for all of the categories. 

https://www.britishcraftawards.com/


Until Tomorrow, Take care and Happy Crafting.xx