Showing posts with label Infusions. Show all posts

Saturday, 17 November 2018

12 x 12 Journal Page

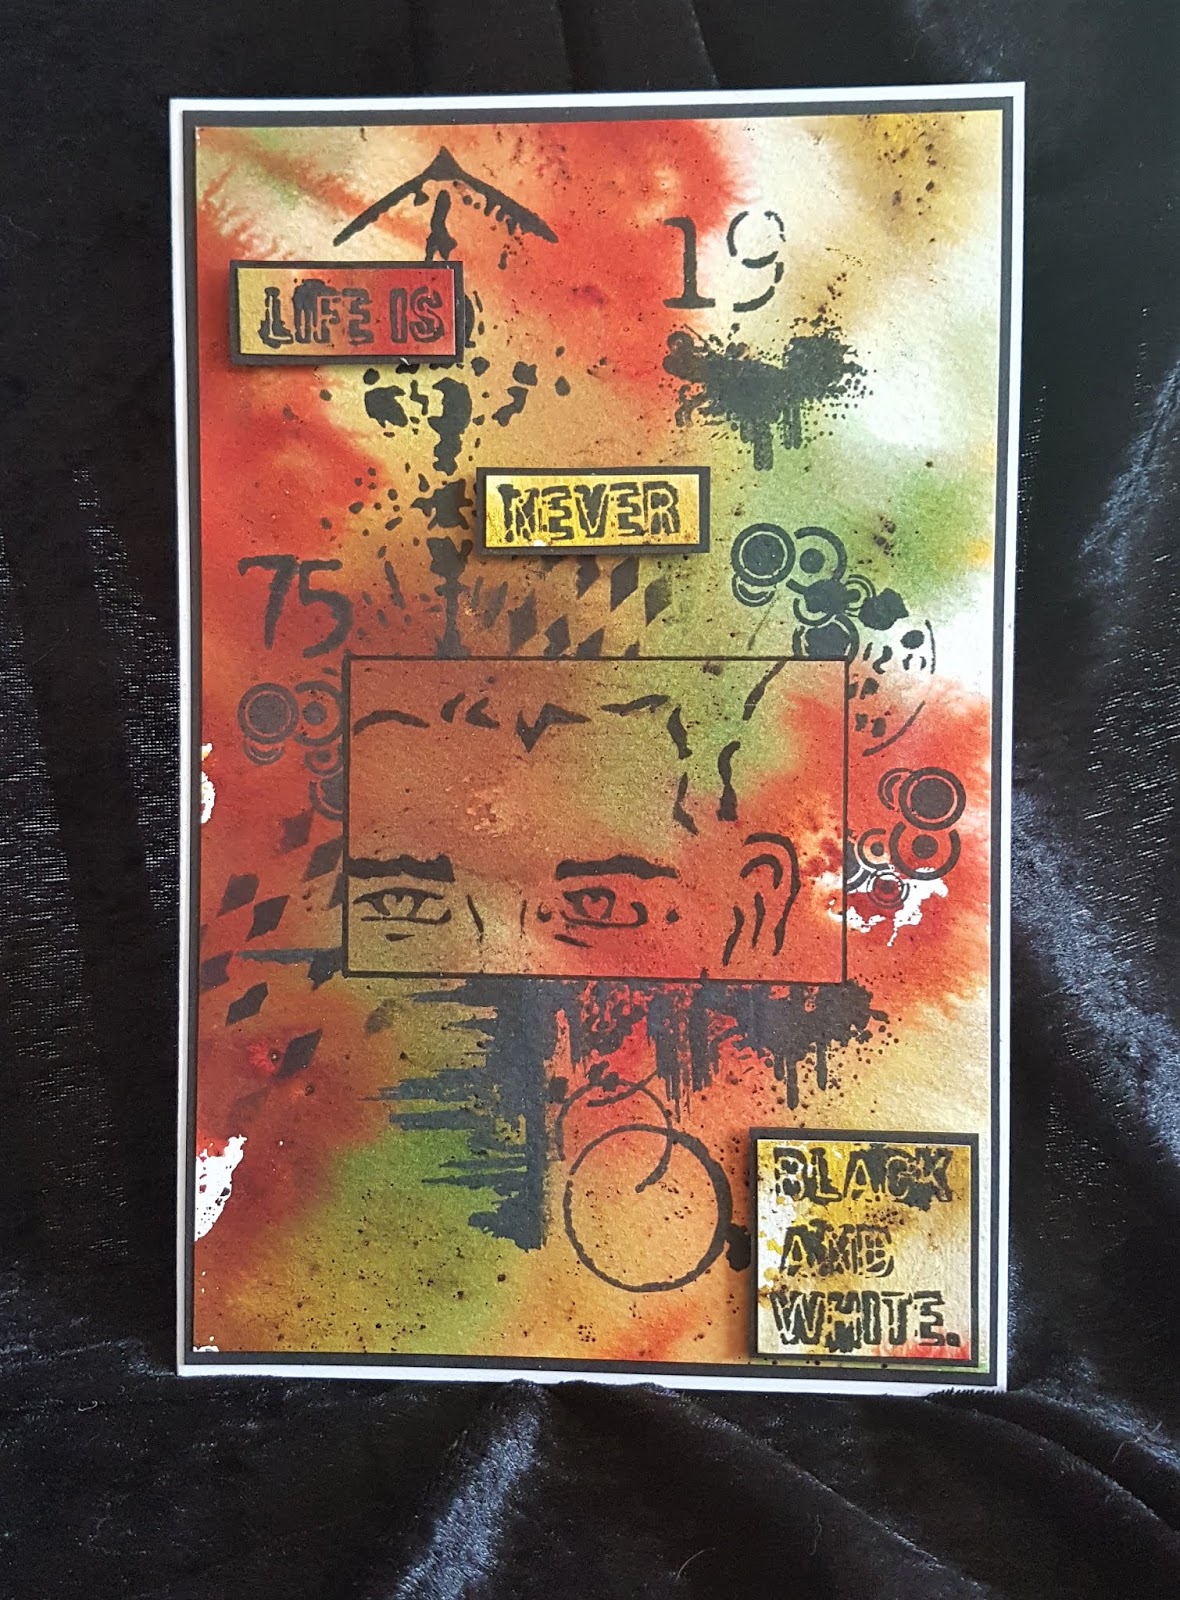
Morning Friends and crafters, Im a little late today.Hope you are all okay and looking forward to a wonderful weekend. I am sharing a 12 x 12 journal page today using the 'Trent' A5 Media Stencil along with a super collection of AALL&CREATE stamps to give a dramatic and colourful background.. I wanted the portrait to really pop out of the page and using the different media to create layers. You could easily use this idea on a smaller card design as the stencils are designed to work for all size projects.

You will need:
Greasproof Paper
HB & 6B Graphite Pencils
Pergamano Blender Pen
Selection of Watercolours
Versafine Black Ink Pad
12 x 12 Pink Pig Journal
Grey Brusho
Infusions Rusty Car and Royal Blood

Step 1: Start by positioning your stencil on the page. Trace through the outside lines for this one. Use the 6B to roughly go over the lines, not too heavy on the lips (I will do a detailed video when I am back home).Make a mask from Greaseproof paper, see photos 2 & 3. Stamp your selected stamps to build up the background.

Step 2: Repeat to make a mask or leave the previous one in place to add colour to the background.

Step 3: Use Pebeo Drawing gum to mask any detail you want to protect. Then once dry, use a wash made with Grey Brusho and water for the entire background.

Step 4: Lightly spritz areas of your background and sprinkle some areas with the Rusty Car and some with the Royal Blood.

Step 5: Remove the masking fluid and the paper ask from you project.

Step 6: Use your selection of watercolours and alcohol markers to add colour and depth to your project, this really adds another layer of interest.

Just a little extra here: If you have not shopped with Hochanda before, here is a voucher code giving you 30% off your first purchase (FEY5JBP7) it can be used for any purchase, feel free to share it.

As you know I love writing my blog and helping as much as I can, well I would really love for you to add you support by adding me as a favourite blog. All you need to do in that section is choose other and add my blog address nickinbarnsley.blogspot It would be great to get a mention even if I dont come anywhere.

Here is the link to add your support for all of the categories. 

https://www.britishcraftawards.com/

Thank you so much for joining me today, I hope you have enjoyed the tutorial and the finished piece. I hope you will join me again very soon. Take care and Happy Crafting.xxx

Monday, 5 November 2018

Invisible to the Eye

Morning Friends and Crafters, Thanks for popping by to see what I have to share with you. Today I have a card I made for the launch of my own collection. I do hope you got to see my first show last Thursday, If you didn't see it, it will be available on rewind via the Hochanda website. I really hope I wasn't too bad and you enjoyed it if you did see it.

You will need:
Profile Stamp Collection 2
Selection of Leaf Stamps (Here I have used my own designs)
Pebeo Drawing Gum
Grey Brusho
Infusions Royal Blood
Watercolour Card
Black Card
White Card Base

Step 1: Take a piece of watercolour card 5 1/2 x 8'' and stamp the profile towards the top right of the card.

Step 2: You will need some masks of the leaves you are using, so stamp them onto copier paper. Start building the leaves up around the face and tumbling down the page.

Step 3: Mask the whole stamped area with Pebeo Drawing Gum and leave to dry.

Step 4: Next splat a small amount of Drawing Gum around the page, not too much.

Step 5: On your glass mat mix some grey Brusho with a small amount of water and wash over the background.

Step 6: Lightly sprinkle the Royal Blood Infusions, here and there over your card, then spritz. You dont need much water as you dont want the colour to spread or break.

Step 7: Next create your layer for the main image, Stamp the leaves around the top right and bottom left corners, mask with Drawing gum and was the card withe the grey Brusho as before.

Step 8: Once dry, remove the Drawing gum and colour using your chosen medium, here I have used alcohol markers, which I wouldn't normally do on watercolour card.

Step 9: Remove the Drawing gum from your main piece and colour in 

Step 10: To finish, layer both pieces onto black card, leaving a very narrow border, Mount onto a white card base.

As you know I love writing my blog and helping as much as I can, well I would really love for you to add you support by adding me as a favourite blog. All you need to do in that section is choose other and add my blog address nickinbarnsley.blogspot It would be great to get a mention even if I dont come anywhere.

Here is the link to add your support for all of the categories. 

https://www.britishcraftawards.com/


Until Tomorrow, Take care and Happy Crafting.xx

Saturday, 3 November 2018

1975

Morning Friends and Crafters, I am back with you this morning with some more inspiration using stamps and stencils from my collection. I do hope you got to see my first show on Thursday, if not it will be available on rewind  via the Hochanda website. Today's card could be made in any colour way, to suit any occasion, As it is I think it would make a wonderful card for a man.

You will need:
Xander Media Stencil
Profile Stamp Set 2
Selection of texture stamps (Your Choice) 
Watercolour Card
Black Card
Infusions Rusty Car, Lemonchello, Emerald Isle
Versafine Black Ink
Basic Rectangle Die

Step 1: Start by making a really colourful background for this project. Spritz your card and sprinkle with the infusions. Leave this to dry naturally  as the colours remain much more vibrant. Cut a rectangle from scrap paper and keep the inner and the outer. Position over your card, select the part of the stencil you want to use and  ink through with Versafine black ink. Use a ruler to make a frame around the image.

Step 2: Use the inner part of the rectangle to make of the image. Then using your choice of stencils and stamps to build up your design. Trim  down your design and keep the trimmings.

Step 3: Now use the trimmings to stamp your sentiments with the same ink. Mount these onto black card using Tacky glue.

Step 4: Mount your design onto black card. (Don't forget to gut the card, use basic dies and use for later projects)

Step 5: To finish your card, mount it onto a white or cream base card. Then add your words using Collall 3D glue gel.

Thank you for stopping by today to see what I have to share. I hope you enjoyed the tutorial along with the finished project. I post everyday and I hope you will join me again soon.  

Before I go there is one more thing, here is a 30% off voucher to use on your FIRST order (anything) from Hochanda, use code FEY5JBP7

As you know I love writing my blog and helping as much as I can, well I would really love for you to add you support by adding me as a favourite blog. All you need to do in that section is choose other and add my blog address nickinbarnsley.blogspot It would be great to get a mention even if I dont come anywhere.

Here is the link to add your support for all of the categories. 

https://www.britishcraftawards.com/


Until Tomorrow, Take care and Happy Crafting.xx

Monday, 29 October 2018

Autumn Leaves Treescape from Clarity

Morning Friends and Crafters, today I am sharing a card I made with the 'Treescape' stamps from Clarity. I do hope you got to see the shows with Maria. This is such a strong stamp, it can be given a totally different look just by changing the background, great for all sizes of card depending on your preference.

You will Need:
Clarity 'Treescape' Stamp
Clarity 'Autumn' Stamp
Clarity 'Leaf' Stamp
Archival Black Ink
Infusions Rusty Car
Infusions Emerald Isle
Infusions Blackcurrant
Spray n Shine
Watercolour Card
Black Card
White Card Base
Water Spray
White Gel Pen
3D Glue Gel
Tacky Glue

Step 1: Spritz the glass mat and sprinkle with the infusions.

Step 2: Spritz the watercolour card and place on the inks.

Step 3: Select the area you want to stamp, Make sure you leave enough space around the edges so you can use it as a layer. Cut it out with a basic die.

Step 4: On another piece of card, use the same infusions but a lot lighter with the amount. When dry stamp the leaves and cut out. Spray with Spray n Shine.

Step 5: Layer your mats onto the base card.

Step 6: Use a ruler and the white gel pen and draw around the frame of the image.

Step 7: Stamp the Autumn and layer onto white card and then onto black.

Step 8: Add the shaped leaves as shown in the photo with 3D Glue gel. Use foam pads in the centre of the topper and glue gel on the sides, I have given this a curved shape.

Just a little extra here: If you have not shopped with Hochanda before, here is a voucher code giving you 30% off your first purchase (FEY5JBP7) it can be used for any purchase, feel free to share it.

I do hope you have enjoyed the tutorial today along with the finished card. I will be flying back to the UK tonight ready for my visit to Hochanda and my first show on Thursday, I do hope you will be watching. I have scheduled posts so I hope you will join me again very soon to see what else I have to share with you. For now Take care and Happy Crafting.xxx

Sunday, 28 October 2018

Ethereal Man

Morning Friends and Crafters. I am so excited to share the first sneak peek of a sample I have made for my very first Hochanda Show on Thursday 1  st November at 4 pm. I am so proud of the collection I have put together, so I do hope you will tune in and support me, I am bound to be full of nerves. The project I am sharing today is such an easy way to create your piece using just a stencil from the collection.

You will need:
Xander Stencil
Words or Sentiment of your choice
Infusions: Royal Blood, A bit Jaded, Rusty Car and Blackcurrant.
Water Spritzer
Versamark
White or Clear Embossing Powder
Watercolour Card
Black Card
White Card
Anti static Bag

Step 1: Wipe your watercolour card with the anti static bag.

Step 2: Ink through the stencil with Versamark, add the embossing powder and heat. Sprinkle with Infusions and spritz with water. In some areas, I really flooded the card to get some really nice flowing patterns. Leave to dry naturally.

Step 3: Layer onto black card and then mount onto white card.

Step 4: Create a background sheet using the same colour infusions, once dry mount your design. 

I have added this to my journal, but it would work equally well as a really nice greeting card,adding one of the word or sentiment stamps to suit the occasion. It would also make a nice piece of art to frame and hang on your wall.

Thank you ever so much for joining me today, It's been a real pleasure to share this with you today. I am nervous and excited but more importantly I am passionate about this collection and I hope you will share this enthusiasm. It's been a long time coming and getting it right and at last it's just as I wanted. I have a post going live tomorrow on the Hochanda Blog so do keep a look out for it. Another thing, here is a 30% off voucher to use on your first order (anything) from Hochanda, use code FEY5JBP7.

As you know I love writing my blog and helping as much as I can, well I would really love for you to add you support by adding me as a favourite blog. All you need to do in that section is choose other and add my blog address nickinbarnsley.blogspot It would be great to get a mention even if I dont come anywhere.

Here is the link to add your support for all of the categories. 

https://www.britishcraftawards.com/


Until Tomorrow, Take care and Happy Crafting.xx


Thursday, 27 September 2018

Christmas Sleigh

Morning Friends and Crafters, today I am sharing with you, a card I made with the Christmas Dimensionals. Again this is a two project tutorial as you really do need to decorate the outside, especially when you have put so much work into the inside. I am sure you all know how much I love these Dimensional ranges, they are so inspiring and make very special cards to give.

You will need:
Sleigh Concept Die
Sleigh Accessorie Die
Festive Words 1
Sparkling Snowflakes 1
Festive Foliage 1
Sleigh Accessories Acrylic Stamps
Tissue Paper
Infusions 'Royal Blood'
Sheena Stamping Card
Red and Gold Mirror Card
12 x 12 Plain Paper Pad
12 x 12 Decorative Paper Pad
Green, White and Blue Foamiran
Centura Pearl White/Silver Card

Step 1: Put a piece of tissue paper on a glass mat, spritz and sprinkle with royal blood, spritz again and leave to dry. Once dry add this to the top of your base card to form the sky.

Step 2: Cut a selection of presents and ribbons, layer these up with Tacky glue. Next cut the moon, stars, trees and houses for decoration.

Step 3: Add Mountains and hills to your scene, secure yellow card behind the windows of the houses to look like lights, add these to your scene. Cut in your concept dies, cover the sleigh with the mirror card, for the reindeer, stamp and die cut from the light brown in the paper pad.

Step 4: Cut the poinsettias and leaves from the foamiran.

Step 5: Cut your mats and layers from the paper pad and Centura pearl. Cut the sentiment in blue, Dies cut the edger die either side of your topper.

Step 6: Arrange and secure your layers as shown in the photo.

Step 7: Add your trees, snowflakes, presents and all of the little extras to finish the inside.

Thank you for taking the time to visit today. I do hope you have enjoyed your visit. Please come back again soon to see what else I have to share with you. For now take care and Happy Crafting.xxx

Monday, 27 August 2018

Merry Christmas Shaker Card

Morning Friends and Crafters, Today I am sharing a card I made for the launch of 'Winter Wonderland, one of Sara's Signature collections. It's jam packed with goodies for all of your Christmas Crafting. So here is a tutorial for a rare shaker card from me.

You will need:
Winter Wonderland Snowflurry
Winter Wonderland Snowflake Quartet
Winter Wonderland Yuletide Sentiment
Winter Wonderland Matt Mirror Card
Winter Wonderland Luxury Glitter Card 6 x 8''
Tissue Paper
Infusions Royal Blood
Tacky Glue
Red Liner Tape
Foam on a Roll
Centura Pearl White/Silver Card

Step 1: Take your glitter card, position the edger die, approximately 1/2'' in from the end. cut out then repeat at the other end. The use Red Liner Tape to secure acetate behind the design.

Step 2: Scrunch and unscrunch the tissue paper and place on to a glass mat, sprinkle with Royal Blood Infusions then spritz with water and let the wonderful colours spread across the tissue. Leave to dry

Step 3: Coat your backing paper with diluted PVA, add your tissue to this and secure at the back.Leave this to dry.

Step 4: Cut snowflakes and the 'Merry Christmas' from the matt Mirror card and secure in place with Tacky glue.

Step 5: Mount this onto a Centura Pearl base with 1/4'' border

Step 6: Run Foam all around the frame, making sure there are no gaps to let the contents spill out.

Step 7: Fill with large Mica Flakes and white Flowersoft 

Step 8: Place and secure the base over the top and your card is complete.

Thank you ever so much for joining me today, I hope you have enjoyed the tutorial and the finished card I have shared today. I hope you will join me again very soon to see some more inspiration. For now take care and Happy Crafting.xx