Showing posts with label pebeo. Show all posts

Tuesday, 27 November 2018

Media Canvas

Morning Friends and Crafters, I will be sharing a few more posts with you this week and then I will be having a break for a little while. So today I m sharing a media canvas that I made using one of my A5 Media Stencils,here I have used 'Bailey'. I hope you enjoy the tutorial.

You will need:
Selection of Daler Rowney System 3 Acrylics
Amsterdam Acrylics (They go a long way)
Canvas Board 8 x 8
White Gesso
Black Fine Liner 1.0
HB Pencil
Selection of Acrylic Brushes
Palette Knife

Step 1: Mix some of the Blue Acrylic with some white Gesso to thin it, use this to prime your canvas board. Use the fine liner and stencil to add the face to your canvas. This is just a guide at the moment. (dont forget you only need one edge to make the face no the full shape) choosing either the inside, outside or mixture of the lines with give you a different look. Stat building up your colours and textures, This project is all about layering, which will show through to give you the depth.

Step 2: Next start adding you lighter blues, whites and more of the warmer tones for the face. Maybe add some splatters as well, I find these are easiest with a fan brush, always wash it out straight away. Leave this to dry before replacing the stencil and roughly adding the details with an HB pencil. Again this is mainly a guide for you.

Step 3:  Continue adding more depth and texture to the background, start adding shadowing and shaping the face, you might prefer to use a finger or brush for this. Use a small brush to add some definition to the features. The lips are best not so defined as it can make them look unnatural but we can subdue them later.

Step 4: Now add more dimension to the face, bringing in even more of the warmer tones to add the illusion of the facial curves. Use deeper tones of the cooler colours to add shadows under the jawline and chin.

Step 5: Now it's just a case of fine tuning until you re happy with the result, Start dulling won the lips to blend them in more. Oncce again, dont forget it's not finished until you are happy with it. You can always add more to it, it's your artwork and creation, this is not a portrait, but your expression of one.

I hope you have enjoyed the tutorial I have shared with you today, along with the finished project. I do hope you will have  ago yourself, especially if it's something you've not tried before, it's all about having fun, dont forget.

Please take a look at my Etsy shop, the link is at the top of my blog. If you do want anything I will only be sending out until the end of  the week unless I can arrange something, if not the shop will close until my return. For now Take care and Happy Crafting.xxx


Sunday, 25 November 2018

Mixed Media Acrylic Portrait

Morning Friends and Crafter, Im back today with another mixed media project for you, There are lots of extra photos to go with this tutorial, making it very easy to follow. It's one of those pieces that really does look better in real life the camera just hasn't picked up the colour as much as I would have liked. With Cyber Weekend in full swing it's really a good time to get all of your essentials and while your at it why not treat yourself to something new.

You will need:
Craftascope A5 Media Stencil 'Bailey' (Only available at my Etsy Shop or via Hochanda)
8 x 8 Board, Here I have used Zutter but any board will be perfect.
Pebeo Studio Acrylics Modeling Paste
Indigoblu 'Townhouse Teal Acrylic Paint
Pebeo Deco Paint (81) Mango
Dylusions 'Squeezed Orange'
Eco Green 'White' Acrylic Paint
Black Gesso

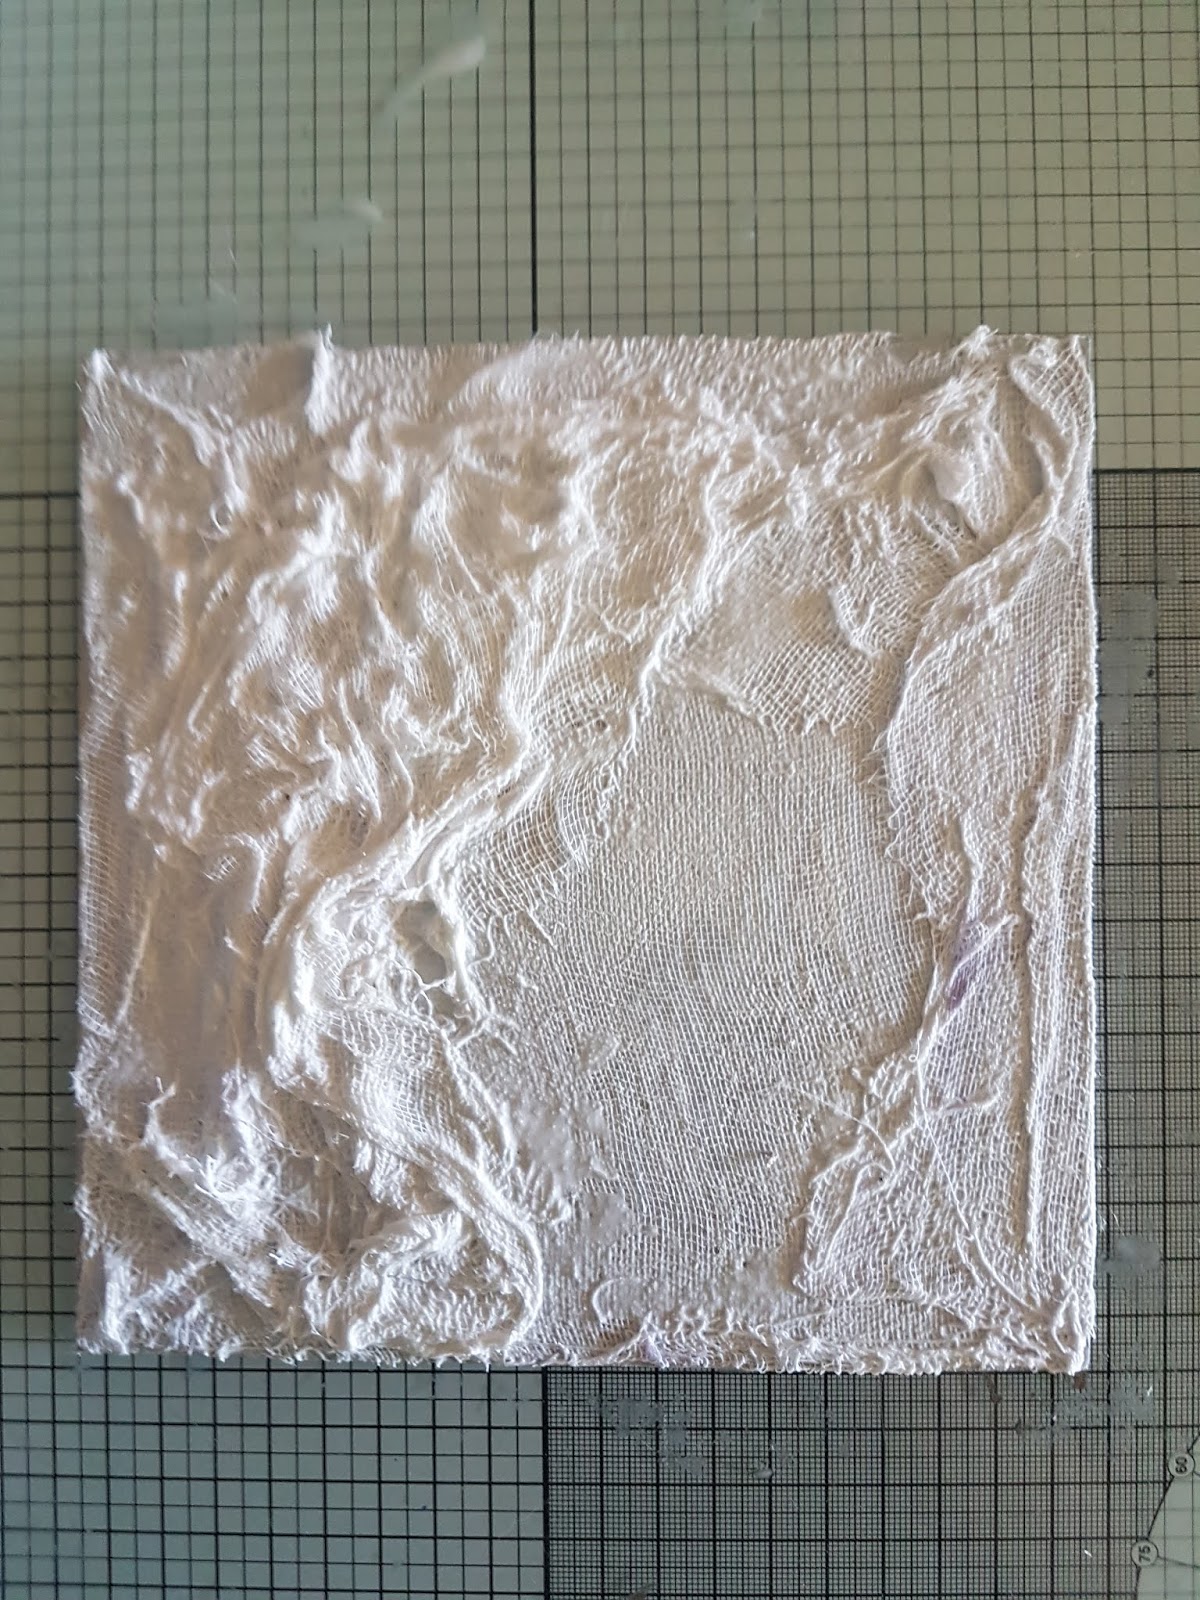
Step 1: Add a couple of inches of the modelling paste to your board.

Step 2: With a palette knife, spread over the surface unevenly.  

Step 3: Cover with a sheet of medical gauze, making sure it makes contact with the paste, especially around the edges.

Step 4: Start building texture around the board, making sure you leave an area for your portrait. Coat each layer with the paste before adding and molding to your project.

Step 5: Repeat step 4.

Step 6: Keep building layers as before to create as much texture and dimension as you like. Leave this to dry thoroughly before continuing.

Step 7: Start adding your background colours. Have lots of fun and dont think about it at all!!!

Step 8: Add a little white Gesso where the face will go, again dont be careful with it, keep away from heavy lines. Add the Gesso roughly. If you add to much you can always add more colour.

Step 9: Lightly trace your 'Bailey' Stencil, use only one set of lines, either the inside, outside or a mixture of both, you dont want to draw around all of them or you will get a thick line. each choice will give you a different look.

Step 10: Use a graphite pencil to deepen the lines of your face, roughly.

Step 11: Start building up more colour to you piece, darker around the edges by adding the smallest amount of black Gesso with your finger. Next use the mango, again with your finger to start building up the features, nose round the chin and cheeks. Use the colours first then to deepen use the smallest amount of black and only if needed, as the colours mix they will give you the depth.

Step 12, 13 & 14: Continue building your layers of colour, until you are happy. Don't worry if you go through stages, when you dont like it, carry on. I went through a lot with this piece. Remember it's not finished till you decide and white Gesso is a very good friends sometimes.


My Etsy shop 'Craftascope' is now open and fully stocked, I have joined in the Cyber Weekend by adding a 20% discount on all orders over 30 pounds (or equivalent) with free postage and packing, until tomorrow, or while the stock lasts. There is a link at the top of each blog page or CLICK HERE.

I do hope you have enjoyed the Tutorial along with the finished project. Maybe try it especially if it's something you have never done before, It's always fun to try something new, It's always fun and there's never a dull moment in crafting, more inspiration to come so do pop back. Take care and Happy Crafting.xxx


Thursday, 22 November 2018

Rusty Journal Cover

Morning Friends and Crafters, A few days ago I shared a rusty project with you. Having experimented on the paper towel and creating a really nice piece I decided to take it a step further and make a cover for my Pink Pig journal. After discovering how well the rust works with stencils, it's opened up a whole new use for them. One tip for using them is to soak them overnight when using them in this way, just to make sure it all comes off.

You will Need:
Clarity Mask 'Chain Link'
Black Texture Paste
Powertex Rusty Powder
Inventors Asylum Rust Spray** or 50/50 Vinegar and Water
Black Friendly Plastic
Boiling Water
Pebeo Silver Gilding Wax 
Scrap Denim (Old Jeans)
Black Gesso
White Gel Pen

**The Rust dye formula, will give you the choice of colour either bright or dark, bright giving the typical rusty look or dark giving a grayer shade. 

Step 1: The texture paste will need to dry so I recommend leaving this overnight, the details is excellent on the stencil and well worth the time. Spread the texture past through the stencil in various places, not to worry if you get smudges. Next add some Gesso here and there to creak a broken fame around the journal. The journal over has it's own texture as well so work keeping some of it clear.

Step 2: Once the cover is dry you can add some highlights with the gilding wax.

Step 3: Dip some friendly plastic in boiling water and stamp your words into it. Once cool highlight these with the silver wax also.


Step 4: Paint a selection of cogs with black Gesso, Then using the acrylics add a rusty look to them.

Step 5: Take your denim and spray with the vinegar mix or rust dye spray. Sprinkle the rust powder through the stencil. Repeat with sections of the chain link fence. Leave overnight, the denim holds the liquid well so you shouldn't need to re wet the fabric. Once dry brush off the excess, then use a needle to add the frayed details around the edges.

Step 6:Use Collall Tacky glue to secure the denim onto your journal.

Step 8: Use Glue Gel to arrange and secure your other elements to complete the project.

Thank you for joining me today, I really hope you have enjoyed the tutorial along with the finished piece. Please come by again to see what else there is to share with you. Take care and Happy Crafting.xx


Saturday, 17 November 2018

12 x 12 Journal Page

Morning Friends and crafters, Im a little late today.Hope you are all okay and looking forward to a wonderful weekend. I am sharing a 12 x 12 journal page today using the 'Trent' A5 Media Stencil along with a super collection of AALL&CREATE stamps to give a dramatic and colourful background.. I wanted the portrait to really pop out of the page and using the different media to create layers. You could easily use this idea on a smaller card design as the stencils are designed to work for all size projects.

You will need:
Greasproof Paper
HB & 6B Graphite Pencils
Pergamano Blender Pen
Selection of Watercolours
Versafine Black Ink Pad
12 x 12 Pink Pig Journal
Grey Brusho
Infusions Rusty Car and Royal Blood

Step 1: Start by positioning your stencil on the page. Trace through the outside lines for this one. Use the 6B to roughly go over the lines, not too heavy on the lips (I will do a detailed video when I am back home).Make a mask from Greaseproof paper, see photos 2 & 3. Stamp your selected stamps to build up the background.

Step 2: Repeat to make a mask or leave the previous one in place to add colour to the background.

Step 3: Use Pebeo Drawing gum to mask any detail you want to protect. Then once dry, use a wash made with Grey Brusho and water for the entire background.

Step 4: Lightly spritz areas of your background and sprinkle some areas with the Rusty Car and some with the Royal Blood.

Step 5: Remove the masking fluid and the paper ask from you project.

Step 6: Use your selection of watercolours and alcohol markers to add colour and depth to your project, this really adds another layer of interest.

Just a little extra here: If you have not shopped with Hochanda before, here is a voucher code giving you 30% off your first purchase (FEY5JBP7) it can be used for any purchase, feel free to share it.

As you know I love writing my blog and helping as much as I can, well I would really love for you to add you support by adding me as a favourite blog. All you need to do in that section is choose other and add my blog address nickinbarnsley.blogspot It would be great to get a mention even if I dont come anywhere.

Here is the link to add your support for all of the categories. 

https://www.britishcraftawards.com/

Thank you so much for joining me today, I hope you have enjoyed the tutorial and the finished piece. I hope you will join me again very soon. Take care and Happy Crafting.xxx

Friday, 16 November 2018

Serene Dolphins

Morning, Some more Dolphins for you today. Having the open spaces in these stamps makes them so versatile for so many looks and styles. They are so easy to colour or fill to suit your project. For this project I have used some Blue Brusho and a selection of Blue Watercolour paint and some Pebeo drawing gum.

You will Need:
Brusho
Selection of Blue Watercolours
Versafine Grey Ink
Memento Midnight Blue
Brush
Drawing Gum
Water 6 x 6 Watercolour Card
Black Card
Blue Centura Pearl Card

Step 1: Stamp your Dolphins onto the watercolour card and mask with the Drawing gum. Leave to dry thoroughly. Use a fan brush to add some splatters of gum to remove later leaving a little white space. Wash your brush Immediately.

Step 2: Spritz your card with water and sprinkle some Brusho for the sea, you really to want some white space here as well to add some drama and movement.

Step 3: Use a brush to add a little blue to the sky. Leave to dry again. Then remove the drawing gum from the Dolphins.

Step 4: Use your selection of blue watercolours to colour the dolphins. Top Tip: I am quite heavy handed with colour so I mask off some of the dolphins with gum, little area here and there, then remove some for another colour. You can always go over it later with a much lighter blue, if required. Next stamp "Serene' using a dark blue ink pad.

Step 5: Mount your finished piece onto black card (Gutted) leaving a narrow border. Then position onto your base card, here I have used Centura Pearl.

Just a little extra here: If you have not shopped with Hochanda before, here is a voucher code giving you 30% off your first purchase (FEY5JBP7) it can be used for any purchase, feel free to share it.

As you know I love writing my blog and helping as much as I can, well I would really love for you to add you support by adding me as a favourite blog. All you need to do in that section is choose other and add my blog address nickinbarnsley.blogspot It would be great to get a mention even if I dont come anywhere.

Here is the link to add your support for all of the categories. 

https://www.britishcraftawards.com/

Thank you ever so much for joining me today, I do hope you have enjoyed the tutorial along with the finished card. I look forward to welcoming you again very soon. Take care and Happy Crafting.xx

Monday, 5 November 2018

Invisible to the Eye

Morning Friends and Crafters, Thanks for popping by to see what I have to share with you. Today I have a card I made for the launch of my own collection. I do hope you got to see my first show last Thursday, If you didn't see it, it will be available on rewind via the Hochanda website. I really hope I wasn't too bad and you enjoyed it if you did see it.

You will need:
Profile Stamp Collection 2
Selection of Leaf Stamps (Here I have used my own designs)
Pebeo Drawing Gum
Grey Brusho
Infusions Royal Blood
Watercolour Card
Black Card
White Card Base

Step 1: Take a piece of watercolour card 5 1/2 x 8'' and stamp the profile towards the top right of the card.

Step 2: You will need some masks of the leaves you are using, so stamp them onto copier paper. Start building the leaves up around the face and tumbling down the page.

Step 3: Mask the whole stamped area with Pebeo Drawing Gum and leave to dry.

Step 4: Next splat a small amount of Drawing Gum around the page, not too much.

Step 5: On your glass mat mix some grey Brusho with a small amount of water and wash over the background.

Step 6: Lightly sprinkle the Royal Blood Infusions, here and there over your card, then spritz. You dont need much water as you dont want the colour to spread or break.

Step 7: Next create your layer for the main image, Stamp the leaves around the top right and bottom left corners, mask with Drawing gum and was the card withe the grey Brusho as before.

Step 8: Once dry, remove the Drawing gum and colour using your chosen medium, here I have used alcohol markers, which I wouldn't normally do on watercolour card.

Step 9: Remove the Drawing gum from your main piece and colour in 

Step 10: To finish, layer both pieces onto black card, leaving a very narrow border, Mount onto a white card base.

As you know I love writing my blog and helping as much as I can, well I would really love for you to add you support by adding me as a favourite blog. All you need to do in that section is choose other and add my blog address nickinbarnsley.blogspot It would be great to get a mention even if I dont come anywhere.

Here is the link to add your support for all of the categories. 

https://www.britishcraftawards.com/


Until Tomorrow, Take care and Happy Crafting.xx