Showing posts with label Bailey. Show all posts

Monday, 3 December 2018

Craftascope A5 Stencil Youtube Tutorial

Morning Friends and Crafters, Today I have for you a video tutorial. I promised I would get one done as soon as possible, so here it is. This is just one of the ways that you can use any of the stencils in my collection. I do hope you enjoy it, If it is popular, I will do some more as time allows. I have also included some additional photos for you.

You will need:
Craftascope 'Trent' A5 Media Stencil or any of the others from the collection
Pergamano Blending Pen
Faber Eraser Pencil
HB Pencil
4B  Graphite Pencil

Here is the piece I did on the video. I thought it would be good to show it as a photo as well.

Another couple more from the collection using the same technique.


Hochanda still have some stock of my collection available, and have been good enough to keep their, introductory price with an additional discount for Freedom Members and the Flexi option, so you can get the full collection for just over 20 pounds.There is very low stock of some of the individual items as well, so if you are thinking about it please dont leave it too long. Due to minimum orders, I doubt I will be able to restock these. I do also have a small selection of my collection available on my 'Craftascope' ETSY Store with free postage and Packing to much of the world, the link is at the top of the main blog page.

Just a little extra here: If you have not shopped with Hochanda before, here is a voucher code giving you 30% off your first purchase (FEY5JBP7) it can be used for any purchase, feel free to share it.

Here are another 2 photos, I have altered the hair here, once you feel comfortable with the easy way of completing your face, you can really experiment with different looks. I would love you to share any of your crafty makes in my Facebook Group 'Craftascope' especially if you have made anything with my collection, It's been great to see them all so far.

I hope you have enjoyed the video and more importantly I hope you have found it useful As I said previously, if it proves popular I will make more with the collection as and when time allows. 

In case I don't get the opportunity again, I would like to wish you all a Very Merry Christmas. Take care and Happy Crafting.xx


Saturday, 1 December 2018

The 3 Boys Together

Morning Friends and Crafters. Today I thought I would share a very special page with you all. It's the very first project I made when I my final prototypes arrived, even before the stamps had been delivered. For this page I decided to use the beautiful Typography range from Leonie. I love this font and it was just the right size for this project. Iv'e used all of the front facing stencils so it's 'Three Boys Together.

You will Need:
HB Pencil
6B Pencil
Pergamano Blending Tool
Smoothies
Greasproof Paper or Similar for a Mask
Distress Inks Mermaid Lagoon and Seedless Preserves
IndigoBlu Banana Custard
A3 Watercolour Card or Good Quality A3 White card.
Stencils
Bubble Wrap
Stick n Spray

Step 1: Work out where you want your faces to be positioned. I did the front to first and then added 'Bailey' Behind. For this one I have used all of the outside lines of the stencils. Remove the stencils and roughly go over the lines with the 6B pencil, before adding your shading with the Pergamano Blending tool. I hope to share a video with you very shortly, but for now pleased refer to my show demo. This is still on Hochanda via rewind as it was repeated on Tuesday 20th November (CLICK HERE FOR THE SHOW).

Step 2: Cut out the required letter for your sentiment or heading, here I have used Leonie's wonderful Typography collection. I positioned them to make sure they would fit, these were all cut from black card.

Step 3: Use Greasproof paper or similar to make a mask to protect your drawings while adding your background. First I took Mermaid Lagoon Distress Ink and applied to the project by pouncing the colour with a heavy and lighter pressure to get the different sizes of circle. I also used the first and second generation colour to give shade.

Step 4: Next I repeated the process with Seedless Preserves. To add more texture, I added Banana Custard Acrylic paint through a stencil. I would have continued and used the Bubble wrap as well but I didn't want to detract to much from the boys.  I cut out the letters again in yellow to bring out the stenciling, securing them to the black letters for more depth. Finally securing them to the project with Tacky glue.

It's been such a wonderful journey for me from the first marks on my paper to originally design my collection to this first project, then to the show. But the most rewarding thing for me has been the projects I have seen created with my collection and the wonderful comments that I have received since. This is just something that money cant buy and I am really touched, so thank you to you all for making it such an amazing experience. 

My collection is still available via my Craftascope Etsy Shop or from Hochanda, while stock is still available. If you dont have it already I do hope you will have a go.

Many thanks for joining me today, I do hope you have enjoyed this tutorial and the finished project. For now Take care and Happy Crafting.xxx


Tuesday, 27 November 2018

Media Canvas

Morning Friends and Crafters, I will be sharing a few more posts with you this week and then I will be having a break for a little while. So today I m sharing a media canvas that I made using one of my A5 Media Stencils,here I have used 'Bailey'. I hope you enjoy the tutorial.

You will need:
Selection of Daler Rowney System 3 Acrylics
Amsterdam Acrylics (They go a long way)
Canvas Board 8 x 8
White Gesso
Black Fine Liner 1.0
HB Pencil
Selection of Acrylic Brushes
Palette Knife

Step 1: Mix some of the Blue Acrylic with some white Gesso to thin it, use this to prime your canvas board. Use the fine liner and stencil to add the face to your canvas. This is just a guide at the moment. (dont forget you only need one edge to make the face no the full shape) choosing either the inside, outside or mixture of the lines with give you a different look. Stat building up your colours and textures, This project is all about layering, which will show through to give you the depth.

Step 2: Next start adding you lighter blues, whites and more of the warmer tones for the face. Maybe add some splatters as well, I find these are easiest with a fan brush, always wash it out straight away. Leave this to dry before replacing the stencil and roughly adding the details with an HB pencil. Again this is mainly a guide for you.

Step 3:  Continue adding more depth and texture to the background, start adding shadowing and shaping the face, you might prefer to use a finger or brush for this. Use a small brush to add some definition to the features. The lips are best not so defined as it can make them look unnatural but we can subdue them later.

Step 4: Now add more dimension to the face, bringing in even more of the warmer tones to add the illusion of the facial curves. Use deeper tones of the cooler colours to add shadows under the jawline and chin.

Step 5: Now it's just a case of fine tuning until you re happy with the result, Start dulling won the lips to blend them in more. Oncce again, dont forget it's not finished until you are happy with it. You can always add more to it, it's your artwork and creation, this is not a portrait, but your expression of one.

I hope you have enjoyed the tutorial I have shared with you today, along with the finished project. I do hope you will have  ago yourself, especially if it's something you've not tried before, it's all about having fun, dont forget.

Please take a look at my Etsy shop, the link is at the top of my blog. If you do want anything I will only be sending out until the end of  the week unless I can arrange something, if not the shop will close until my return. For now Take care and Happy Crafting.xxx


Sunday, 25 November 2018

Mixed Media Acrylic Portrait

Morning Friends and Crafter, Im back today with another mixed media project for you, There are lots of extra photos to go with this tutorial, making it very easy to follow. It's one of those pieces that really does look better in real life the camera just hasn't picked up the colour as much as I would have liked. With Cyber Weekend in full swing it's really a good time to get all of your essentials and while your at it why not treat yourself to something new.

You will need:
Craftascope A5 Media Stencil 'Bailey' (Only available at my Etsy Shop or via Hochanda)
8 x 8 Board, Here I have used Zutter but any board will be perfect.
Pebeo Studio Acrylics Modeling Paste
Indigoblu 'Townhouse Teal Acrylic Paint
Pebeo Deco Paint (81) Mango
Dylusions 'Squeezed Orange'
Eco Green 'White' Acrylic Paint
Black Gesso

Step 1: Add a couple of inches of the modelling paste to your board.

Step 2: With a palette knife, spread over the surface unevenly.  

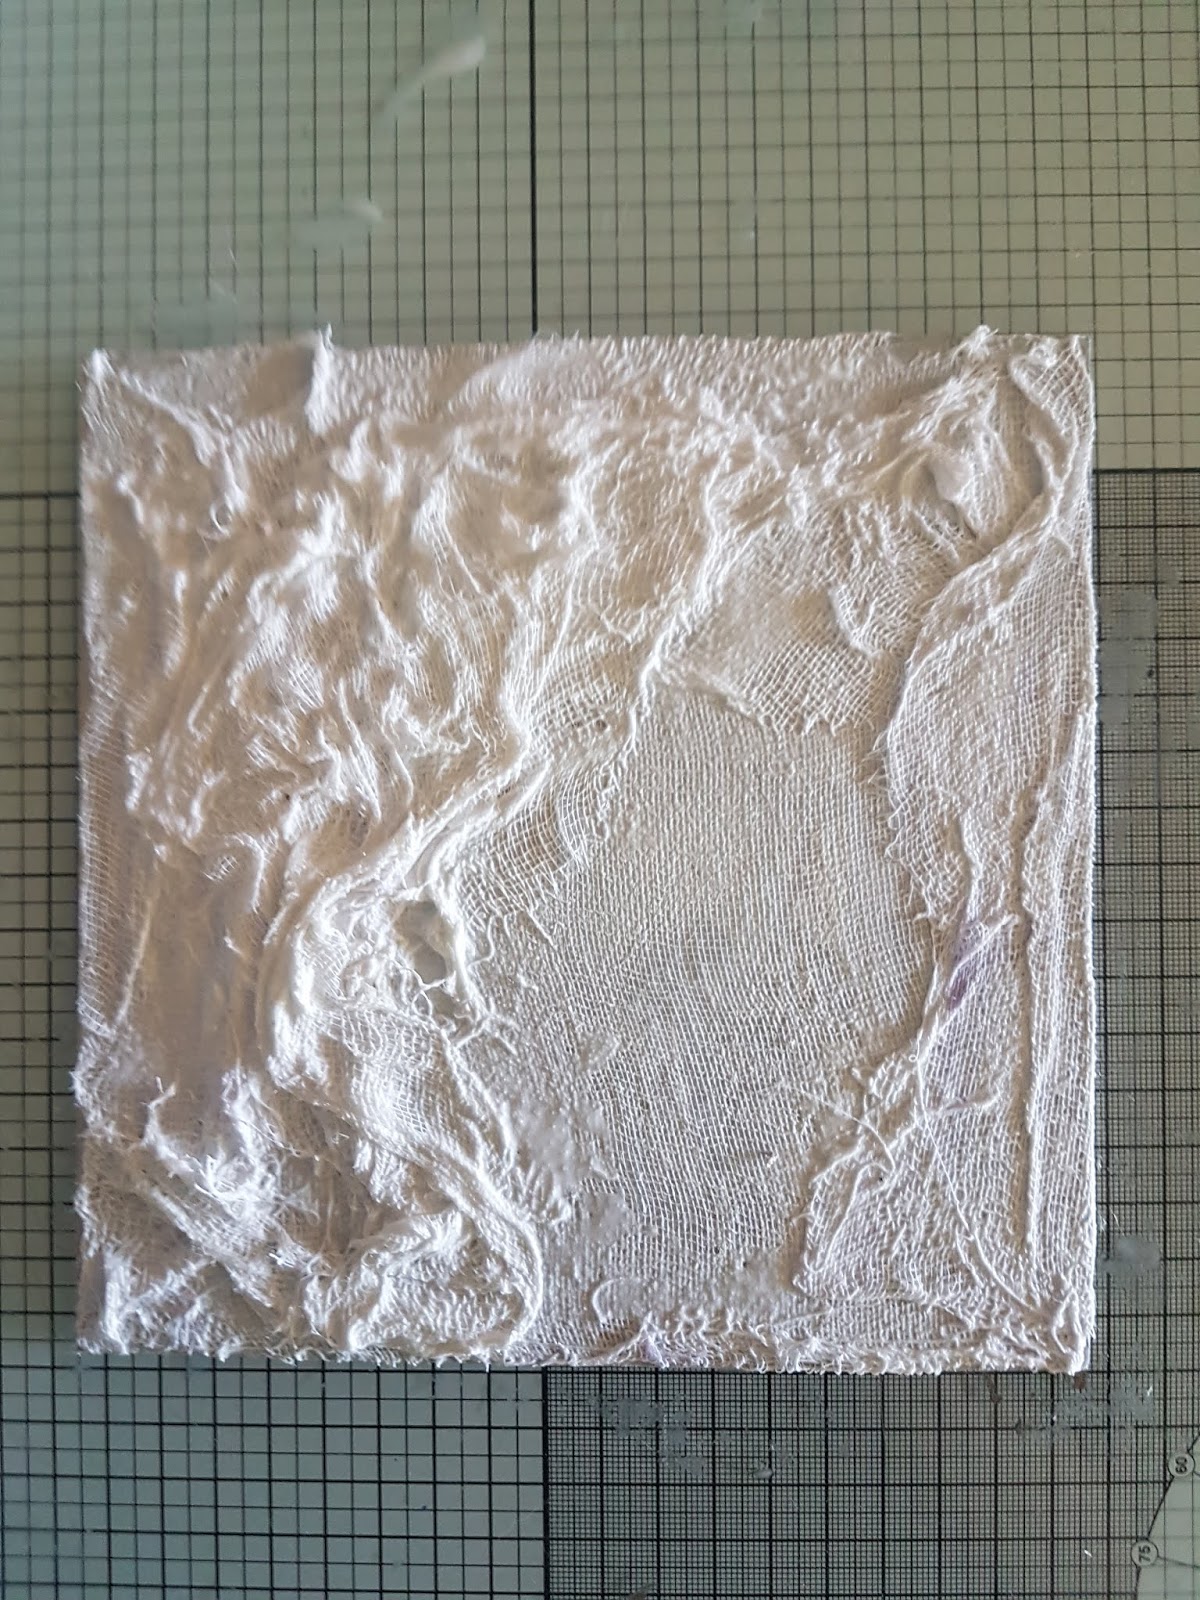
Step 3: Cover with a sheet of medical gauze, making sure it makes contact with the paste, especially around the edges.

Step 4: Start building texture around the board, making sure you leave an area for your portrait. Coat each layer with the paste before adding and molding to your project.

Step 5: Repeat step 4.

Step 6: Keep building layers as before to create as much texture and dimension as you like. Leave this to dry thoroughly before continuing.

Step 7: Start adding your background colours. Have lots of fun and dont think about it at all!!!

Step 8: Add a little white Gesso where the face will go, again dont be careful with it, keep away from heavy lines. Add the Gesso roughly. If you add to much you can always add more colour.

Step 9: Lightly trace your 'Bailey' Stencil, use only one set of lines, either the inside, outside or a mixture of both, you dont want to draw around all of them or you will get a thick line. each choice will give you a different look.

Step 10: Use a graphite pencil to deepen the lines of your face, roughly.

Step 11: Start building up more colour to you piece, darker around the edges by adding the smallest amount of black Gesso with your finger. Next use the mango, again with your finger to start building up the features, nose round the chin and cheeks. Use the colours first then to deepen use the smallest amount of black and only if needed, as the colours mix they will give you the depth.

Step 12, 13 & 14: Continue building your layers of colour, until you are happy. Don't worry if you go through stages, when you dont like it, carry on. I went through a lot with this piece. Remember it's not finished till you decide and white Gesso is a very good friends sometimes.


My Etsy shop 'Craftascope' is now open and fully stocked, I have joined in the Cyber Weekend by adding a 20% discount on all orders over 30 pounds (or equivalent) with free postage and packing, until tomorrow, or while the stock lasts. There is a link at the top of each blog page or CLICK HERE.

I do hope you have enjoyed the Tutorial along with the finished project. Maybe try it especially if it's something you have never done before, It's always fun to try something new, It's always fun and there's never a dull moment in crafting, more inspiration to come so do pop back. Take care and Happy Crafting.xxx


Monday, 19 November 2018

Faces

Morning Friends and Crafters, late again. So sorry got that much on at the moment and sadly the back up blogs I did before I came to the UK are all published now, so it's one at a time for a while, so do bear with me. Today I am sharing a Journal/Scrapbook page, again this could easily be resized for a smaller card or even scaled down to make a really nice ATC. Like I always say, it's all about having fun.

You will Need:
Rice Paper, Printed and Stamped (Totally your Choice or a mix)
Selection of Stamps- Here I have used Paper artsy, Indigo Blu, Sheena (again your selection)
Selection of stencils (Your Choice)
Funky Foam
Indigo Blue Townhouse Teal, Pantry White,
Eco Paints Cranberry & White mixed Your Glass Mat
Black Gesso
Old Stiff Brush
Creative Expressions Glue n Seal or Similar

Step 1: On your journal page use the face stencils to add some part faces, Trace through with a HB pencil, go over this with a 6B,blend and shade with the Pergamano blender from Clarity. (Video coming soon)

Step 2: Next use section of your chosen rice paper to add more interest, depth and layers. I have used some printed and some stamped for this project. Use Glue N Seal or similar to add them.

Step 3: Stamp your profile stamp in the top left hand corner to overlook the page and bring your eye in to the centre. Start to build up more layers with your chosen stamps.

Step 4: Next start adding some of your acrylics to really bring everything together. You can always re stamp if you cover up something you want to be seen, it all adds more dimension to the finished project.

Step 5: Continue building up the layers, using the acrylics, stamps and stencils. I always find 3 colours are best to bring things together. To make the '3' I drew it onto Funky Foam and cut out with scissors. I then mixed some Cranberry and white together on a mat, spread out with a Brayer, Stamp the 3 then use the same colour to add some more stenciled design. Once again, if you cover something you want to be prominent, you can re stamp. Finally using the old brush and black Gesso, I swiped back and forth around the edges to give a frame to the project, This brings everything together and highlights the black stamped designs.

Another thing, here is a 30% off voucher to use on your first order (anything) from Hochanda, use code FEY5JBP7.

As you know I love writing my blog and helping as much as I can, well I would really love for you to add you support by adding me as a favourite blog. All you need to do in that section is choose other and add my blog address nickinbarnsley.blogspot It would be great to get a mention even if I dont come anywhere.

Here is the link to add your support for all of the categories. 

Thank you so much for joining me again today, I hope you have enjoyed the tutorial and the finished project. I hope you will pop by again very soon to see what else I have to share. For now Take care and Happy Crafting.xx

Saturday, 10 November 2018

Dark and Scary

Morning Friends & Crafters. I switched on this morning to find that there was no blog scheduled, I dont know how that slipped through my fingers. So here is a project I have written up today. It's a journal page, a little dark but by altering the colours and the background stamps you choose it could have a totally different feel to it. How about doing a double page with both styles as a real contrast. to show different feelings. This could also make a great card, scaled down and as always a great ATC. I have said before I love to capture cards and projects I do as ATC's to keep, especially when they're for the Design Teams.

You Will Need: 
Craftascope 'Bailey' A5 Media Stencil
Craftascope 'Dolphin' Stamp Set 1
Craftascope 'Profile' Stamp Set 2
Selection of Brusho
HB Pencil
Tim Holtz Distress Crayons
12 x 12 Journal Book (Pink Pig), card or chosen media
White Gel Pen
Pebeo Drawing Gum
Black Card
White Card
3D Glue Gel
Tacky Glue

Step 1: Select the position for your stencil, Use the outside lines to trace through. Mask the face with Pebeo Drawing gum.

Step 2: Spritz your project and sprinkle with your Brusho. When dry, remove the drawing gum.

Step 3: Roughly outline the face using a black Distress Crayon. Start building up you layers of your face with the crayons.

Step 4: Use a very small amount of the black around the face and smudge away with your finger, this will really highlight the face, while giving depth to the finished piece.

Step 5: Stamp your words onto white card, then mount onto black. Next use some lighter Distress Crayons to add colour to these words.

Step 6: Use a selection of your chosen stamps to create the background and the feeling of your project.I have gone quite dark with this on using stamps by AALL&Create. But the stamps you choose to use will totally change the feeling of your project. It could just as easily be bright and cheerful, depending on how you feel on what you want to create.

Before I go there is one more thing, here is a 30% off voucher to use on your FIRST order (anything) from Hochanda, use code FEY5JBP7. 

As you know I love writing my blog and helping as much as I can, well I would really love for you to add you support by adding me as a favourite blog. All you need to do in that section is choose other and add my blog address nickinbarnsley.blogspot It would be great to get a mention even if I dont come anywhere.

Here is the link to add your support for all of the categories. 

https://www.britishcraftawards.com/

Thank you for joining me today, I hope you have enjoyed the tutorial along with the finished piece. Please pop by again to see what else I have to share with you.xx

Thursday, 8 November 2018

Face Pop Art

Hi everyone, I have a pop art journal page for you today. A little bit different for me, but it's been one of the great things to come from my collection, it has taken me in many different directions. It's been great journey and a pleasure to try so many new areas, I hope it will do the same for any of you who bought it as I have designed it to go will just about anything you can think of. I do like to think that some of you will do the same and try something very different to your normal style. You might follow a totally different path. I have had so many ideas of other things I would like to do with this collection, it's just such a shame we cant stretch time. This project has been great fun, you could use any one of these sections as a card for someone or just make a card in this style.

You Will Need:
Craftascope Art Media Stencil Collection Trent,Xander,Bailey and Brendan
Craftascope Dolphin Stamp Set 1
Spotty Washi Tape
Watercolour Paints
Pencil
Versafine Black Ink Pad
Copier Paper

Step 1: On your 12 x 12 Sheet or Journal Page, use Washi Tape to divide the page, Place each stencil in turn and draw around it with a pencil. For the top section I just flipped the stencil.

Step 2: Using watercolours, paint all of the faces. Then choose some really bright colours to use for the backgrounds. Next choose and stamp the words into each of the sections. You can really play with the faces and make them individual, Have lots of fun!!

Step 3: Use the stencils again with Versafine Black ink and a smoothie or phat foam to add back the lines and finish the pop art look.

I hope this has given you some ideas, it doesn't have to be the same project but elements or even the style, just another way to use the collection, which I hope you like.

As you know I love writing my blog and helping as much as I can, well I would really love for you to add you support by adding me as a favourite blog. All you need to do in that section is choose other and add my blog address nickinbarnsley.blogspot It would be great to get a mention even if I dont come anywhere.

Here is the link to add your support for all of the categories. 

https://www.britishcraftawards.com/


Until Tomorrow, Take care and Happy Crafting.xx