Showing posts with label 3D Glue Gel.. Show all posts

Friday, 23 November 2018

Stitched Mixed Media Face

Hi Friends and Crafters. I am sharing a stitched mixed media project with you today. Something a little different to try out with my collection. This uses a simple chain stitch for the outline and a couple of French Knots for the eyes. The background has been made with Calico with the print for the background pulled from the Gel Press from Clarity. It's great fun to use and a great way of making some really interesting backgrounds for any of your crafty makes.

You will Need:
Versafine Black Ink Pad
Daler Rowney System 3 Cadmium Yellow, Cadmium Red and Ultra Marine.
Brayer
Burgundy/Red Embroidery Thread
Black Card
White Stamping Card
Calico

Step 1: Start with the background on your calico. Add and spread each colour in turn using your Brayer. Use Red, then Blue and finally the yellow. Firmly and evenly smooth the calico over the surface and lift the print. Leave to dry thoroughly.

Step 2: Using the remainder of the ink on your plate, repeat with your card. Lift the print and leave too dry.

Step 3: Position the stencil onto the calico and using either a fine liner or graphite pencil, trace around the outside lines of the whole design. Add the Calico to your hoop and stitch your design use 3 threads and use the chain stitch. This fives a really nice raised result, with dimension and texture while allowing smooth turns around the curves. Use a darker thread for the eyes and a couple of french knots to add life to the eyes. Ray the edges of your cloth to give more interest and texture.

Step 4: Choose a selection of words that appeal to you from across both stamp sets. Use Versafine black ink to stamp onto your gel printed card. Use Tacky glue to mount them onto black card, leaving a narrow border.


Step 5: Mount your fabric onto black card using Collall Tacky Glue. Then use 3D Glue gel to position and secure your words around the face.

Another thing, here is a 30% off voucher to use on your first order (anything) from Hochanda, use code FEY5JBP7.

As you know I love writing my blog and helping as much as I can, well I would really love for you to add you support by adding me as a favourite blog. All you need to do in that section is choose other and add my blog address nickinbarnsley.blogspot It would be great to get a mention even if I dont come anywhere.

Here is the link to add your support for all of the categories. 


Many thanks for joining me today. I hope you have enjoyed the tutorial along with the finished project. It would be great for you try it out especially if it's something you have not done before. This makes a great wall hanging, a page for a journal or scrapbook page and a smaller version would make a lovely stitched card. Why not try it as a partial face with a boarder around it, whatever you do have fun and enjoy what you do. For now Take care and Happy Crafting.xxx


Saturday, 10 November 2018

Dark and Scary

Morning Friends & Crafters. I switched on this morning to find that there was no blog scheduled, I dont know how that slipped through my fingers. So here is a project I have written up today. It's a journal page, a little dark but by altering the colours and the background stamps you choose it could have a totally different feel to it. How about doing a double page with both styles as a real contrast. to show different feelings. This could also make a great card, scaled down and as always a great ATC. I have said before I love to capture cards and projects I do as ATC's to keep, especially when they're for the Design Teams.

You Will Need: 
Craftascope 'Bailey' A5 Media Stencil
Craftascope 'Dolphin' Stamp Set 1
Craftascope 'Profile' Stamp Set 2
Selection of Brusho
HB Pencil
Tim Holtz Distress Crayons
12 x 12 Journal Book (Pink Pig), card or chosen media
White Gel Pen
Pebeo Drawing Gum
Black Card
White Card
3D Glue Gel
Tacky Glue

Step 1: Select the position for your stencil, Use the outside lines to trace through. Mask the face with Pebeo Drawing gum.

Step 2: Spritz your project and sprinkle with your Brusho. When dry, remove the drawing gum.

Step 3: Roughly outline the face using a black Distress Crayon. Start building up you layers of your face with the crayons.

Step 4: Use a very small amount of the black around the face and smudge away with your finger, this will really highlight the face, while giving depth to the finished piece.

Step 5: Stamp your words onto white card, then mount onto black. Next use some lighter Distress Crayons to add colour to these words.

Step 6: Use a selection of your chosen stamps to create the background and the feeling of your project.I have gone quite dark with this on using stamps by AALL&Create. But the stamps you choose to use will totally change the feeling of your project. It could just as easily be bright and cheerful, depending on how you feel on what you want to create.

Before I go there is one more thing, here is a 30% off voucher to use on your FIRST order (anything) from Hochanda, use code FEY5JBP7. 

As you know I love writing my blog and helping as much as I can, well I would really love for you to add you support by adding me as a favourite blog. All you need to do in that section is choose other and add my blog address nickinbarnsley.blogspot It would be great to get a mention even if I dont come anywhere.

Here is the link to add your support for all of the categories. 

https://www.britishcraftawards.com/

Thank you for joining me today, I hope you have enjoyed the tutorial along with the finished piece. Please pop by again to see what else I have to share with you.xx

Thursday, 12 April 2018

Moonlit Couple

Morning, I have another project for you this morning using the 'Rustic Wedding' Signature Collection from Sara. Just by changing the colours used, the look and feel changes completely. I thought it might be a good idea to share to show you how versatile it can be, even when used within the wedding theme. We all adore the Rustic look, but it's always good to make as much use as possible from your stash. A quiet moment for the Happy couple in the moonlight, after all the excitement of the day, The Perfect Ending.

You will need:
Rustic Wedding 'Just Married Die'
Rustic Wedding 'Always and Forever' Stamp Set
Matt Black Card 6 x 6''
Sheena Stamping Card 6 x 6''
Centura Pearl Hint of Silver Card Base 6.5 X 6.5''
Distress Inks: Faded Jeans, Blueprint Sketch and Chipped Sapphire
Silver Embossing Powder
Versamark Ink Pad
Anti Static Bag
Heat Gun
Pebeo Silver Gilding Wax
Self Adhesive Sheet (single sided)
Clear Glitter


Step 1: Create your landscape on the Sheena Card, Use ripped copier paper for the hills and mountains. Use the Distress inks, the deeper shades towards the edges and lighter towards where the hills meet to give the moonlit illusion. Use Stick n Spray to secure a circle to your piece, position it where you would like your oversized moon.

Step 2: Add your sky, again the darker shades blending towards the centre, getting lighter towards the moon and land. Deepen the edges with the deepest colour. Then stamp a few tress for depth of your scene.

Step 3: Centre your die within the black card, cut and emboss the first. The cut a further 2 the same, layer them up using Tacky Glue, keeping the embossed piece at the top.

Step 4: Use a section of self adhesive sheet behind the bride, trim around the edges with scissors. Cover with clear glitter to add sparkle to her dress. Secure to your background piece with either foam tape or 3D glue gel.

Step 5: Using Versamark, stamp the 'Just Married' sentiment within the banner and emboss with silver embossing powder. (Don't forget to use your anti-static bag first). Trim around the banner, shape and add to your design.

Step 6: Sparingly add the silver gilding wax, to the trees and leaves to add the hint of moonlight. The to finish the card add to your card base, made with Centura Pearl, Hint of Silver.

Thank you for joining me today, I really hope you have enjoyed the tutorial along with the finished card today. I do hope you will join me again as there is always something to share. For now take care and Happy Crafting.xxx

Thursday, 22 March 2018

Elephant March

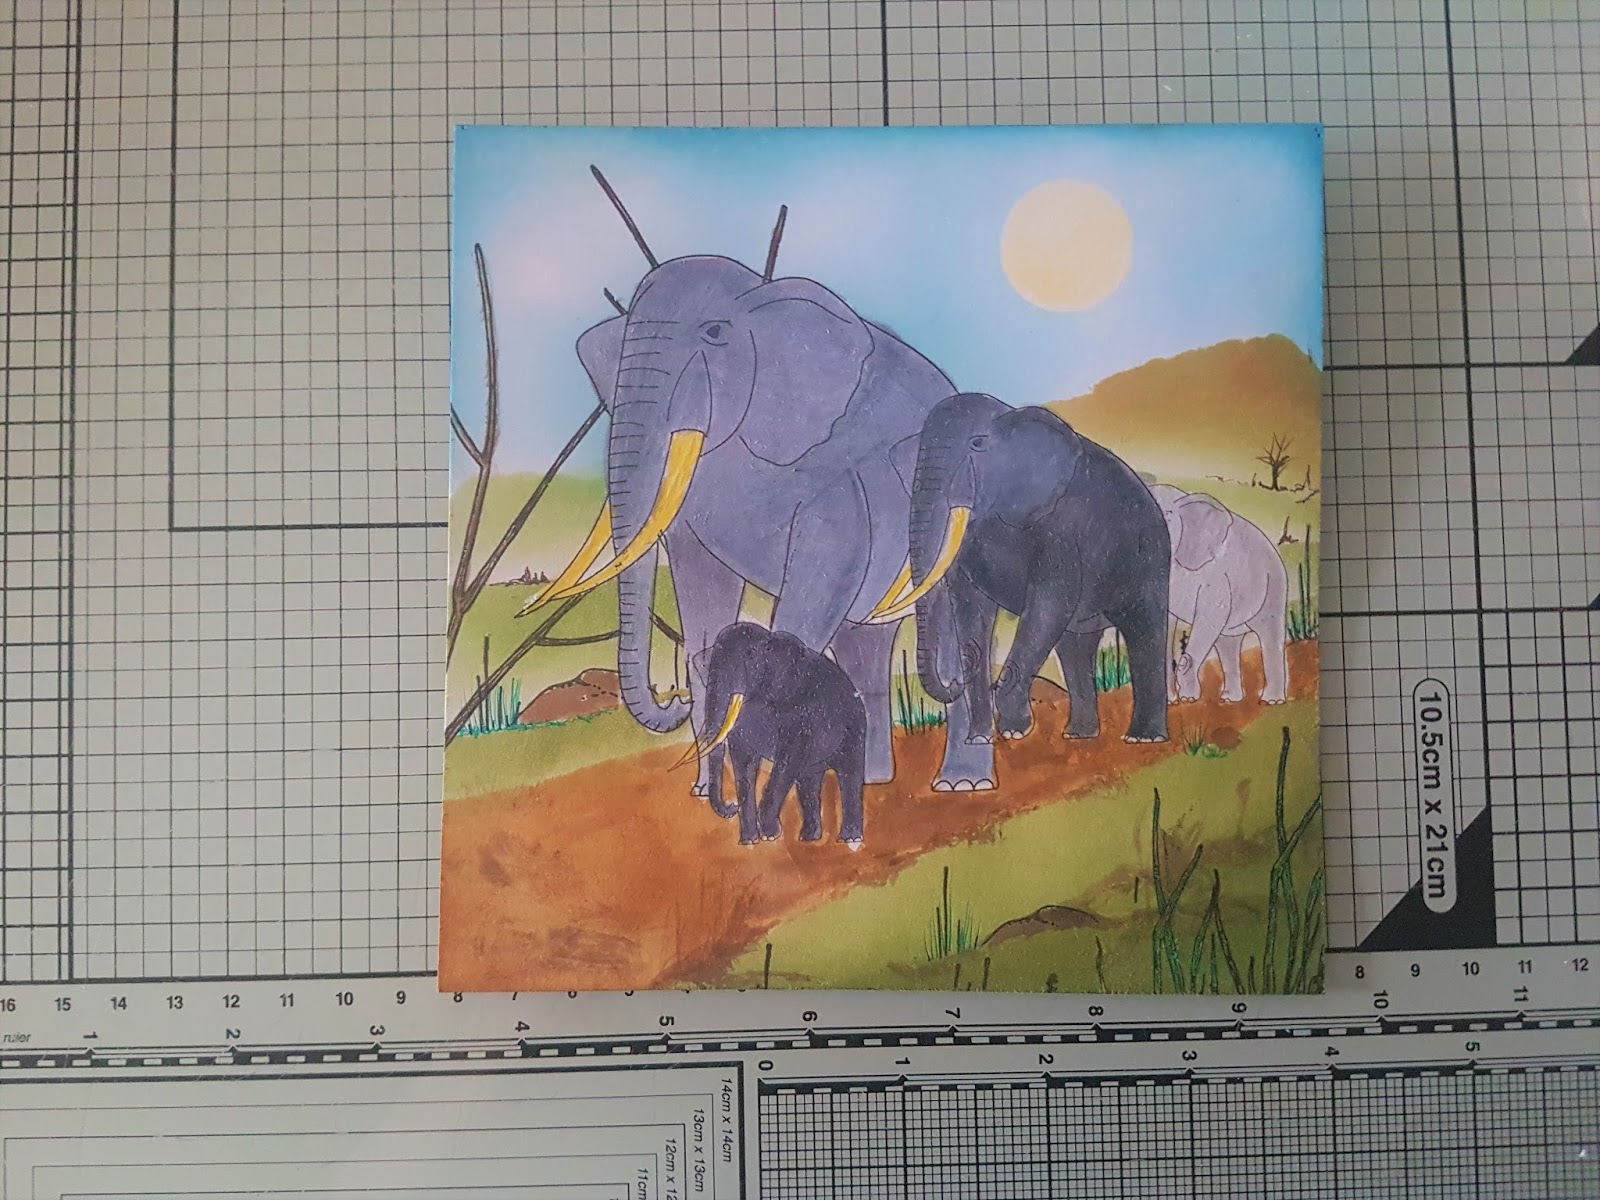
Hi there, Im a little late today, well very late actually. 1001 Things to sort and never enough hours in the day. I was up very early this morning but I have still managed to fall behind with the things I wanted to do. Today, I am sharing a card I made using the 'Jungle Dreams' Collection from Michelle at MJM Studios.

You will need:

Jungle Dreams Collection
Sheena Stamping Card
Distress Inks Peeled Paint, Forest Moss, Faded Jeans, Gathered Twigs and Spiced Marmalade.
Alcohol Markers
Pebeo Drawing Gum
Clarity Moon Masks
Collall Tacky Glue
Collall 3D Glue Gel

Step 1: Take the elephant and size it to the largest , then build up the heard using the same animal adjusting the size each time. Cover them with Pebeo Drawing Gum.

Step 2: Use some ripped copier paper to create a path for them. Here I have used a mix of Gathered Twigs and Spiced Marmalade to make an orangey brown. Use it deeper in some places to give a bumpy textured look to the path.

Step 3: Build up your landscape next using a mix of the green Distress Inks.

Step 4: Add the moon mask and add blue, again unevenly to give the illusion of clouds and mist from the heat of the day.

Step 5: Remove the moon mask and add a little yellow, not too much. The use some stamps to add branches, grasses and rock. Remove the Drawing gum.

Step 6: Colour the elephants with alcohol markers, dont give to smooth a blend as you do want some texture to their skin and shadows, It makes their skin look a little more rough.

Step 7: Layer the piece onto white card. Then mount onto a larger piece of black before layering it onto a white Centura Pearl Base card. print one of the sentiments, here I have cut it individually and mounted each piece onto white Centura Pearl.

Thank you for popping by today, I hope you like the finished card along with the tutorial I have shared. I hope you will join me again soon. It has started to snow again heavily here, I am hopeful that it wont be as bad as they forecast and I will be able to post tomorrow. Take care and Happy Crafting.xx


Monday, 19 February 2018

Cascading Cups

Here's a card I made for the launch of Sara's 'Vintage Tea Party' collection. The launch was a huge success, by now many of you will have received your collections. I am sure you are having lots of fun creating your own designs.

For this card you will need:
Light blue Centura pearl
Pale blue Distress ink
Paper roses and flowers
Foliage

Step 1: Score an A4 sheet of Centura Pearl at 8'' and fold. Trim the top so it also measures 8''. Now cut another strip 2 x 8'' and position at the edge of your card leaving the gap in between.

Step 2: Cut a selection of cups, selectively run them through the embossing folder, then highlight the embossed detail with ink.


Step 3: Using Tacky glue, bridge the gap between the pieces of card to create the bridge and hold the card together. Create a pleasing look and be careful not to glue the cups to the base card.

Step 4: Cut the teapot from the 'Afternoon Tea' set, once in white using the decorative insert. Then again in blue without the insert. Trim the handle and spout from both to create a vase. Shape and add to the card with 3D glue gel.Then arrange your flowers and secure with 3D glue gel.

Step 5: On the inside of your card, add a light blue background using Centura Pearl. Finally cut and secure your sentiment using the same blue card.

Thank you for taking the time to visit my blog today, Hopefully you have enjoyed the tutorial I have shared with you along with the additional photos. I do hope you will visit again very soon. For those of you you who didn't get to see Part 3 of my Floral Embellishment Series, Please take a look, I would really appreciate your comments and support.

Thursday, 15 February 2018

You're just my cup of Tea!!

Wow, Well the launch of  'The Vintage Tea Party' One Day Special certainly went down a storm. I am so pleased for those of you who have this collection ordered and on it's way, I know you will love it. Today I am sharing a sample I made for the show, using one of the embossing folders and some other elements from the collection.

For this card you will need:
Basic Oval Die
Deep Blue Core'dinations
Weathered Wood Distress ink
Blueprint Sketch Distress Ink
Navy ribbon
Paper flowers
Adhesives

Step 1: Take a 5 x 7 piece of the Core'Dinations, run it through your embossing folder. Colour the raised design with the deeper blue ink. Layer this onto black card leaving a generous border.

Step 2: Cut the cup and saucer die along with the oval from Sheena stamping card. Select the parts of the embossing folder and the position on the elements to look best. Then colour with the same ink. Blend around the edges with Weathered Wood to add more dimension.

Step 3: From the Core'Dinations card cut out the sentiment, It only needs one. However I also cut 2 further sentiments from black card and layered them up for more depth. Secure this in place to you Oval using Tacky glue.

Step 4: Position your cup and saucer on the card using 3D glue gel for a little dimension.Use the waste from the kettle die to add steam to the tea cup for a little extra touch.

Step 5: Using foam tape, secure the card to your base card, here I have used Centura Pearl as it gives a wonderful card base. Finally add a Navy Bow and a paper rose to match.

Thank you for taking the time to visit today. I hope you have enjoyed the tutorial and the finished card I have shared. I would love your feedback on what I am sharing with you, so I know that I am keeping the blog interesting, If there is any changes that would be good and that I am not here on my own.lol For now Take care and Happy Crafting.xx

Wednesday, 3 August 2016

Birthday Triangles

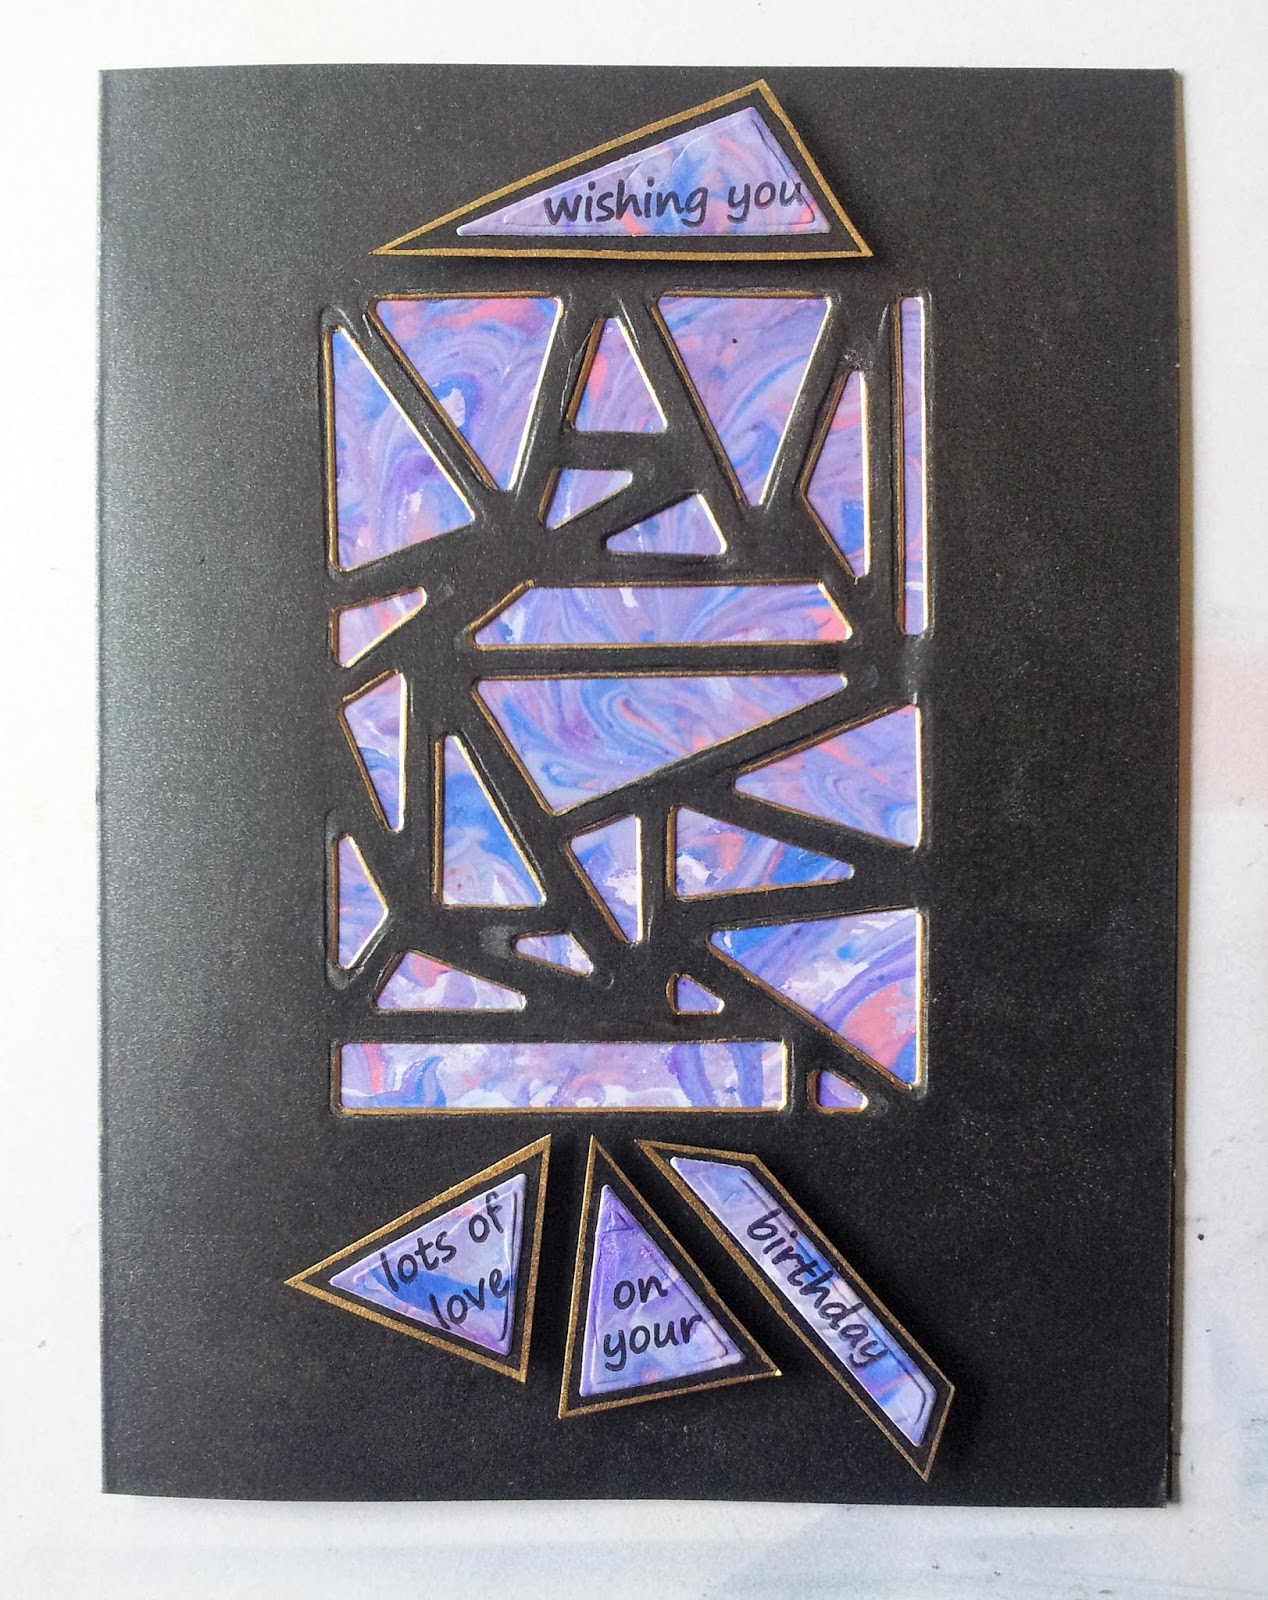
Morning and welcome to another step by step using the wonderful dies that Leonie launched on Hochanda. Don't forget, if you missed any of the shows or want some more inspiration the shows are available on the Hochanda website via the Television Schedule. Today's card is fairly simple but also quite different, here i have made it as a birthday card but it could be made for any occasion, it would be a great card for a man as well.

I started by taking an A4 sheet of black pearlescent double sided card. I marked where my score line was going to be to enable me to position and cut the dies. Here I used the 'Mosaic' Die in full but without the outside cutting edge to leave it in the card.

I then took a sheet of white glossy cardstock and created a marbled background. The colours I used were: Midnight Blue, Purple Violet Cosmic Shimmer Mists along with Cherry and Midnight inks.

I then took the outer die from the 'Mosaic' set and cut the background where it would be best for this project.

Next I used a Gold Krylon pen to edge the die cuts and make them more pronounced.

I chose the words I wanted to use and stamped them in black onto the remainder of my marbled background, choosing lighter areas to allow the words to be seen clearly. I cut them out using the dies and layered them onto black card using Cosmic Shimmer glue. I went around the edges with the gold Krylon pen to make them stand out from the background card.

I secured the words shapes to the card using 3D glue gel and secured the backing paper behind the apertures.

Thank you so much for your visit today, I hope you have enjoyed this step by step and the card I have shared. I am so pleased to have your comments and really enjoy reading them.Thank you and take care xxx

Monday, 18 July 2016

Let It Snow

Morning. Well here is the Christmas card I was going to show yesterday. Another one to add to my Christmas Box. As Sue Wilson was on Hochanda, I thought I would love to make a card using her dies. Obviously this is out of sync now.

I started by cutting out my embellishments from the Christmas Finishing Touches. I coloured the foliage with Pine Needles and Mowed Lawn. For the branches I used Gathered Twigs and Walnut Stain and for the holly, I used Fired Brick (all Distress Inks).

Next I cut some white Super Smooth card to 7 1/2 x 5 1/4, centred the background die from Sues Australian collection and cut.


Then I cut the frame from the 'Let it Snow' die set, again with the same card.

On a piece of super smooth card I added some Wonder Tape (50 mm) from Be Creative before cutting out the 'Let It Snow' Sentiment. I then removed the wonder tape and covered the die cut with Festive Red Diamond Sparkles.

Taking another sheet of super smooth, I cut it to measure 8 1/4 x 6 1/4. Using versamark, I stamped a selection of snowflakes and embossed with ultra fine clear embossing powder.

I cut the same oval in copier paper and using Memento 'Summer Sky, I started to blend from dark to light.

I then repeated with Shaded Lilac Distress ink.

Then with Blueprint Sketch and finally Chipped Sapphire.

I removed the copier paper and repeated the blending around the edge of my card. I was only concerned with doing enough to be seen through the die cut slots.

I used my die cut card to position the 'Let it Snow' Die cut and secured with Cosmic Shimmer.

I covered the Australian background layer with the same snowflakes, this time in a selection of blues, using the darker colours for the small ones. I mounted this onto my background using foam tape to raise it  away from the background for dimension.


My card base measured 8 3/4 x 6 1/2'', I mounted my design onto this using Cosmic Shimmer.

To finish the card, I shaped and positioned my embellishments, using Cosmic Shimmer and 3D glue gel.

Thank you so much for taking the time to visit today. I do hope you have enjoyed the step by step and like the card I have shared. On a countdown now to Leonie Pujol's new Launch on Friday. It will be the One Day Special on Hochanda at 8pm. I do hope you will tune in.xx