Showing posts with label MJM Design Studios. Show all posts

Thursday, 22 March 2018

Elephant March

Hi there, Im a little late today, well very late actually. 1001 Things to sort and never enough hours in the day. I was up very early this morning but I have still managed to fall behind with the things I wanted to do. Today, I am sharing a card I made using the 'Jungle Dreams' Collection from Michelle at MJM Studios.

You will need:

Jungle Dreams Collection
Sheena Stamping Card
Distress Inks Peeled Paint, Forest Moss, Faded Jeans, Gathered Twigs and Spiced Marmalade.
Alcohol Markers
Pebeo Drawing Gum
Clarity Moon Masks
Collall Tacky Glue
Collall 3D Glue Gel

Step 1: Take the elephant and size it to the largest , then build up the heard using the same animal adjusting the size each time. Cover them with Pebeo Drawing Gum.

Step 2: Use some ripped copier paper to create a path for them. Here I have used a mix of Gathered Twigs and Spiced Marmalade to make an orangey brown. Use it deeper in some places to give a bumpy textured look to the path.

Step 3: Build up your landscape next using a mix of the green Distress Inks.

Step 4: Add the moon mask and add blue, again unevenly to give the illusion of clouds and mist from the heat of the day.

Step 5: Remove the moon mask and add a little yellow, not too much. The use some stamps to add branches, grasses and rock. Remove the Drawing gum.

Step 6: Colour the elephants with alcohol markers, dont give to smooth a blend as you do want some texture to their skin and shadows, It makes their skin look a little more rough.
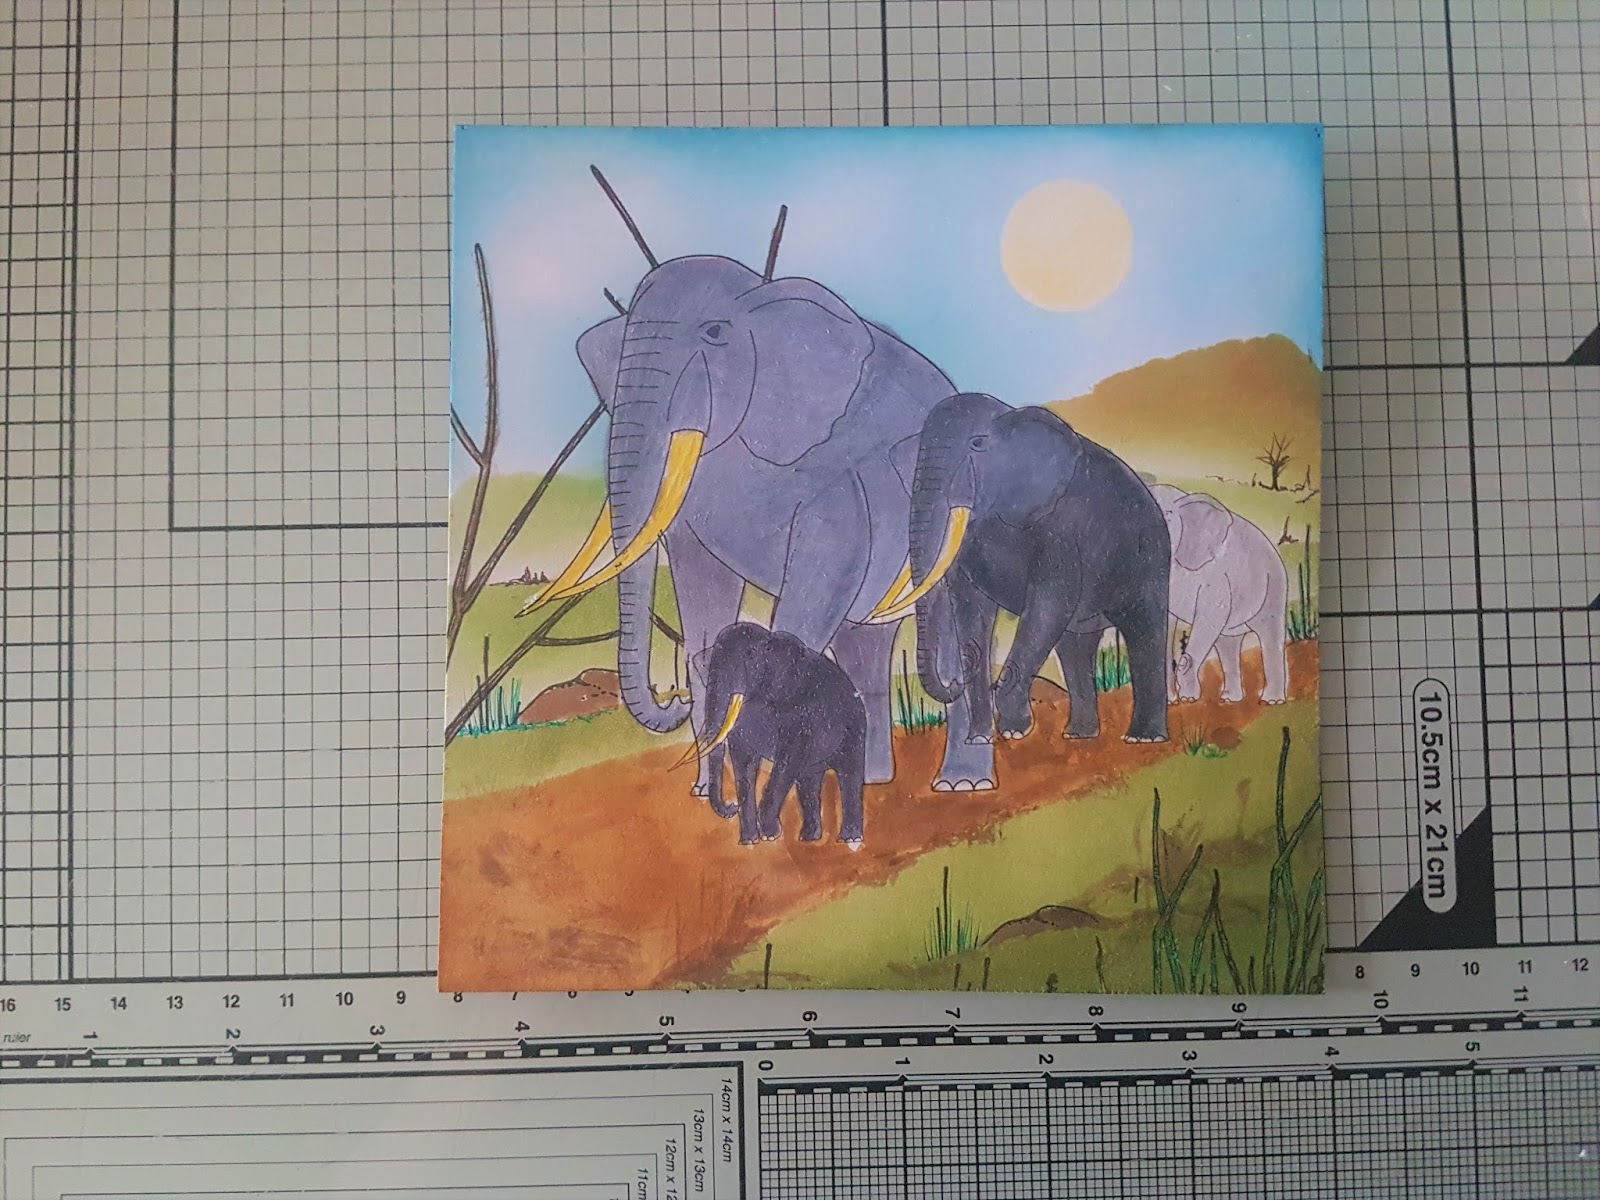
Step 7: Layer the piece onto white card. Then mount onto a larger piece of black before layering it onto a white Centura Pearl Base card. print one of the sentiments, here I have cut it individually and mounted each piece onto white Centura Pearl.

Thank you for popping by today, I hope you like the finished card along with the tutorial I have shared. I hope you will join me again soon. It has started to snow again heavily here, I am hopeful that it wont be as bad as they forecast and I will be able to post tomorrow. Take care and Happy Crafting.xx


Friday, 16 March 2018

Stitched Hummingbird

Morning, I hope you are all well, I hear you are bracing yourselves, ready for a cold snap from the return of 'The Beast from The East 2' I do hope it's not as bad as last time, so stay warm and safe. Today I am sharing a little embroidered piece, using the images from the Jungle Dreams Collection from Michelle. If you're going to the NEC this weekend, I hope you have a great time.

For this project you will need:
10'' Square of Calico
7'' or 8'' hoop
Clarity Light Wave or similar
Embroidery Threads
Needle
Pencil
Coloured Card and Matching Ribbon

Step 1: Choose the designs you would like to use and print them off, Choose a selection of threads.

Step 2: Mark the edge of of your hoop by finger pressing or placing in the hoop. Remove and transfer your design using the light panel or holding up against a window.

Step 3: Stitch your design, here I have used a lot french knots to add more texture, but the choice is yours.

Step 4: Trim a little fabric from around the edges, then roughly stitch the excess at the back. Make sure your design is pulled tight in the frame.

Step 5: Secure the ribbon hanger at the back to form a loop for hanging. Run glue all around the back of the frame and secure your card, coloured facing outwards. Place under a heavy book to ensure even adhesion. Once dry trim around the frame.

Here is the finished piece:

Thank you for taking the time to pop by today, I do hope you have enjoyed the tutorial and the finished project. If you do have time it would be lovely to see some comments, I really do love to read them. Take care and Happy Crafting.xx

Thursday, 15 March 2018

Rainforest Adventure Scrapbook Page.

Morning, Years ago when I was in South America, I had a marvelous time in the Rainforest. I had lots of lovely pictures and wanted to display them in a scrapbook, but couldn't find the elements that would look good. With the launch of Jungle Dreams from Michelle (MJM Studios) on Hochanda all that changed. I dug all of the photos out and created this scrap page. Are you all loving the new collection from Michelle, I imagine you are coming up with all sorts of ideas and designs.

For this page you will need:
Serif Craft artist or similar program orsoftware
Super Smooth Card
Super Smooth Paper
Black Card
Spray n Shine
Scissors
Printer
Adhesives, Tack Glue, 3D Glue Gel

Step 1: Use your software to build up your design.Simply add the elements you want to use by dragging them onto your virtual page.

Step 2: Once happy with your design it's time to create your decoupage elements. Copy the elements you want to use and paste them onto a new page.


Step 3: Cut out all of your elements and add any finishes you want to. For the cheese plant I used Spray and Shine from Crafters Companion.

Step 4: Shape your extra decoupage elements and position them on your project using 3D Glue gel.


Step 5: Layer your project onto Matt Black card, or pick a colour that will draw attention to a certain part of your project.

Just take a minute to look at how each of the elements print, the metal bird is amazing, it looks just like a real metal embellishment. The quality of the images is astounding.

Thank you for taking the time to visit today, It's always nice to have you join me. I love to share my experiences with different crafty products. I hope you have enjoyed my tutorial today along with the finished piece. Hope you will pop by again very soon. 

I have a Groovi Tutorial being published on the Hochanda Blog at 10 am this morning, I do hope you will take a look. Take care and Happy Crafting.xx

Tuesday, 13 March 2018

Savannah Landscape

Morning, Today I am sharing the first tutorial for a card I made for the launch of Jungle Dreams from Michelle. I wonder how many of you have started receiving your collections, I imagine you are having lots of fun designing with the wonderful elements. For this card, all I have used is one element, a frame border, the possibilities are endless.

For this you will need:
Jungle Dreams Collection
Distress Inks: Rusty Hinge, Wild Honey, Aged Mahogany
Tree Stamps
Clarity Masks or Ripped Copier paper
Clarity Moon Mask or Circle cut from Copier paper
Yellow card
Black base card

Step 1: Print out the border frame, Make sure you leave this to dry thoroughly before using the distress inks.

Step 2: Position your moon/sun mask and first landscape mask.

Step 3: Build up your colours, fairly deep at the bottom. working away from the mask, fading out to leave a paler tone where the hills meet. Continue with adding to your land and sky. With the sky add a small amount of Aged Mahogany for warmth.

Step 4: Peel away the moon mask, add trees and bushes, remembering to keep the perspective to build your scene.

Step 5: Mount you piece onto yellow card and then secure to your black card base.


Thank you for taking the time to visit today, I hope you have enjoyed the tutorial and the finished card. Hopefully you will visit again soon.Take care and Happy Crafting.xx

Wednesday, 7 March 2018

A few Sneak Peeks of What's to Come

Hi Crafters, I couldn't resist the temptation and longer, Michelle is launching her 'Jungle Dreams' collection tonight on Hochanda at 6 pm, with another show at 8 pm. It's your new One Day Special, certainly not one to miss either. It's such a wonderful collection and the samples from everyone are out of this world. Over on the Hochanda Blog, I have included a review and preview of the collection, So I do hope you ill pop over, please do leave some feedback there, if you have time.

Once again, it has been a pleasure to design with this superb collection. I know I seem to say it each time, but it's always true that tie seems to run out before the ideas. I have used such a small amount of the wonderful content, each time I browse I come across more elements I have missed.

If you have ever had one of Michelle's collections before you will know how generous she is with the content, both amount and quality. If you've not tried one of the collections before, I would highly recommend that you do. Every elements is top quality and can be used in any number of ways regardless of the project you are creating.

Thank you ever so much for taking the time to join me today, it's always good to have your company. Just to let you know that tomorrow on the Hochanda Blog, I am beginning a 3 part Journal making series. If I manage to get over 50 Comments on that blog, I will be giving away a 6 x 6 version of the journal at the end of the series. To be in with a chance all you have to do is share that post and leave a comment on the Journal blog. You will get one entry for your comment, so if you leave a comment on each of the 3 in the series you will have 3 chances of being the lucky recipient of the journal. I will repeat this on the blog post tomorrow, in case anyone misses it. Take care and Happy Crafting.

Monday, 29 January 2018

Parchment Lilies

Morning, Hopefully you got to see the shows on Hochanda, where Michelle from MJM Design Studios launched her wonderful artwork on a triple set of CD Roms. The Lilies and Light CD collection has been produced by Crafters Companion and is packed to the rafters with goodies to use. When I saw this particular design, I knew it would lend itself perfectly to parchment.

To start with I traced the design onto parchment using my pen and white ink. If you want to print on to your parchment rather than trace, you can change the outline colour to grey and fade the outline image down to approximately 30%. Obviously a printer will not print the white for you. Personally I prefer to trace with white, directly from the image.

Next using my Groovi plate from Clarity I traced the frame part of the design. I also traced one of the sentiments from the disk using gold ink.

I started adding the white work embossing from the back of the parchment in stages building it up over time.

I then used polychromo pencils to colour, again from the reverse.

To finish I added my piece onto black matt card, then layered it onto a card base made from Centura Pearl 'Hint of Silver'

Thank you for visiting today, I hope you like this project and the step by step I have shared.  Please don't hesitate to ask any questions you have about this or any other piece.

I hope to see you again very soon, There's more to come. Take care and Happy Crafting.xx

Sunday, 28 January 2018

Lilies and Light from Michelle (Catch Up)

Morning Everyone.
I wont be posting on Sundays, It's going to be my catch up day. With all the Die cutting I have been doing this week, I am ankle deep in paper waste,glue, paint, inks and dyes, it's all been great fun though. I did want to let you all know that Michelle will be on Hochanda at 2 pm this afternoon, with the wonderful Lilies and Light Collections. I have included some photos for those who haven't seen them yet, I know Facebook aren't sharing all the posts with you.

If you missed them before, please tune in today as they're really not to be missed. I can honestly say that they are full of amazing, usable images, which can be used for all manner of projects.

I have even more examples to come from Monday this week, so I hope you will take the time to look at the step by steps.

Hope you all enjoy the rest of your weekend, for now take care and Happy Crafting.xx

Monday, 22 January 2018

Clematis Initial T-Shirt

Today's project is using more lovely imagery from Lilies and Light by Michelle of MJM Design Studios. It's so difficult to explain just how versatile this CD collection really is. It's not just for digital crafters, there is something in this for everyone, whatever crafting you enjoy and maybe you will even try something new. I have tried to show as many different projects as possible with Michelle's artwork, so I hope you will come back for more inspiration. The Lilies and Light CD collection is available from Hochanda and the Crafters Companion website.

It's such an easy but effective way to decorate a budget T Shirt in any way you please. It's also a great project to do with children, they will get a real buzz from designing their own clothes. First I printed my design onto copier paper. Then using a light box, I traced the outline design on the reverse using Black Colourist transfer ink and left to dry. Once dry I coloured the design with colours from the Colourist Transfer Inks.

When the design was finished and dry. I placed the paper face down onto the shirt and pressed with a hot iron to transfer the image.

There are so many wonderful designs included in the collection, this is just one of them. The designs can easily be used for stitching designs as well. The possibilities really are endless. See you soon, lots more to come.xx

Friday, 19 January 2018

Crystal Marquetry Tulip

Hello all, I'm properly back. Working with Michelle's ( MJM Design Studios ) Lilies and Light Collection was a real treat for me. Being so versatile, her images can be used across the board. There really is something for everyone. Not just a few elements either, the triple CD collection is jam packed with everything you could possibly need to create a multitude of projects. Today's project also used the Wonder Crystals from Be Creative's Justin and Gordon, along with the Wonder Sheets.


To start I selected the design, then printed it directly onto the Wonder Sheet. I peeled the backing off and secured it to a piece of 250 gsm card.

Next, the individual pieces were cut out carefully.

Each element of the design was then covered with Wonder Crystals from the extensive colour palette from Be Creative, then heat embossed.

Once cool, they were arranged and secured using Collall Tacky glue from Crafters Companion.

To show off the design, it was mounted onto a double sided pearl black card. I used another coordinating image from the collection to create an insert.


Here is the finished card.

I do hope you like it and the step by step. It's nice to be back with you. I have really missed you all. Much more to come.xxx