Showing posts with label crafters companion. Show all posts

Thursday, 29 November 2018

Tough Tag

Morning Friends and Crafters. I had such a wonderful time at Hochanda. It was such a great show, Matt made me feel as relaxed as possible. The whole team at Hochanda made me feel right at home, very welcome and did everything they could to make it perfect. The set was staged to perfection, I met 'Magic Hands' in real life, I didn't even know they were attached to a person,lol Today, I thought I would share a tutorial for one of the show demos.

You will Need: 
Craftascope 'Trent' A5 Media Stencil
Craftascope 'Profile' A5 Media Stamp Collection 2
Eco Green Acrylic Paint Mulch and Clamshell or Similar  (Cream and Beige)
Brayer
Glass Mat or Gel Printing Plate 8 x 10''
8 x 4'' Tag
Crafters Companion Spray n Shine
Basic Rectangle Die (Approx 4 x 3'')
Mermaid Lagoon Distress Ink
Versafine Black Ink
Black Fine Liner
White Gel or Posca Pen
Black Card

Step 1: Create the background. Use a Brayer to spread a little of one colour onto your matt or plate. Scrunch up some copier paper and remove some of the colour to create a pattern. The add your tag face down and smooth the back, peel away to lift the print. Do this with your second colour, you really dont need much paint for this at all, leave to dry. Cut your rectangle from copier paper, keep both parts. Spray with a little Stick n Spray and position onto your tag.

Step 2: Use a smoothie or similar to add the Distress Ink  all over the tag. The colour will highlight the texture from the acrylic resist. Rub over with a clean cloth or kitchen roll to remove any excess ink.

Step 3: Carefully position the outer rectangle and remove the inner. Next position the stencil and ink through with the black ink. Leave this to dry for 10 to 15 minutes to avoid any smudges.

Step 4: Remove the stencil to reveal.

Step 5: Remove the outer rectangle, make sure its dry, then remove any excess adhesive with a kitchen roll or similar.
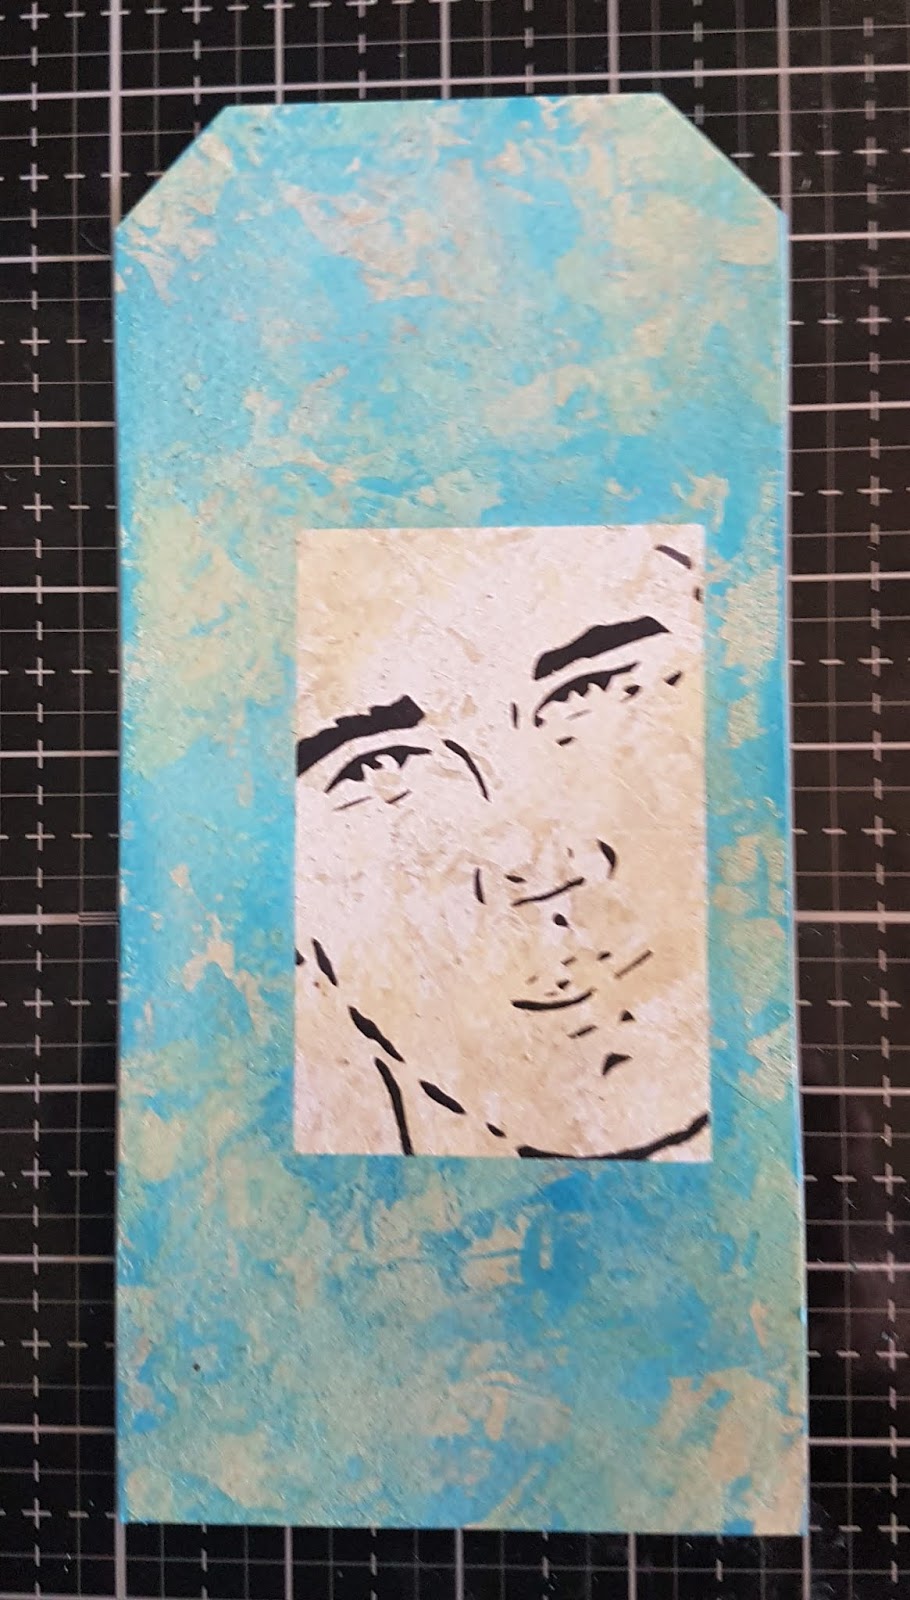
Step 6: Use your black fine liner to add a deckled edge around the rectangle, highlighting the image.

Step 7: Mount your tag onto Black card, Stamp your words onto white card and cut them out individually. Rather than mount these, take your black and white pens and add some detail around them. The tag is now complete, it's great on it's own but would also look great added to a card or other project.

If you would like to get your hands of the last few of my collection they are only available at Hochanda or via my Etsy site, a link is at the top of my blog (CRAFTSCOPE ETSY SHOP).

Just a little extra here: If you have not shopped with Hochanda before, here is a voucher code giving you 30% off your first purchase (FEY5JBP7) it can be used for any purchase, feel free to share it.

Thank you ever so much for joining me today. I do hope you have enjoyed the tutorial along with the finished project I have shared. I hope you will join me again very soon to see what else I have to share. For now Take care and Happy Crafting.xxx


Wednesday, 28 November 2018

Mica Face

Morning Friends and Crafters, so pleased you are joining me again today. I thought I would share something easy, but really striking and effective. It would make a really fun card for a guy or any occasion really, depending on what you add or the sentiment you choose.For the background layer I have used the script stamp from Leonie, it's an amazing stamp to create backgrounds or add texture, interest or dimension to any project, it's out in my craft room constantly.

You will Need:
Selection of Mica Powders
Versamark Ink Pad
Anti Static Pad
Soft Brush
Crafters Companion 'Spray n Shine'
Black Gloss Card
Purple Centura Pearl card
White Card
Black Card Base
Collall Tacky Glue
Collall 3D Glue Gel

Step 1: Wipe over your card with the anti static bag, position your stencil and ink through with the Versamark ink pad.

Step 2: Remove the stencil and sprinkle your chosen colours of mica.

Step 3: Use a very soft brush to remove the excess powder and lightly polish the card with the brush. Spray a very light mist of the Spray n Shine to set the mice in place.

Step 4: Repeat the process, this time using the script stamp to create your next layer. Mount your design onto the script background then onto the purple layer before adding it to your card base. Don't forget to gut your card layers with a basic die to save weight and card for other projects.

Step 5:On another piece of gloss card, stamp your sentiment as before and coat with the mica. Brush away the excess and polish with the soft brush, Once again spray with the Spray n Shine. Trim each of the words and mount them onto white card with Tacky Glue.

Step 6: Use 3D Glue Gel to position and secure the words in place on your finished card.


I do hope you have enjoyed the tutorial today and the finished project. I hope to see you here very soon to see what else I have to share with you. Don't forget to visit my Etsy shop if you would like any of the items from my collection, the link is at the top of the blog page. For now Take care and Happy Crafting.xxx


Thursday, 18 October 2018

Postcards at Christmas

Morning Friends and Crafters, Christmas Is such a busy time for us all. A lot of us just don't always have time to make our card's throughout the year, I started off with good intentions, but as always life takes over. Having an embossing folder, that can do all the work for you, is fantastic. This 3D Embossing folder is they answer to all of our prayers, it's perfect for batch card making, so here are 3 very fast cards.

You will Need:
Dear Santa Embossing Folder
Black Card
Tim Holtz Black Kraft Core'Dinations 
Aged Mahogany Core'Dinations Card
Pebeo Gilding Wax (selection of colours)
Matt and Layers
Adhesives

Step 1: Cut your card to size, 5 x 7'' and emboss with the design.

Step 2: Just look at the wonderful detail this folder gives you.

Step 3: To this card, add gilding wax to add even more detail and bring out the depth and dimension. Red and Gold so so well together.

Step 4: Add a ribbon and some Mistletoe to finish the look and add your mat and layers.


Step 5: Here is the Kraft Core'Dinations, just sanded back and polished with the polishing cloth.

Step 6: Here is the black card, simply finished off with the gilding wax again to really show of the details.

Here are the finished cards just waiting for a little embellishment.


Thank you for popping by today. I hope you have enjoyed these little time savers, they are especially great for people you have forgotten. Another thing, here is a 30% off voucher to use on your first order (anything) from Hochanda, use code FEY5JBP7.

I hope to see you again very soon, For now Take care and Happy Crafting.xxx

Monday, 15 October 2018

Holly Frame

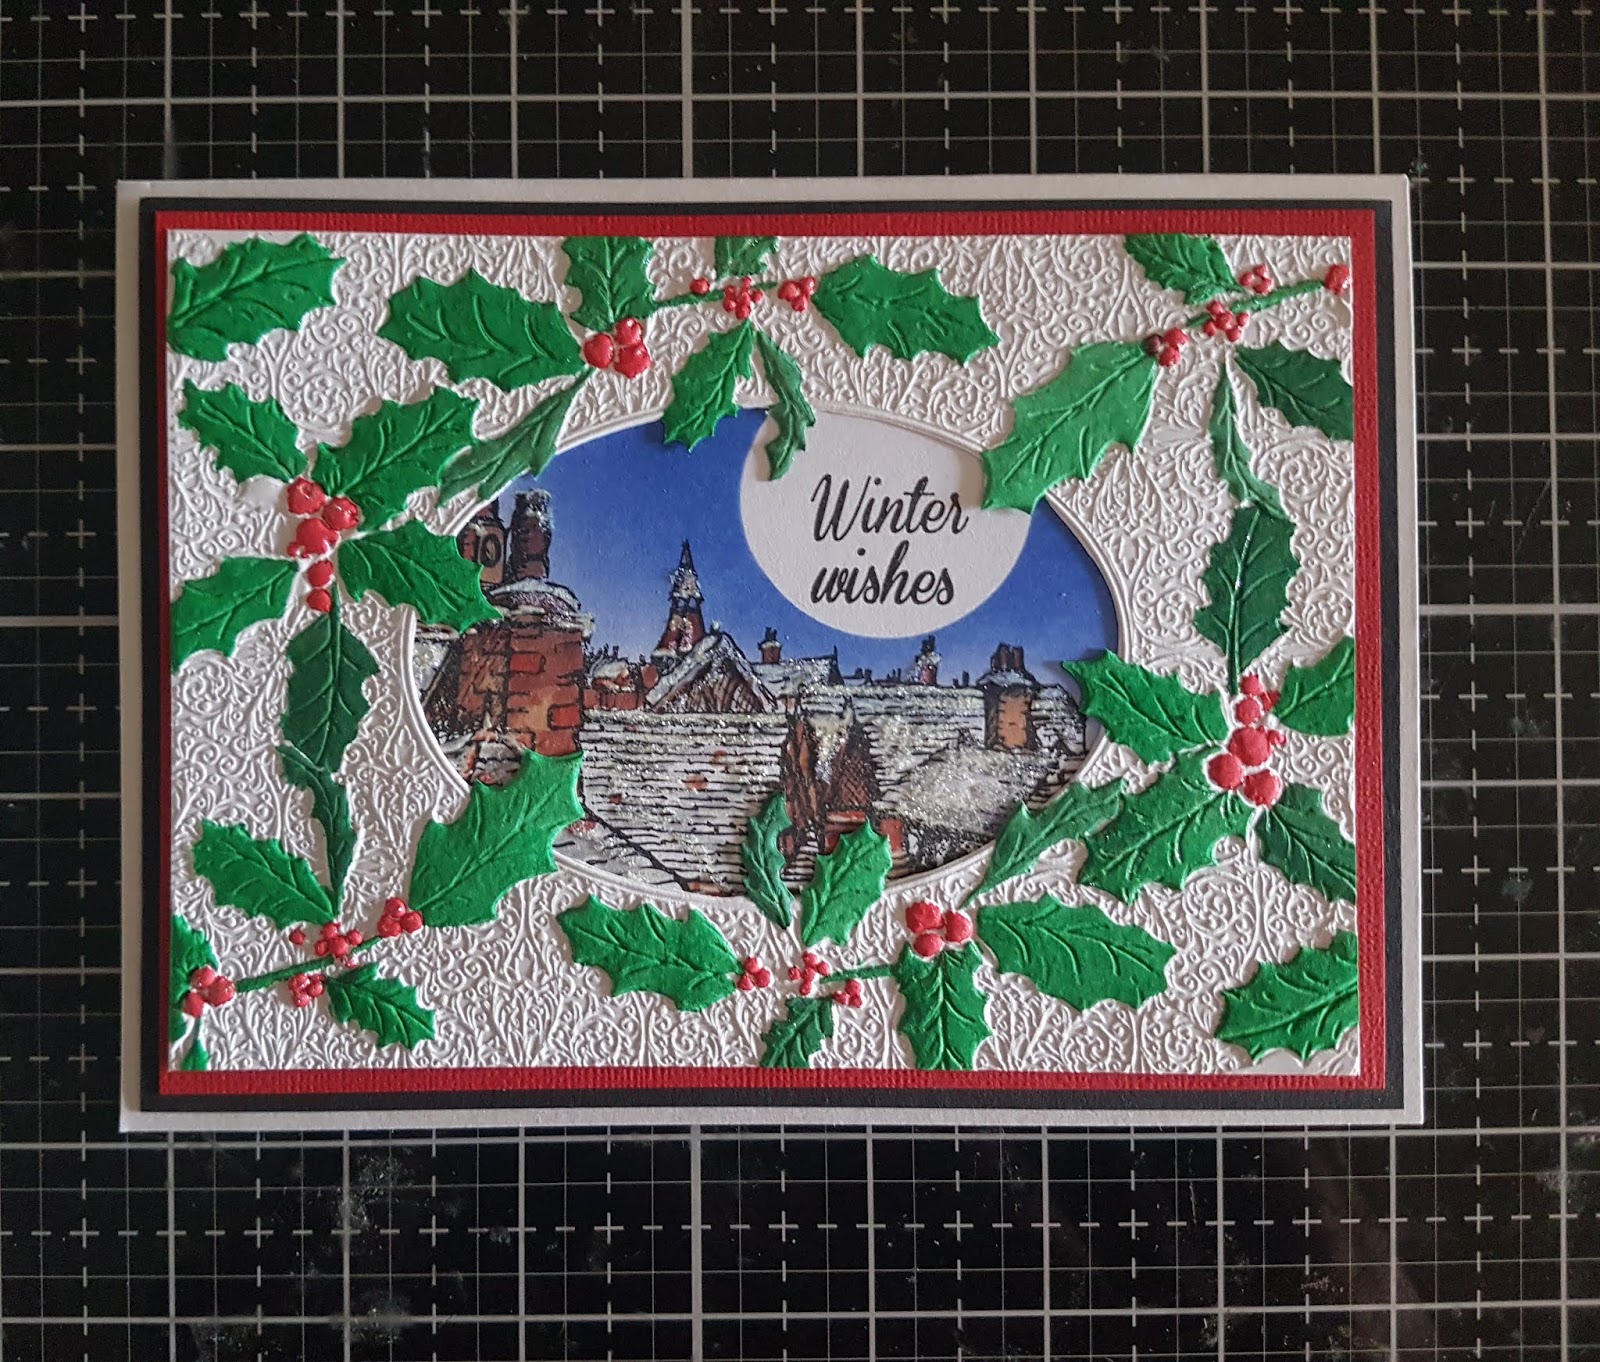
Hi Everyone, Thank you for popping by today, it's always great to have some company. Writing Blog posts can sometimes feel like your chatting away to yourself. Today's card is using one of the wonderful embossing folders from Crafters Companion. This is a particularly useful folder to use as a frame for any of your festive projects. Here I have used is with a stamp from the 'A Little Bit Festive' Collection by Sheena.

You will Need:
Decorative Holly Embossing Folder
Sheena 'A Little Bit Festive' Stamp
Watercolours
Alcohol Markers
Red & Black Card
Sheena Stamping Card
Centura Pearl Card Base
Tartan Ribbon
Clarity Moon Mask
Collall Tacky Glue

Step 1: Stamp the Sheena Stamp onto your Stamping Card.

Step 2: Colour your image with a selection of Alcohol Markers. Add a Clarity Moon Mask to the sky before blending with your Distress Ink.

Step 3: Emboss your 3D Folder.

Step 4: Pick out the holly and Berries, then colour with your choice of watercolours or markers.

Step 5: Layer your finished onto red and then black card before mounting it onto your base card.

Step 6: Add a matching Tartan bow to finish your card.

Thank you so much for stopping by today. I do hope you have enjoyed the tutorial along with the finished card. Another thing, here is a 30% off voucher to use on your first order (anything) from Hochanda, use code FEY5JBP7.

Would be lovely to see you here again soon, Please dont forget to add your comments if you have time. For now Take care and Happy Crafting.xxx

Saturday, 6 October 2018

Christmas Reindeer

Welcome along Friends and Crafters. Great that you have stopped by again to see what I am sharing. Today I thought it would be nice to share this little Christmas Scene made using the 3D Embossing Folders from Crafters Companion. This folder is so versatile. It could be used with so many of your Christmas Projects to add depth and Texture.

You will need:
Softly Falling Embossing Folder
Gemini Festive Words 1
Sleigh Accessories Pack
Tree Concept Die
Tree Accessories Die
Blue Core'dinations 6 3/4 x 7 1/2''
White Stamping Card
Centura Pearl White/Silver Card
12 x 12 Paper Pad (Plains)
Adhesives Collall Tacky Glue

Step 1: Emboss your blue card, then using your sanding block, gently rub over the surface, this will really bring out the detail. Wipe over with the polishing cloth, this really does make all the difference.

Step 2: Rip a length of Stamping card to make some hills. Secure this to your card with Collall Tacky glue.

Step 3: Cut and stamp the Reindeer and trees and secure them in place. Add snow or Flowersoft to the landscape and lastly add your chosen sentiment.

Thank you for stopping by today, I do hope you have enjoyed the tutorial and the finished card. Hope to see you again very soon to see what else I have to share with you. This is going to be an exciting few weeks. For now Take care and Happy Crafting.xx

Friday, 5 October 2018

Planet in The Clouds

Morning Everyone, Today I am sharing a card I made for the Spectrum Noir Metallic Marker shows. If you missed them or want to look back, they will be available via Catch Up on the Hochanda Website. I have also used stamps from 'A little Bit Magical' by Sheena, I think these look really good coloured in Metallics.

You will Need:
Spectrum Noir Metallic Markers 'Antique Elements'
City in The Clouds 'A little bit Magical
Black Card
Centura Pearl Precious Metals
Versamark Ink Pad
Anti Static Bag
Crafters Companion Textures Stamp Set
Basic Square Dies


Step 1: Wipe over your card with an Anti Static Bag.

Step 2: Cut a 5 1/2' Square with a die, Stamp and emboss your design with Black Embossing Powder

Step 3: Colour in your design, here I have used all of the colours in the set. Add a sentiment, using the Rose Gold Marker.

Step 4: Cut a mat from the Centura Pearl Precious Metals collection to match your design. Then secure it to your base card with Collall Tacky Glue

Step 5: Use a texture stamp with one of the Metallic Markers to edge the image.

Step 6: Mount your card with Tacky glue.

Thank you for joining me today, I do hope you will join me again soon to see what I am sharing. Another thing, here is a 30% off voucher to use on your first order (anything) from Hochanda, use code FEY5JBP7.

For now take care and Happy Crafting.xxx


Thursday, 27 September 2018

Christmas Sleigh

Morning Friends and Crafters, today I am sharing with you, a card I made with the Christmas Dimensionals. Again this is a two project tutorial as you really do need to decorate the outside, especially when you have put so much work into the inside. I am sure you all know how much I love these Dimensional ranges, they are so inspiring and make very special cards to give.

You will need:
Sleigh Concept Die
Sleigh Accessorie Die
Festive Words 1
Sparkling Snowflakes 1
Festive Foliage 1
Sleigh Accessories Acrylic Stamps
Tissue Paper
Infusions 'Royal Blood'
Sheena Stamping Card
Red and Gold Mirror Card
12 x 12 Plain Paper Pad
12 x 12 Decorative Paper Pad
Green, White and Blue Foamiran
Centura Pearl White/Silver Card

Step 1: Put a piece of tissue paper on a glass mat, spritz and sprinkle with royal blood, spritz again and leave to dry. Once dry add this to the top of your base card to form the sky.

Step 2: Cut a selection of presents and ribbons, layer these up with Tacky glue. Next cut the moon, stars, trees and houses for decoration.

Step 3: Add Mountains and hills to your scene, secure yellow card behind the windows of the houses to look like lights, add these to your scene. Cut in your concept dies, cover the sleigh with the mirror card, for the reindeer, stamp and die cut from the light brown in the paper pad.

Step 4: Cut the poinsettias and leaves from the foamiran.

Step 5: Cut your mats and layers from the paper pad and Centura pearl. Cut the sentiment in blue, Dies cut the edger die either side of your topper.

Step 6: Arrange and secure your layers as shown in the photo.

Step 7: Add your trees, snowflakes, presents and all of the little extras to finish the inside.

Thank you for taking the time to visit today. I do hope you have enjoyed your visit. Please come back again soon to see what else I have to share with you. For now take care and Happy Crafting.xxx