Showing posts with label Versamark. Show all posts

Tuesday, 16 October 2018

Tree of Life

Morning, Great too have you join me this morning. I am sharing one of the cards I made for the launch of 'A Little Bird' stamps and stencils from Clarity, Barbara launched them last weekend. If you would like to watch the shows for inspiration, they should still be available on "Rewind' via the Hochanda website.

You Will Need:
Clarity 'A Little Bird' Stencil
Clarity 'Life' From the Stamp Club
Clear Embossing Powder
White Stamping Card
Centura Pearl White/Silver Base Card
Black Card
Distress Oxide Blueprint Sketch
Distress Oxide Seedless Preserves
Distress Oxide Wilted Violet
Versamark Ink Pad
Black Soot Distress Ink

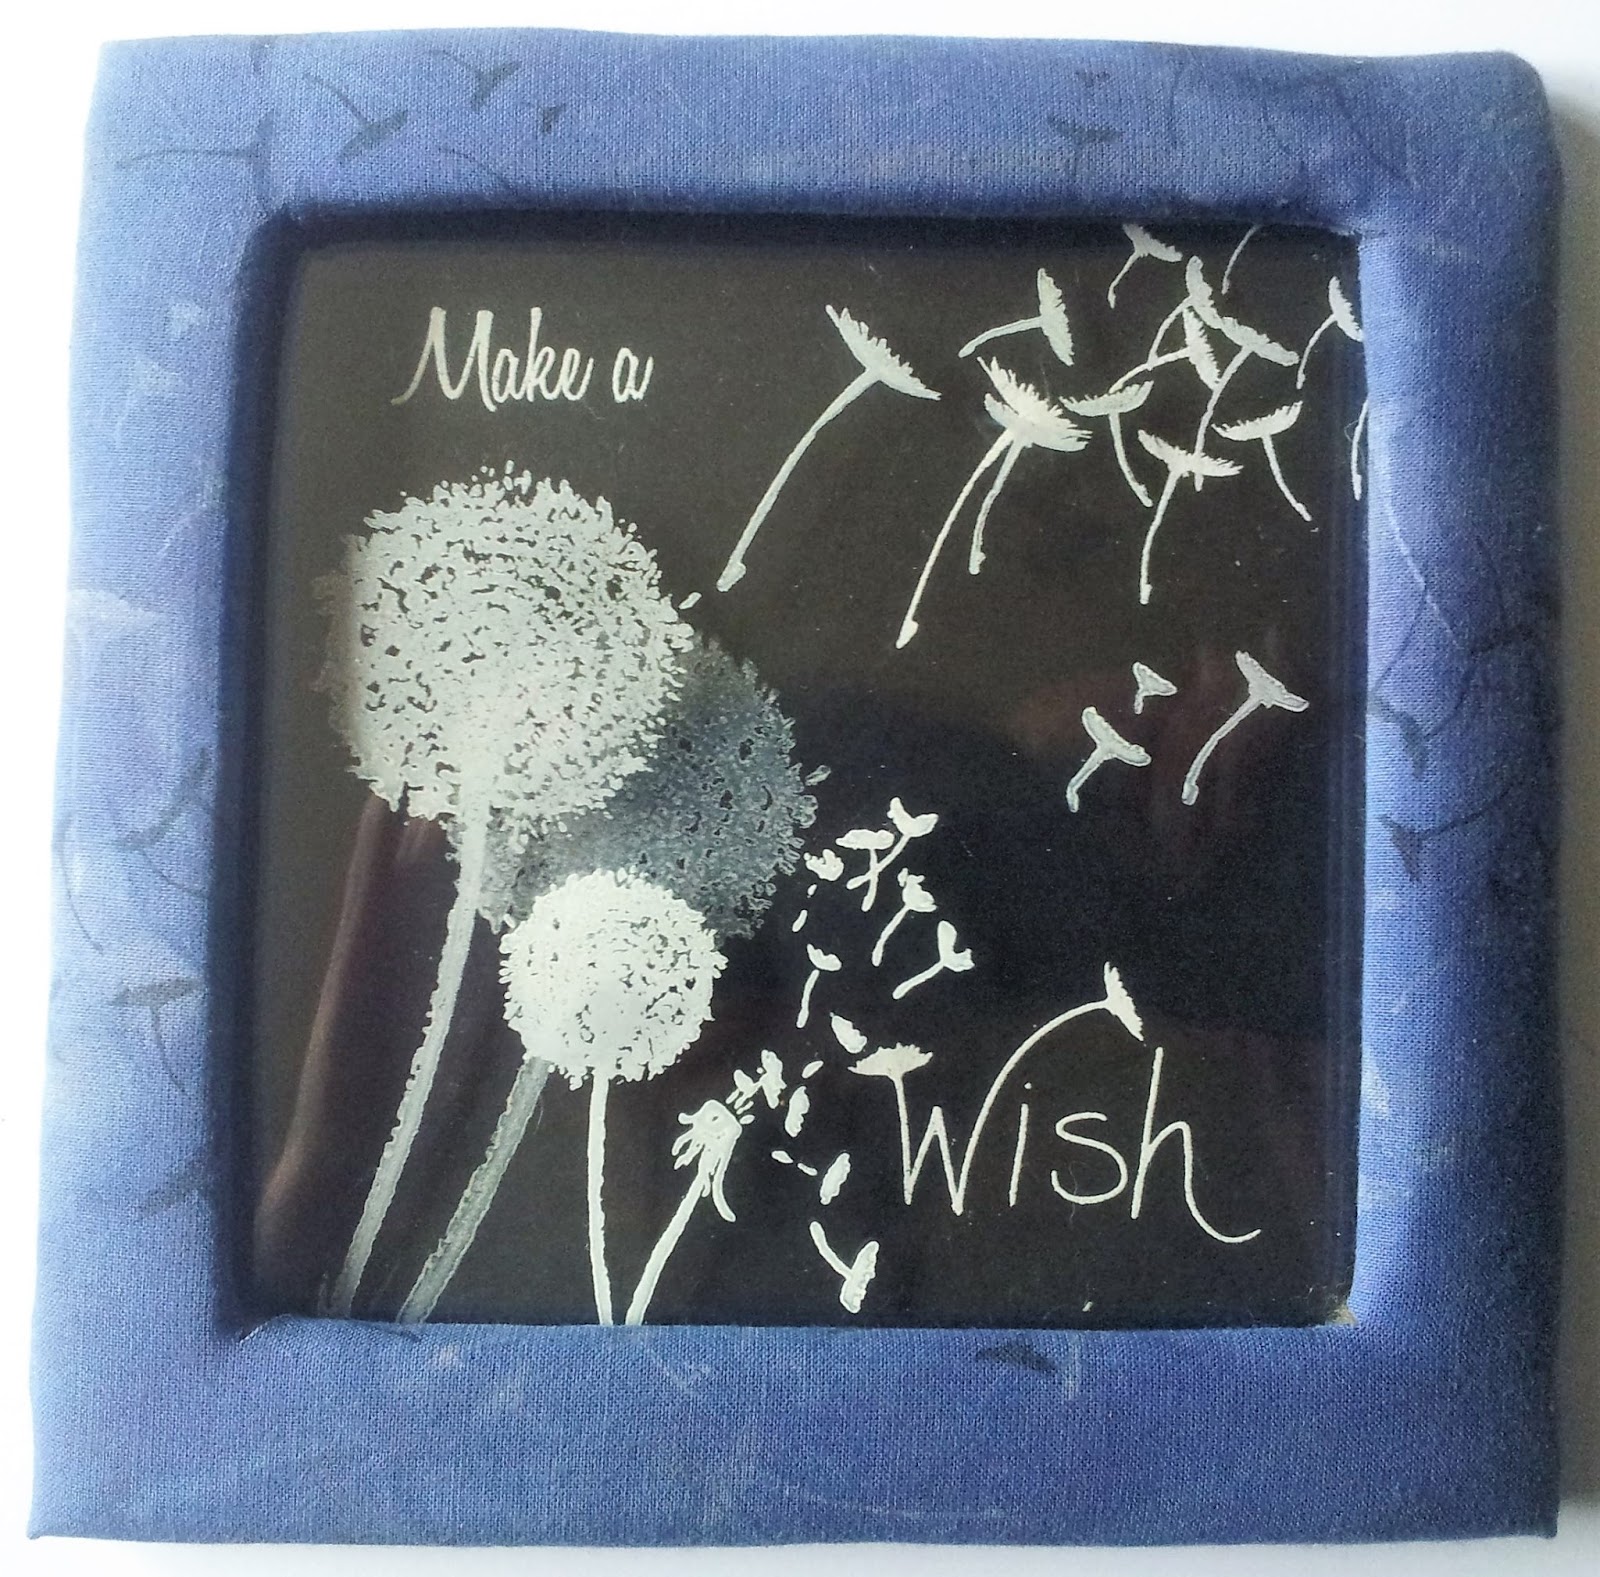
Step 1: Ink up the reverse of your stencil, using the Distress Oxide Inks. Then run through your machine, this will give a wonderful emboss to the finished image. Coat this with clear embossing powder and heat. Next stamp 'Life' using Versamark and again heat emboss with the clear powder.

Step 2: Use Black Soot to completely cover the whole area. You want to get a really dark solid black. Trim around the full stencil, including the rounded corners.

Step 3: Mount onto black card, leaving a very narrow border, ten mount onto your white base card.

This technique gives the illusion of a coloured die cut which has been mounted onto the black card.

Thank you so much for joining me today, I do hope you have enjoyed the tutorial along with the finished card. I hope you will join me again very soon to see what I have to share with you. For now, Take care and Happy Crafting.xx

Thursday, 11 October 2018

Strength & Harmony

Morning everyone, Today I am sharing a card I made with the  'A Little Bird' Collection of stamps and stencils from Clarity. For this one I am using just one of the stencils from the set. This is a lovely stencil to use in so many different ways.

You will need:
Clarity 'Little Bird' Stencil
Clarity Word Chains No 12
Versamark Ink Pad
Clear Embossing Crystals
Distress Oxide Blueprint Sketch
Distress Oxide Cracked Pistachio
Distress Oxide Peacock Feathers
Black Card
White Card
Matching Blue Card.
Copier Paper and a Heat Gun

Step 1: Secure your stencil in place over your black card. Add some copier paper to protect the edges as well. Ink through the stencil, use the Blueprint Sketch at the top, then the Cracked Pistachio at the bottom, lastly add the Peacock Feathers in the centre, blending slightly either side for a seamless transition.

Step 2: Add clear embossing powder, then remove the stencil and heat. It gives the most beautiful finish, like glaze on pottery. Trim the design, leaving a quarter inch border. Mount onto white card then onto the matching blue, leave narrow borders.

Step 3: Take your black base card, stamp the Strength and Harmony with Blueprint Sketch and emboss as before.

Step 4: Mount your finished piece onto your base card with Tacky glue and your card is finished.

Just a little extra here: If you have not shopped with Hochanda before, here is a voucher code giving you 30% off your first purchase (FEY5JBP7) it can be used for any purchase, feel free to share it.

I do hope you have enjoyed the tutorial today along with the finished card. I hope to welcome you back very soon, for now Take care and Happy Crafting.xx


Tuesday, 9 October 2018

New Beginning

Morning everyone, Today I have a mini 'How To' and a couple of extras, all done with the Spectrum Noir Metallic Markers. The markers are great for using on Black or Darker card, Saying that I have also used them to great effect on white card as well.

You will Need:
Spectrum Noir Metallic Markers 'Antique Elements'
A little bit Magical by Sheena 'From the Ashes'
Black Card
Antic Static Bag
Versamark Ink Pad
Precious Metals Centura Pearl
Clear Embossing Powder

Step 1: Wipe over your card with an anti static bag.

Step 2: Stamp and Emboss your design and sentiment

Step 3: Colour your design, Here I have used Aged Copper 

Step 4: Use the flames from the same stamp set to edge your card, emboss this and colour using Aged Copper and Rose Gold.

Step 5: Mount your card onto Precious Metals Centura Pearl, then onto your black base card.


Here are a couple more cards using the metallic markers to stamp with rather than colour in.


Thank you so much for joining me today. I do hope you enjoyed the 'How to' along with the finished card and the extra cards. Another thing, here is a 30% off voucher to use on your first order (anything) from Hochanda, use code FEY5JBP7.


I hope you will pop by again to see what else I have to share with you. For now Take care and Happy Crafting.xxx

Friday, 5 October 2018

Planet in The Clouds

Morning Everyone, Today I am sharing a card I made for the Spectrum Noir Metallic Marker shows. If you missed them or want to look back, they will be available via Catch Up on the Hochanda Website. I have also used stamps from 'A little Bit Magical' by Sheena, I think these look really good coloured in Metallics.

You will Need:
Spectrum Noir Metallic Markers 'Antique Elements'
City in The Clouds 'A little bit Magical
Black Card
Centura Pearl Precious Metals
Versamark Ink Pad
Anti Static Bag
Crafters Companion Textures Stamp Set
Basic Square Dies


Step 1: Wipe over your card with an Anti Static Bag.

Step 2: Cut a 5 1/2' Square with a die, Stamp and emboss your design with Black Embossing Powder

Step 3: Colour in your design, here I have used all of the colours in the set. Add a sentiment, using the Rose Gold Marker.

Step 4: Cut a mat from the Centura Pearl Precious Metals collection to match your design. Then secure it to your base card with Collall Tacky Glue

Step 5: Use a texture stamp with one of the Metallic Markers to edge the image.

Step 6: Mount your card with Tacky glue.

Thank you for joining me today, I do hope you will join me again soon to see what I am sharing. Another thing, here is a 30% off voucher to use on your first order (anything) from Hochanda, use code FEY5JBP7.

For now take care and Happy Crafting.xxx


Monday, 1 October 2018

Butterfly

Morning Friends and Crafters, I am sharing one of the cards I made for the launch of the Spectrum Noir Metallic Markers on Hochanda. I have kept the card fairly simple using the markers to colour the butterfly. Just take a look at just how well the markers stamp, I used them to stamp the sentiment.

You Will Need:
Spectrum Noir Metallic Markers (Antique Elements)
A Butterfly From the Sheena Collection
Sentiment from 'A little Bit Scenic' ''Flying Colours'
Dandelion Stamp
Black and White Embossing Powder
Anti Static Bag
Versamark Ink Pad
White Gesso
Centura Pearl Purple (Darks Collection)
Black Card Base
Black Card

Step 1: Wipe over your card with an Anti Static Bag.

Step 2: Stamp the butterfly and the dandelion clock with Versamark ink. Cover the Butterfly with Black Powder and the dandelion with the White. Then heat to melt the embossing powder.

Step 3: Colour the Butterfly with Antique Pearl and Vintage Satin Metallic Markers.

Step 4: Mask the butterfly, Then add a very small amount of water to some white Gesso, add quite a lot of fine white splats, I find the easiest way is to use a fan brush.

Step 5: Mount a piece of the purple Centura Pearl onto your Black Card Base, Stamp your sentiment onto a piece of black card with the Rose Gold Metallic Marker, mount onto a piece of purple.

Step 6; Secure your finished image to the base using Tacky glue.

Step 7: Add your layered sentiment onto the card with 3D Glue Gel.

Here is the finished card: Another thing, here is a 30% off voucher to use on your first order from Hochanda, use code FEY5JBP7.

Thank you ever so much for joining me again today, it's been great having the company. I hope you have enjoyed the tutorial along with the finished card. Please do pop by again very soon as I always have something to share with you. For now Take care and Happy Crafting.xxx

Tuesday, 18 September 2018

By the Seaside

Morning Everyone, Welcome along today. I am sharing a card I made for the launch of the Three Way Overlay stamps and mask set that Barbara launched on Hochanda on 2nd September. I do hope you got to see the shows over the Celebration weekend to mark 25 years of Clarity.

You will need:
Clarity Three Way Townhouse Overlay Stamps
Clarity Letterbox & Alphabet Stamp Collection
Versamark Black Ink Pad
Memento Summer Sky
White Stamping Card 6 x 6'' & 8 x 8''
Black Card
Brayer
Indigo Blu Townhouse Teal Acrylic Paint
Indigo Blu Pantry White Acrylic Paint
Watercolour Pans
Brush and Water

Step 1: Stamp your Townhouse outline in black ink.

Step 2: Overlay the positive Townhouse stamp using the 'Summer Sky', I built the colour up as it's a fairly pale colour but layered it's a beautiful summery colour.

Step 3: Use a selection of watercolours to give the a seaside feel to your image.

Step 4: Create your background using the 8 x 8'' card, Use a Brayer to build up with the acrylic paints, the more layers the better for additional texture,set aside to dry.

Step 5: Arrange and stamp the letterboxes and fill with your chosen words. Layer this onto black card. Mount your background piece onto your base card. Then to finish the card add the topper you have created.

Thank you so much for joining me today, it's been great to have your company. I hope you have enjoyed the tutorial and the finished card. Hopefully you will stop by very soon to see what else I have to share with you. For now Take care and Happy Crafting.xxx


Friday, 14 September 2018

Harmony House

Morning Friends and Crafters, Thank you for joining me today. I am sharing a card I made for the Launch of the wonderful Three Way Overlay Stamps on Hochanda. I do hope you got to see the shows during the celebrations for 25 years of Clarity.

You will need:
Clarity Three Way Overlay Townhouse Stamp Set
Clarity Word Chain Stamps "Harmony"
Clarity "Wee Houses" Stamp Collection
Black Card
Versamark Ink Pad
Anti Static Bag
Selection of Mica Powders
Spray n Shine

Step 1: Wipe your card with an Antic Static bag.

Step 2: Stamp your negative stamp using Versamark. Add the 'Harmony' from the word chains. Next add three of the wee houses.

Step 3: Sprinkle your selection of Mica Powders.

Step 4:Using a very soft brush to brush of the excess. Protect with Spray n Shine or Hairspray.

Step 5: Take another piece of black card, this will be your layer. Edge the card with Versamark and using the same selection of colours add Mica, Brush off the excess as before. Once it's been cleaned up spray with Spray n Shine or some hairspray, this will stop the image being smudged.

Step 6: Layer you design onto the edged card you have just made, with Tacky Glue. Then mount this piece on to a black card base.

Thank you ever so much for popping by today. I do hope you have enjoyed the tutorial and finished card. Hope to see you again very soon to see what I have to share. For now take care and Happy Crafting.xx


Wednesday, 29 August 2018

Let It Snow

Morning, So I am still playing catch up with my posts. Today I am sharing a card I made with the 3D Christmas Embossing folders from Crafters Companion. Another lovely design that I have used as a focal point. I t could also be used as a smashing background, giving lots of texture to your project.

You will need:
Shimmering Snowflakes Embossing Folder
Gemini Sparkling Snowflakes Set 1
Gemini Sparkling Snowflakes Set 2
Gemini 'Let It Snow' Die
Centura Pearl Blue (Darks Collection) 5 x 7'', 5 1/2 x 7 1/2'' & 8 X 7''
Centura Pearl White/Silver Card Base 8 1/2 x 7 1/2''
Double Sided Adhesive Sheet
Centura Pearl White/Silver 7 1/2 x 6 1/2''
AB Glitter
Matching Blue Ribbon
Silver Embossing Powder
Versamark Ink Pad
Anti Static Bag


Step 1: Wipe over your  5 x 7'' card with an Anti Static bag, Coat your folder with Versamark, Add silver embossing powder and heat.

Step 2: Cover you 7 1/2 x 6 1/2'' Centura Pearl card with a double sided adhesive sheet. Cut snowflakes from the  8 x 7  Blue card, careful to leave the edges as this will be your mat, Secure the snowflakes and sentiment to the sheet as shown.

Step 3: Cover the sheet with AB Glitter and set aside.

Step 4: Mat your embossed card onto the Blue Centura Pearl 5 1/2 x 7 1/2 with Tacky Glue

Step 5: Layer your snowflake card onto the blue, then mount onto your base card with Tacky Glue.

Step 6:Add your embossed design to the base section with foam on a roll or 3D Glue Gel.

Step 7: Add a mounting ribbon to finish your card.

Thank you for joining me today, I hope you have enjoyed the tutorial and the finished card I have shared. Join me again for more inspiration. For now Take care and Happy Crafting.xx

Saturday, 1 October 2016

Make a Wish

Morning, This is one of the projects I made for Bev's Bee Crafty launch show on Hochanda live from Alexandra Palace. I wanted to add a frame to this large MDF piece and to create and almost 3D look with real depth, like the layered glass images you sometimes see. I used the beautiful Dandelion set for this, it's such a wonderful set of stamps with such great detail.

To start with, I took a piece of cardboard and cut it to the same size as the MDF. Then using a square die I cut an aperture that would give a large enough window for the design while still keeping enough of the frame for the support needed.

Next I cut some thick wadding to the same size as the frame I had cut from the cardboard.

I coloured the back section of my MDF with Black Soot Distress Ink, the MDF has such a super smooth finish and takes inks extremely well, without any need for an undercoat. I wanted to keep the smooth surface for this piece.

On this back section I used Versamark to stamp the Sentiment, Dandelion and Seed Heads, then embossed with White detail embossing powder, making sure that the design fitted within the frame. To add the other layers I used squares of acetate large enough to fit behind the frame. Taking the first sheet I overlaid it onto the MDF stamped image to allow me to position the next layer of stamping, for these I used white Stayzon Ink. I repeated this for my next layer. When these were both dry, I secured them in turn using foam tape to give the distance between layers.

I took a square of cream calico  and stamped the dandelion seed heads around the area where the frame would be. I stamped them in both Black Versafine Ink and Versamark to act as a resist. Then I dyed the fabric using a blue denim fabric dye.

Once dry, I cut the centre so I could cover the frame.

I stretched and secured around the inner frame using Cosmic Shimmer glue. Because of the tab at the bottom I just folded this edge and secured above the tab. The other 3 sides were secured with Wonder Tape and Cosmic Shimmer glue.

I covered the base/stand with the same fabric I had used for the frame and cut out the slit.

To finish I secured the frame to my base with Cosmic Shimmer glue.

I hope you like this project and the step by step I have shared with you today, I thoroughly enjoyed making it and sad that I had to send it for the show. Hope to see you again tomorrow, Take care and Happy Crafting.xx