Showing posts with label Brusho. Show all posts

Friday, 21 June 2019

Way Out!!!

Morning Friends and Crafters. Fancy a little bit of fun with some vibrant colours and some straws? Well that's just what I have been doing, with the background for this mutlicoloured banner. This is a real statement die, great for any occasions and all types of crafting, from card making, journalling and scrapbooking and lots more. It's a great addition to your crafty stash and also makes a great card for a bloke.

I have managed to get a little bit of stock back on my Etsy Store, I am still trying to get the Stamp version of the 'Retro Banner' back in stock and will let you know if it's possible.

You will need:
Selection of Brusho
Mat Black Cardstock 7 1/4 x 7 1/4''
White Stamping Card 7 x 7''
Mat Black Cardstock to cut the Banner
Coloured Card (A real Scrapbuster)
Tacky Glue and 3D Glue Gel

Step 1: Take 4 colours of Brusho, totally your choice. Premix them with a little water. Drop the first colour onto the card and blow out towards the edge of the card. Repeat this with your other colours to give a wonderfully vibrant background.

Step 2: Cut out the Retro Banner 3 times in black card from gutting. You need to whole banners and a section of 2. ****TOP TIP**** Don't use your pokey tool, tap the die firmly cutting side up on a surface to release on it's own, It does release and doesn't distort your die cut.

Step 3: Mount your vibrant background onto your base card, You can easily gut this card before sticking it down and use it on another project. 

Step 4: On your white card secure the banner die cuts to form a circular shape. Use coloured card to paper piece the banners.***TOP TIP***** This is a great way to use all of your scrap card pieces, I know we all have them.

Step 5: Back this piece onto your black card and make sure you have gutted it. You could easily position your banner die and use it latter for another card or project.

Step 6: Select a sentiment for your card. When I finished the background, I used the rest of the premixed Brusho to colour some scraps using the straws as well, these come in really handy for sentiments or smaller projects and we dont like to waste the colours. Here are two variations, but you could use any sentiment to suite the project.

Well, thats a really fun card to make, the explosion of colour with the banner would look fantastic in a journal or scrapbook, it really does make a statement. So versatile, how about printing thumbnails of photos and putting them in the blocks. Whatever you make or decide to do with your Banner I do hope you will share your Creations. Look forward to my next Back to Basics with Craftascope Show, dont forget if you have any ideas or anything you would like to see, please add it to the comments section under the videos, it makes it easier for me if they are all in one place. For now Take care and Happy Crafting.xx

Friday, 16 November 2018

Serene Dolphins

Morning, Some more Dolphins for you today. Having the open spaces in these stamps makes them so versatile for so many looks and styles. They are so easy to colour or fill to suit your project. For this project I have used some Blue Brusho and a selection of Blue Watercolour paint and some Pebeo drawing gum.

You will Need:
Brusho
Selection of Blue Watercolours
Versafine Grey Ink
Memento Midnight Blue
Brush
Drawing Gum
Water 6 x 6 Watercolour Card
Black Card
Blue Centura Pearl Card

Step 1: Stamp your Dolphins onto the watercolour card and mask with the Drawing gum. Leave to dry thoroughly. Use a fan brush to add some splatters of gum to remove later leaving a little white space. Wash your brush Immediately.

Step 2: Spritz your card with water and sprinkle some Brusho for the sea, you really to want some white space here as well to add some drama and movement.

Step 3: Use a brush to add a little blue to the sky. Leave to dry again. Then remove the drawing gum from the Dolphins.

Step 4: Use your selection of blue watercolours to colour the dolphins. Top Tip: I am quite heavy handed with colour so I mask off some of the dolphins with gum, little area here and there, then remove some for another colour. You can always go over it later with a much lighter blue, if required. Next stamp "Serene' using a dark blue ink pad.

Step 5: Mount your finished piece onto black card (Gutted) leaving a narrow border. Then position onto your base card, here I have used Centura Pearl.

Just a little extra here: If you have not shopped with Hochanda before, here is a voucher code giving you 30% off your first purchase (FEY5JBP7) it can be used for any purchase, feel free to share it.

As you know I love writing my blog and helping as much as I can, well I would really love for you to add you support by adding me as a favourite blog. All you need to do in that section is choose other and add my blog address nickinbarnsley.blogspot It would be great to get a mention even if I dont come anywhere.

Here is the link to add your support for all of the categories. 

https://www.britishcraftawards.com/

Thank you ever so much for joining me today, I do hope you have enjoyed the tutorial along with the finished card. I look forward to welcoming you again very soon. Take care and Happy Crafting.xx

Monday, 5 November 2018

Invisible to the Eye

Morning Friends and Crafters, Thanks for popping by to see what I have to share with you. Today I have a card I made for the launch of my own collection. I do hope you got to see my first show last Thursday, If you didn't see it, it will be available on rewind via the Hochanda website. I really hope I wasn't too bad and you enjoyed it if you did see it.

You will need:
Profile Stamp Collection 2
Selection of Leaf Stamps (Here I have used my own designs)
Pebeo Drawing Gum
Grey Brusho
Infusions Royal Blood
Watercolour Card
Black Card
White Card Base

Step 1: Take a piece of watercolour card 5 1/2 x 8'' and stamp the profile towards the top right of the card.

Step 2: You will need some masks of the leaves you are using, so stamp them onto copier paper. Start building the leaves up around the face and tumbling down the page.

Step 3: Mask the whole stamped area with Pebeo Drawing Gum and leave to dry.

Step 4: Next splat a small amount of Drawing Gum around the page, not too much.

Step 5: On your glass mat mix some grey Brusho with a small amount of water and wash over the background.

Step 6: Lightly sprinkle the Royal Blood Infusions, here and there over your card, then spritz. You dont need much water as you dont want the colour to spread or break.

Step 7: Next create your layer for the main image, Stamp the leaves around the top right and bottom left corners, mask with Drawing gum and was the card withe the grey Brusho as before.

Step 8: Once dry, remove the Drawing gum and colour using your chosen medium, here I have used alcohol markers, which I wouldn't normally do on watercolour card.

Step 9: Remove the Drawing gum from your main piece and colour in 

Step 10: To finish, layer both pieces onto black card, leaving a very narrow border, Mount onto a white card base.

As you know I love writing my blog and helping as much as I can, well I would really love for you to add you support by adding me as a favourite blog. All you need to do in that section is choose other and add my blog address nickinbarnsley.blogspot It would be great to get a mention even if I dont come anywhere.

Here is the link to add your support for all of the categories. 

https://www.britishcraftawards.com/


Until Tomorrow, Take care and Happy Crafting.xx

Tuesday, 20 March 2018

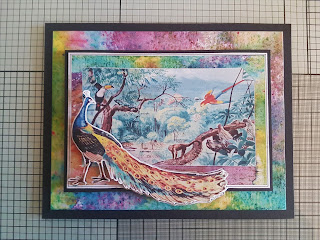
Peacock Parade

Oh No!!!! More Snow :-( Like everyone else, I a really fed up with it. They have given out Amber Warnings and are forecasting a major snowstorm on Thursday and Friday here. Maybe 30 odd years ago it would have been exciting, but not now. Anyway, I do hope you are all warm and wherever you are the snow is melting away. Today, I am sharing a card I made with Jungle Dreams from Michelle at MJM Studios. It's a wonderful image to use.

You will need:
Jungle Dreams Collection
Matt Black Card
Watercolour Card
Smooth Card
3D Glue Gel
Tacky Glue
Scissors 

Step 1: Select the image from the disk. Print it out onto smooth card. This one is one of the coloured toppers. Also print and extra peacock and cut out, this will be for the decoupage. I have just done one layer but you could do more.

Step 2: Print out a background, this particular background is a wonderful Brusho background, which particularly suits watercolour card. It really coordinates well with the topper.

Step 3: Mount this onto your black card base. The size will really depend on what size topper you have chosen to print.

Step 4: Cut out your topper and layer it onto black card stock using Collall tacky glue. Layering it onto the same card ties the whole piece together.

Step 5: Secure your mounted topper to the background using Collall 3D glue gel or foam tape for extra dimension.

Step 6: Add some shape to the peacock and layer up with Collall 3D glue gel.

Thank you for popping by today, I hope you have enjoyed the tutorial along with the card I have shared. Would be lovely to see some comments or your feedback. If you have the collection maybe share your experiences or tell us what you have done. Take care and Happy Crafting.xx

Monday, 5 June 2017

Special Friend

Morning, Here I have used watercolour card, Brusho and Pixie Powders to create a background to use with the Circle Pop Out Kinetic card dies from Crafters Companion. The shows should still be available via 'Rewind' via the Hochanda website.

I took a sheet of watercolour card and thoroughly saturated it on both sides under the tap. I then sprinkles Violet, Prussian Blue and Ultramarine Brusho. Next I added a very small amount of Bronze Blush and White Pearl Pixie Powders in a few areas across the card before spritzing with a little water. I then left it to dry.

I next cut out the kinetic base in white Centura Pearl, 'Hint of Silver' and 2 of the beautiful floral panels. From one of the panels I cut out the flowers and shaped them. I cut out the background and assembled my card.

To finish, I added the flowers that I had shaped using Collall Tacky Glue. The I used the Blue Cosmic Shimmer PVA to add centres to all of the flowers.

Thank you ever so much for taking the time to visit today. I do hope that you have enjoyed the step by step and the finished card. If you do enjoy reading my blog and the things I share then I would love your nomination for best blog in the International Craft Awards,the link is here:
http://www.craftsbeautiful.com/awards/
Take care and Happy Crafting.xx

Saturday, 29 April 2017

When's a Heart Not a Heart

Hi everyone, I hope you're all enjoying your May Day Bank Holiday and the weather is nice, where you are. When is a Heart not a Heart? When it's a tree. This is a project I made for Leonie's One Day Special on Hochanda. I thought it would be a nice idea to come up with a card that used the waste after cutting all of those lovely dies.

To start I cut 2 pieces of card bot measuring 8'' square, one was scrap the other ,my base card. On the scrap piece I cut through the middle with a wobbly line, then on the lower portion I die cut a pattern using the flower sprigs that come in the 'Funky Base Heart' set, this would become my stencil.

I placed the lower stencil onto my base card, while I blended and coloured the sky, using shaded Lilac and Tumbled Glass Distress inks.

Next I took the upper part of my stencil to cover the sky, I used Stick n Spray to position the 'Imagine' stencil for Leonie's collection. Then I added the land using Mowed Lawn and Twisted Citron Distress ink. Finally I replaced the lower stencil and sponged through the pattern with Mowed Lawn.

On a sheet of watercolour card I created a background using Brusho, half of the sheet with Emerald Green, Leaf Green and Yellow. The other half with Light Brown. I spritzed this with water, once dry I cut out the Hearts from the green side and trunk shapes from the brown.

From a previous project, I had kept the waste so I used 3 of these to layer up the watercolour trees.

Using a green alcohol marker, I coloured the white edges.

Using 3D Glue Gel, I added the trunks and tree tops to my card before layering it onto a dark Blue base card made using Centura Pearl.

Thank you for joining me today, sorry for not posting the last couple of day's. my hands have been incredibly bad and so I haven't been able to do anything at all. Take care and Happy Crafting.xx

Tuesday, 9 August 2016

Watery Feathers

Morning. Well it's been a very busy few day's. I'm sure it's the same for a lot of crafters at the moment getting on with Christmas cards as well as everything else that needs doing. I have had to take a few days out as things around the home have really needed attention. Today I thought I would share something I made with the feathers collection that Bev launched on Hochanda a little while ago. The feathers really are beautifully drawn, and are so versatile, there are a whole range of card styles that you can make. This one is a fairly colourful, clean and simple. 

I started of with a sheet of cream watercolour card. I took the large feather stamp and spritzed with some water. Then I sprinkled on Cobalt Blue and Gamboge Brusho and spritzed again with water.

 Then I stamped this onto the card stock, I took the smaller feather and followed the same process and left to dry.

When the image was dry I overstamped the image with Coffee Archival Ink. I also stamped the sentiment in Coffee Archival.

Finally I layered the project onto a piece of Teal Centura Pearl and then onto Black Centura Pearl both from the dark's collection from Crafters Companion.Here is the finished piece.

Many thanks for joining me today, I have to say it feels like a long while since I shared a post. Just shows you how much has been going on since the last one. Leonie will be Launching her Beautiful New Collection tomorrow night on Hochanda at 8 pm.

I hope you have enjoyed the step by step and the card I have shared with you today and hope that you will join me again. Thank you ever so much for all of your lovely comments both here and on Facebook.