Showing posts with label watercolour card. Show all posts

Thursday, 26 September 2019

Mixed Media Stitched Journal

Morning Friends and Crafters, well at last I have had the chance to prepare and film the stitched Mixed Media Journal, it will go live at 7 pm (UK Time) this evening, if you would like to join me on on you tube . It's very similar to the one I decorated on my last Hochanda Show. The show is also available on my youtube channel, if you would like to look back on it. The video is 'The Regal Rose' collection, with Janice which aired on the 13th August at 12 noon.

I have to admit this was a tricky one to film, with positioning the camera and with such a small viewing area that I had to work in. You will have to forgive me for the mishaps, I hope I haven't made it look to difficult, I can assure you it's a lot easier to make than I have made it look.

The size of the covers are 8 1/2 x 6 1/4 and are cut from Zutter Board. This is a perfect size for A4 card, Fabric or material folded to A5 size. There is no waste at all and no trimming necessary. I do hope you will join me at 7 pm, I will be there to answer any questions you have and for a chat of course.

Just a couple things to remind you about. There are a few more days left to get your hands of the HALF PRICE Blooming Marvelous Collection, Please don't miss out, it's a wonderful collection of Stamps, Dies and Stencils. Secondly the GIVEAWAY, all you have to do is leave a review for any Craftascope purchase on Etsy for your chance to win my New Collection. There is a link to my Etsy Store at the top of the page.

Here is the link for the video this evening, I hope you will join me for a chat.


For now Take Care and Happy Crafting.xx

Monday, 29 October 2018

Autumn Leaves Treescape from Clarity

Morning Friends and Crafters, today I am sharing a card I made with the 'Treescape' stamps from Clarity. I do hope you got to see the shows with Maria. This is such a strong stamp, it can be given a totally different look just by changing the background, great for all sizes of card depending on your preference.

You will Need:
Clarity 'Treescape' Stamp
Clarity 'Autumn' Stamp
Clarity 'Leaf' Stamp
Archival Black Ink
Infusions Rusty Car
Infusions Emerald Isle
Infusions Blackcurrant
Spray n Shine
Watercolour Card
Black Card
White Card Base
Water Spray
White Gel Pen
3D Glue Gel
Tacky Glue

Step 1: Spritz the glass mat and sprinkle with the infusions.

Step 2: Spritz the watercolour card and place on the inks.

Step 3: Select the area you want to stamp, Make sure you leave enough space around the edges so you can use it as a layer. Cut it out with a basic die.

Step 4: On another piece of card, use the same infusions but a lot lighter with the amount. When dry stamp the leaves and cut out. Spray with Spray n Shine.

Step 5: Layer your mats onto the base card.

Step 6: Use a ruler and the white gel pen and draw around the frame of the image.

Step 7: Stamp the Autumn and layer onto white card and then onto black.

Step 8: Add the shaped leaves as shown in the photo with 3D Glue gel. Use foam pads in the centre of the topper and glue gel on the sides, I have given this a curved shape.

Just a little extra here: If you have not shopped with Hochanda before, here is a voucher code giving you 30% off your first purchase (FEY5JBP7) it can be used for any purchase, feel free to share it.

I do hope you have enjoyed the tutorial today along with the finished card. I will be flying back to the UK tonight ready for my visit to Hochanda and my first show on Thursday, I do hope you will be watching. I have scheduled posts so I hope you will join me again very soon to see what else I have to share with you. For now Take care and Happy Crafting.xxx

Saturday, 27 October 2018

Card Box and Notelets

Morning Friends and Crafters, I have a full project here for you today, It's a little card box and Notelets. It would make a lovely little gift for someone, or you could even make them to sell for yourself or for a special charity. For these I have used the wonderful stamps from Clarity 'A Little Bird' collection.

I have a special and very exciting post over on the Hochanda Blog today as well, if you get time it would be great if you would take a look and even better if you could leave a comment there.

You will Need:
Clarity 'A little Bird' Stamps
Acetate
Centura Pearl Box 6 x 6'' Finished Size
Amsterdam Acrylics
Versafine Black Ink Pad
Stayzon Black Ink
Basic Square Die
Tacky Glue
Red Liner Tape
 Selection of Coordinating Distress Oxides
Watercolour Card
Black Card
Centura Pearl Card Bases

For the Box:

Step 1: Start by cutting 2 x 8'' squares of Centura Pearl card. Score at 1'' on each side, use your big score and score one on the base side and one on the lid side of your board. Make sure you know which is your lid. In the lid cut an aperture approximately 4'' (just slightly bigger than the stamped image so you get a border.

Step 2: Stamp you design on Acetate, using Stayzon black ink. Then on the reverse, paint the design with the Amsterdam Acrylics.

Step 3: Cut the Acetate about 1 cm larger than the aperture.

Step 4: Secure behind the aperture using red liner tape.

For the Notelets:

Step A: On the watercolour card, make a selection of backgrounds for your notelets. Use colours that you feel work together. Add these colours to a large stamping block and spritz the block and the card, then apply. You can get some really interesting patterns like this. Leave them to dry.

Step B: Stamp your design on to each coloured background and mount onto black card. Cut a base card, leaving enough space to stamp one of the word chains on each one.

Step C: Repeat this for each one of your notelets, one for each of the colour selections you have chosen.

and here is a selection with the finished box:


Thank you, I am so pleased you have stopped by today. I do hope you have enjoyed the tutorial along with the finished project. Another thing, here is a 30% off voucher to use on your first order (anything) from Hochanda, use code FEY5JBP7.

I do have a post on the Hochanda blog today so it would be great if you could take a look and it you have time to leave a comment. For now Take care and Happy Crafting.xxx


Wednesday, 10 October 2018

Twilight & Sunset

Hi Everyone, So glad to be here with you again this morning, Here is a really atmospheric card I made for the launch of 'A Little Bird' from Clarity. It's a wonderful collection of Stencils and Stamps. I have made this card and mounted it so it looks like a faux Die cut.

You will Need:
Clarity 'A Little Bird' Stencil
Versamark Ink
Clear Embossing Powder
Water Spray
White Card Base
Watercolour Card
Black Liner Pen
Infusions Royal Blood
Infusions Rusty Car

Step 1: Ink up the reverse of your stencil with Versamark Ink. Run through you machine to get a nice, deep emboss. Coat with embossing powder and Heat.

Step 2: On a separate sheet of watercolour card, totally wet the side you are using and lightly spritz on the back to stop it curling. Sprinkle the surface with the infusions, keeping them separate, (See Photo). When dry mount it onto your base card.

Step 3: Repeat this with your embossed watercolour card, keeping the same colours in the same halves. When dry add shadow to one side of the image, this gives a 3D look. Trim this to leave a narrow border of the edge.

Step 4: Layer this on to your background with Tacky glue.

Here is the finished card:

It's been lovely of you to visit today. I hope you have enjoyed the tutorial along with the finished card. Another thing, here is a 30% off voucher to use on your first order (anything) from Hochanda, use code FEY5JBP7.

I do hope you will join me again very soon, to see what else I have to share with you. For now Take care and Happy Crafting.xx


Tuesday, 20 March 2018

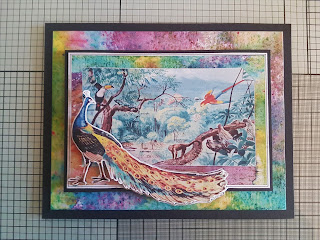
Peacock Parade

Oh No!!!! More Snow :-( Like everyone else, I a really fed up with it. They have given out Amber Warnings and are forecasting a major snowstorm on Thursday and Friday here. Maybe 30 odd years ago it would have been exciting, but not now. Anyway, I do hope you are all warm and wherever you are the snow is melting away. Today, I am sharing a card I made with Jungle Dreams from Michelle at MJM Studios. It's a wonderful image to use.

You will need:
Jungle Dreams Collection
Matt Black Card
Watercolour Card
Smooth Card
3D Glue Gel
Tacky Glue
Scissors 

Step 1: Select the image from the disk. Print it out onto smooth card. This one is one of the coloured toppers. Also print and extra peacock and cut out, this will be for the decoupage. I have just done one layer but you could do more.

Step 2: Print out a background, this particular background is a wonderful Brusho background, which particularly suits watercolour card. It really coordinates well with the topper.

Step 3: Mount this onto your black card base. The size will really depend on what size topper you have chosen to print.

Step 4: Cut out your topper and layer it onto black card stock using Collall tacky glue. Layering it onto the same card ties the whole piece together.

Step 5: Secure your mounted topper to the background using Collall 3D glue gel or foam tape for extra dimension.

Step 6: Add some shape to the peacock and layer up with Collall 3D glue gel.

Thank you for popping by today, I hope you have enjoyed the tutorial along with the card I have shared. Would be lovely to see some comments or your feedback. If you have the collection maybe share your experiences or tell us what you have done. Take care and Happy Crafting.xx

Monday, 5 June 2017

Special Friend

Morning, Here I have used watercolour card, Brusho and Pixie Powders to create a background to use with the Circle Pop Out Kinetic card dies from Crafters Companion. The shows should still be available via 'Rewind' via the Hochanda website.

I took a sheet of watercolour card and thoroughly saturated it on both sides under the tap. I then sprinkles Violet, Prussian Blue and Ultramarine Brusho. Next I added a very small amount of Bronze Blush and White Pearl Pixie Powders in a few areas across the card before spritzing with a little water. I then left it to dry.

I next cut out the kinetic base in white Centura Pearl, 'Hint of Silver' and 2 of the beautiful floral panels. From one of the panels I cut out the flowers and shaped them. I cut out the background and assembled my card.

To finish, I added the flowers that I had shaped using Collall Tacky Glue. The I used the Blue Cosmic Shimmer PVA to add centres to all of the flowers.

Thank you ever so much for taking the time to visit today. I do hope that you have enjoyed the step by step and the finished card. If you do enjoy reading my blog and the things I share then I would love your nomination for best blog in the International Craft Awards,the link is here:
http://www.craftsbeautiful.com/awards/
Take care and Happy Crafting.xx

Saturday, 29 April 2017

When's a Heart Not a Heart

Hi everyone, I hope you're all enjoying your May Day Bank Holiday and the weather is nice, where you are. When is a Heart not a Heart? When it's a tree. This is a project I made for Leonie's One Day Special on Hochanda. I thought it would be a nice idea to come up with a card that used the waste after cutting all of those lovely dies.

To start I cut 2 pieces of card bot measuring 8'' square, one was scrap the other ,my base card. On the scrap piece I cut through the middle with a wobbly line, then on the lower portion I die cut a pattern using the flower sprigs that come in the 'Funky Base Heart' set, this would become my stencil.

I placed the lower stencil onto my base card, while I blended and coloured the sky, using shaded Lilac and Tumbled Glass Distress inks.

Next I took the upper part of my stencil to cover the sky, I used Stick n Spray to position the 'Imagine' stencil for Leonie's collection. Then I added the land using Mowed Lawn and Twisted Citron Distress ink. Finally I replaced the lower stencil and sponged through the pattern with Mowed Lawn.

On a sheet of watercolour card I created a background using Brusho, half of the sheet with Emerald Green, Leaf Green and Yellow. The other half with Light Brown. I spritzed this with water, once dry I cut out the Hearts from the green side and trunk shapes from the brown.

From a previous project, I had kept the waste so I used 3 of these to layer up the watercolour trees.

Using a green alcohol marker, I coloured the white edges.

Using 3D Glue Gel, I added the trunks and tree tops to my card before layering it onto a dark Blue base card made using Centura Pearl.

Thank you for joining me today, sorry for not posting the last couple of day's. my hands have been incredibly bad and so I haven't been able to do anything at all. Take care and Happy Crafting.xx

Sunday, 23 October 2016

With Love

I have really enjoyed pattern building with Leonie's collection as well as using the stamps in conjunction with the masks. They are a hugely useful collection to have in your crafty stash. For this I decided to make a card with just a focal point using one of Leonie's larger stamps. If you did happen to miss any of the shows, Don't forget they will be available via 'Rewind' on Hochanda's website.

To begin with I cut a square of watercolour card measuring 2 1/4'' using a basic die and stamped the 'Pansy' stamp with black Memento ink.

Then using another basic die, I cut another square this time around 3''. I then used the foliage to stamp around the edges with black Memento ink.

I also made myself a card base from the watercolour card giving me a 6'' square card for my finished piece.

Next I took a a sheet of copier paper (cut lengthwise). I placed the first piece about 1/2'' from the score line and the other about 1/2'' away to give me a narrow strip and secured with washi tape. Taking the foliage stamp again, I filled within the strip with Memento black ink.

I used the 'Love' stamp from a previous collection from Leonie, it was from the set of stamps which she launched with the mixed media dies. I stamped this onto my card base below where I would later place my topper.

With a selection of alcohol markers, I coloured in the Pansy and foliage.

I then stamped the butterfly onto watercolour card and coloured them to coordinate with the pansy.

Using foam tape I secured the pansy topper to the foliage square. I then stuck this to my card using Collall Tacky Glue from Crafters Companion. To finish my card, I used Collall 3D glue gel to arrange the butterflies.

Thank you for joining me today, I hope you like what I have made today and the step by step I have shared with you. I hope you will visit again. Take care and happy Crafting.xx