Showing posts with label 3D glue gel. Show all posts

Wednesday, 19 June 2019

Positive Vibes

Hi Everyone, Well it's so hot here today, I can hardly breathe it's so humid as well. So today, I have a really quick and effective card for you. We sometimes need a card in a hurry, that looks great but doesn't take us too long to create. This card still has a lot of texture and interest and would really suit any occasion, depending on the words or sentiment you decide on.

I hope you will join me later this evening for my 'Natter with Nick' at 7 pm. I have another offer for you that will last until Sunday at Midnight so tune in so you don't miss this weeks.

You will need:  
White Stamping Card
Copier Paper Masks (your chosen design)
Versafine Black Ink
Black Card
Tacky Glue
3D Glue Gel

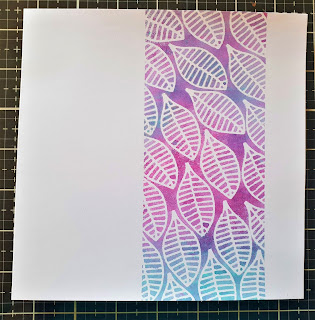
Step 1: Cut your chosen leaves from copier paper to make the masks, spray on the back with Temporary Spray Adhesive and set aside. Take 2 halves of copier paper, use the spray again to secure to your card to form a 3'' strip down your card blank, this will act as a mask. Arrange you leaves all along the strip.

Step 2: Use the Pearlywinks sprays to add that vibrant colour  then remove the masks to reveal the design.

Step 3: Using your Pearlywinks sprays again, colour your small piece of stamping card.

Step 4: Stamps a selection of words from the Retro Stamp Sets and cut out. Mat them onto Black card using Tacky Glue.

Step 5: Use the 3D glue gel to secure your sentiments in Place on the card.

And here is your finished card.

Thank you for joining me today, I hope you have enjoyed the tutorial today. Just another reminder about the Graceful Striplet Die,There are very few left and there are lot of people who have them in their baskets. I don't have enough for each person who has it in the basket, so if you do want it, please check out, I feel like I am going on and on, but I really dont want anyone to miss out and they are going to. 

For now, Take care and Happy Crafting.xxx

Tuesday, 2 October 2018

Howl at the Moon

Morning, I am sharing a themed card today, as it's the 2nd of October. Halloween has now become the third biggest 'Event' for UK retailers, behind Christmas and Easter. The spooky night in October has even overtaken Valentines Day. Until recently this was largely associated with our American cousins, but it has been sweeping Britain over the past few years.

Card and Craft sales have been soaring, so now is the time for all craft enthusiasts to get creating. Here is a card I have made for the special night, a little different from what you would typically find. The design could easily be modified for another occasion by changing the colour and embellishments.

You will need:
Matt Black Cardstock
Sheena Stamping Card
Black Distress Ink
Fossilised Amber Distress Ink
Rusty Hinge Distress Ink
Candied Apple Distress Ink
Clarity Landscape Mask and Stencil
Clarity Letterbox Stamps and Masks
Clarity Wee Houses
Bee Crafty Spooky Tree Stamp
Graphic 45 An Eerie Tale 12x12 Pad (or your choice of pad)
Glue,Scissors and Foam on a roll for assembly.


Cut a piece of Sheena Stamping Card to card to measure 7'' square. This is the same size as the clarity mask.


Using the stencil as a guide, stamp the first 3 letterboxes with black Archival ink and add the mask. *Top tip: Work on a piece of copier paper and mark the halfway point to help position the stamping.


Position the next set of 3 letterboxes either side of the first, these will contain the word 'Halloween' later.


Position the inner part of the landscape mask using Stick n Spray, make sure all of your letterboxes are masked.


With all mask in place blend over the card using your Black Soot Distress ink. Clean and remove your masks.


To add further depth to your piece, stamp a tree in the foreground. Here I have used one of the spooky trees.


Position the moon mask and position your outer mask using Stick n Spray.


Starting with the lightest colour(Fossilised Amber), blend around the moon. Then blend to darker with the Rusty Hinge and then Candied Apple.


Tear a piece of copier paper and place over your work, using the darkest colour along with a little black taken from your craft mat, lightly create your landscape.


Next, create your haunted building, here one of the wee houses from Clarity. Use black Versafine to stamp with. Then colour the house with a dark brown Archival marker, using the same pen make a little fence.


Using a small brush and some water add the smallest amount to the windows and doors, lightly blot to remove the colour, this gives  a glowing appearance. Repeat until you are happy.

From the pad, cut out some pumpkins and a sentiment.


To complete the card, layer your design onto a sheet from the same pad with glue. Using foam tape add this to your black 8x8 card base. Then add the embellishments with 3D glue gel.


I hope you like the finished card along with the Tutorial. Another thing, here is a 30% off voucher to use on your first order from Hochanda, use code FEY5JBP7. Take care and Happy Crafting.

Friday, 21 September 2018

Winter Wishes from the Winter Wonderland Signature Collection

Morning Friends and Crafters. Lovely of you to join me today. I am sharing a card I made for the launch of Sara's Signature Range, 'Winter Wonderland'. It's been a hugely popular collection and I am not at all surprised, as everything within it coordinates beautifully. I love the foil transfers, If you've not used them I would highly recommend them, They're so easy to use and give a really professional look.

You will Need:
Winter Wonderland 6 x 6 Foil Transfers
Winter Wonderland Foils 'Ice Blue'
Winter Wonderland Seasonal Sprigs Die Collection
Winter Wonderland Entwined Holly Embossing Folder
Winter Wonderland A4 Luxury Glitter Card Winter Blue & Sparkling Silver
Matching Ribbon Bow
Basic Circle Die
Basic Square Die
White Stamping Card
Centura Pearl Card Base 8 x 8''

This is a really simple, but effective card. It would be an excellent one to make En mass, which really helps at a time when we all have so much to do.

Step 1: Cut a 7'' square of glitter card and secure it to your  Centura Pearl Card Base.

Step 2: Die cut a matt and layer using 2 adjacent circle dies, approximately 4 1/2'', layer together with Tacky glue.

Step 3: Use the foil & transfers to add a wreath and sentiment to a second smaller circle, about 1'' smaller that the previous one.

Step 4: Emboss a 6 /12'' square of white card, secure it to your base. Add your larger plain circles to the card using foam tape or pads for depth.

Step 5: Next add your sentiment circles, again add these with foam tape or pads. To finish your card, decorate with a selection of foliage and berries cut from both colours of the glitter card, lastly add a matching blue ribbon bow.

Many thanks for joining me today, it's been great to have your company. I do hope you have enjoyed the tutorial along with the finished card that I have shared with you. I do hope you will join me again very soon to see what else I have to share.

If you have time to leave a comment it would be much appreciated, I sometimes wonder if the age of Blogging has passed and whether or not people just prefer pictures on Social media. For now Take care and Happy Crafting.xxx

Monday, 10 September 2018

Have a Merry Christmas

Morning Friends and Crafters, Today I am sharing a card with one of my favourite of the Signature Collections from Sara. I love all of the collections, so I suppose it's very hard to choose really. I loved using the Foils and Foil Transfers, it's the first time I have used them and I was very impressed. They look amazing, give a really professional look but are also so easy to use.

You will Need:
Festive Wishes Die and Stamp Set
Winter Wonderland Foils
Winter Wonderland Foil Transfers
Fluttering Snowflakes Embossing Folder
A4 Luxury Matt Mirror Card Teal
Sheena Wow Clear Embossing Powder 
Versafine Deep Lagoon
Sheena Stamping Card
Centura Pearl White/Silver 6 x 6'', 7 x 7'', 
Centura Pearl Card Base 8 x 8''
Collall Tacky Glue
3D Glue Gel

Step 1: Take your 6 x 6'' card. Cut 'Merry' from the Matt Mirror Card, then position but dont stick it down yet.

Step 2: Wipe your card with Anti Static, stamp ''Have a'' and 'Christmas' with Versafine, coat with embossing powder & heat.


Step 3: Select some snowflake transfers & rub o the foil. Next mat this on to mirror card, leaving a narrow border

Step 4: Emboss your 7 x 7'' card and mount onto the mirror card, Just look at thee fabulous details in the emboss, it's beautiful.

Step 5: Wrap a length of matching ribbon around the front of the card and secure at the back with tape.

Step 6: Mount onto your base card, then add the topper section with Foam tape for extra dimension, this finishes your card.

Thank you so much for taking the time to visit today. I do hope you have enjoyed the tutorial and the finished card I have shared. Please stop by again soon to see hat I will be sharing with you. For now Take care and Happy Crafting.xx


Wednesday, 25 April 2018

Monochrome Mandala

Morning, I hope you are well and have been enjoying the nice weather. The Mozzies are out in force here, so I have been bitten a treat. Getting things sorted with Immigration at the moment, so I am hoping that everything will be sorted by next week and I can get back to posting as normal. Today I thought, I would share a simple but striking way of using the wonderful Henna Easel.

You will need:
'Best Wishes' From the Rose Easel Dies Set
Die'Sire Create a Card Henna Easel Die Set
Matt Black Card 
Centura Pearl White 'Hint of Silver'
Burgundy Double Sided Satin Ribbon

Step 1: Create you base Easel Blank using the dies set with Matt Black Card.

Step 2: Create a mat using the largest die for your topper. Also cut the same using Centura Pearl.

Step 3: Wrap a length of ribbon around your card and secure at the back using double sided tape.

Step 4: From Centura Pearl, use both outer dies to create a slim frame for your base. Then secure with Tacky Glue.

Step 5: Cut your detail into the black topper section. Next place the Centura Pearl behind with the dies still in place, then run through your machine to emboss rather than cut.

Step 6: For the base repeat with the largest detail die to create an accent piece for your base, secure with 3D glue gel.

Step 7: Add a matching bow to finish your card, then add a sentiment in a matching colour.

Thank you so much for taking the time to visit today. I hope you have enjoyed the tutorial and the finished card. I do hope you will continue visiting to see what else I have to share with you. Take care and Happy Crafting.xx

Tuesday, 20 March 2018

Peacock Parade

Oh No!!!! More Snow :-( Like everyone else, I a really fed up with it. They have given out Amber Warnings and are forecasting a major snowstorm on Thursday and Friday here. Maybe 30 odd years ago it would have been exciting, but not now. Anyway, I do hope you are all warm and wherever you are the snow is melting away. Today, I am sharing a card I made with Jungle Dreams from Michelle at MJM Studios. It's a wonderful image to use.

You will need:
Jungle Dreams Collection
Matt Black Card
Watercolour Card
Smooth Card
3D Glue Gel
Tacky Glue
Scissors 

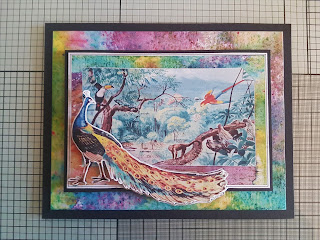
Step 1: Select the image from the disk. Print it out onto smooth card. This one is one of the coloured toppers. Also print and extra peacock and cut out, this will be for the decoupage. I have just done one layer but you could do more.

Step 2: Print out a background, this particular background is a wonderful Brusho background, which particularly suits watercolour card. It really coordinates well with the topper.

Step 3: Mount this onto your black card base. The size will really depend on what size topper you have chosen to print.

Step 4: Cut out your topper and layer it onto black card stock using Collall tacky glue. Layering it onto the same card ties the whole piece together.

Step 5: Secure your mounted topper to the background using Collall 3D glue gel or foam tape for extra dimension.

Step 6: Add some shape to the peacock and layer up with Collall 3D glue gel.

Thank you for popping by today, I hope you have enjoyed the tutorial along with the card I have shared. Would be lovely to see some comments or your feedback. If you have the collection maybe share your experiences or tell us what you have done. Take care and Happy Crafting.xx

Friday, 16 February 2018

Doily Decoupage

Morning everyone. Today, I am sharing a decoupage card I made for the launch of Sara's Vintage Tea Party collection. I've used the pad, which is packed with design all in coordinating colours. I have coupled this with a sentiment and a die from the collection. 

I made sure that when I used the paper around the decoupage elements I was selective, to get the most from the pad, I didn't want to waste a single part.

For this card you will need:
Centura Pearl Ivory card base
Centura Pearl Pink (lights collection)
Centura Pearl Mint (lights collection)
Vintage Doily Die
Tea-riffic Sentiment dies
Paper pad

Step 1: Take your chosen paper, you will need  one full sheet for the base. Take the same design from 2 other sheets, carefully cut out. Cut the sentiment and the Doily from the mint card. Cut the doily in half and secure on the edge of your paper. (see photo)

Step 2: Shape the elements with a ball tool on a foam mat. Layer your decoupage onto the design, using 3D glue gel. Add your sentiment to the centre. Layer this onto your pink Centura Pearl with Tacky glue, then mount onto your card base.

Many thanks for taking the time to visit today. I hope you have enjoyed the short tutorial I have shared for this card. It really is a lovely way of showing off the designs from the paper pads.

Later today I have got the 3rd part of my flower embellishment series on the Hochanda Blog. Today I am sharing roses using clay. I do hope you will take a look and hopefully add your comments. I would like to make the Flower Embellishment's a monthly feature, but without the support to show that it's popular, it might not happen. 

Thank you so much. For now, Take care and Happy Crafting.xx