Showing posts with label Retro Vibes. Show all posts

Friday, 12 July 2019

Have a Groovy Birthday

Hi everyone. At last things to seem to have cooled down a little. A lovely day, wonderful sunshine and much more comfortable as well. How about a great birthday card for today's post made with some of the Retro Collection. This would be great for a teenager, a bloke, well actually anyone really, a really fun card, looks totally different with other colours or embellishments. This one also uses the small set of rose petals to add the balloons.

You Will Need:
White Card Blank 5 1/2 x 7 3/4
Archival Forget Me Not
Archival Sunset
Versafine Black Ink
Black Fine Liner
Copic Alcohol Markers (Blue, Red & Yellow)
Glossy Accents
3D Glue Gel

Step 1: Use the single frames and solids to position and stamp onto your card blank. Start with the solid colour, then add the frames and words.

Step 2: Cut 3 of the rose petal dies, each in a different size, Colour with your alcohol markers.

Step 3: Stamp another of the large solids with the Archival, Then stamp 'Birthday'. Cut out and mount onto some Black Card.

Stamp 4:  Use 3D Glue Gel to position and add the last sentiment and the balloons. Use a black fine liner to add a wobbly line around the card, approximately 1/4'' in from the edge. The use the fine liner to add some strings to the balloons. To finish the card, add some glossy accents to the balloons to add a lovely gloss.

Thank you for joining me today. I hope you've enjoyed this tutorial and the finished card. It's been great for you to join me. I hope you will stop by again very soon.xx


Friday, 21 June 2019

Way Out!!!

Morning Friends and Crafters. Fancy a little bit of fun with some vibrant colours and some straws? Well that's just what I have been doing, with the background for this mutlicoloured banner. This is a real statement die, great for any occasions and all types of crafting, from card making, journalling and scrapbooking and lots more. It's a great addition to your crafty stash and also makes a great card for a bloke.

I have managed to get a little bit of stock back on my Etsy Store, I am still trying to get the Stamp version of the 'Retro Banner' back in stock and will let you know if it's possible.

You will need:
Selection of Brusho
Mat Black Cardstock 7 1/4 x 7 1/4''
White Stamping Card 7 x 7''
Mat Black Cardstock to cut the Banner
Coloured Card (A real Scrapbuster)
Tacky Glue and 3D Glue Gel

Step 1: Take 4 colours of Brusho, totally your choice. Premix them with a little water. Drop the first colour onto the card and blow out towards the edge of the card. Repeat this with your other colours to give a wonderfully vibrant background.

Step 2: Cut out the Retro Banner 3 times in black card from gutting. You need to whole banners and a section of 2. ****TOP TIP**** Don't use your pokey tool, tap the die firmly cutting side up on a surface to release on it's own, It does release and doesn't distort your die cut.

Step 3: Mount your vibrant background onto your base card, You can easily gut this card before sticking it down and use it on another project. 

Step 4: On your white card secure the banner die cuts to form a circular shape. Use coloured card to paper piece the banners.***TOP TIP***** This is a great way to use all of your scrap card pieces, I know we all have them.

Step 5: Back this piece onto your black card and make sure you have gutted it. You could easily position your banner die and use it latter for another card or project.

Step 6: Select a sentiment for your card. When I finished the background, I used the rest of the premixed Brusho to colour some scraps using the straws as well, these come in really handy for sentiments or smaller projects and we dont like to waste the colours. Here are two variations, but you could use any sentiment to suite the project.

Well, thats a really fun card to make, the explosion of colour with the banner would look fantastic in a journal or scrapbook, it really does make a statement. So versatile, how about printing thumbnails of photos and putting them in the blocks. Whatever you make or decide to do with your Banner I do hope you will share your Creations. Look forward to my next Back to Basics with Craftascope Show, dont forget if you have any ideas or anything you would like to see, please add it to the comments section under the videos, it makes it easier for me if they are all in one place. For now Take care and Happy Crafting.xx

Wednesday, 19 June 2019

Positive Vibes

Hi Everyone, Well it's so hot here today, I can hardly breathe it's so humid as well. So today, I have a really quick and effective card for you. We sometimes need a card in a hurry, that looks great but doesn't take us too long to create. This card still has a lot of texture and interest and would really suit any occasion, depending on the words or sentiment you decide on.

I hope you will join me later this evening for my 'Natter with Nick' at 7 pm. I have another offer for you that will last until Sunday at Midnight so tune in so you don't miss this weeks.

You will need:  
White Stamping Card
Copier Paper Masks (your chosen design)
Versafine Black Ink
Black Card
Tacky Glue
3D Glue Gel

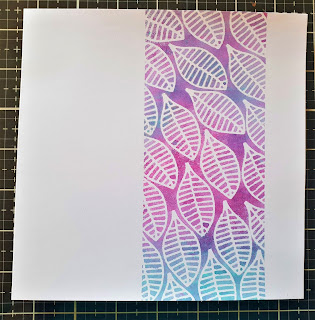
Step 1: Cut your chosen leaves from copier paper to make the masks, spray on the back with Temporary Spray Adhesive and set aside. Take 2 halves of copier paper, use the spray again to secure to your card to form a 3'' strip down your card blank, this will act as a mask. Arrange you leaves all along the strip.

Step 2: Use the Pearlywinks sprays to add that vibrant colour  then remove the masks to reveal the design.

Step 3: Using your Pearlywinks sprays again, colour your small piece of stamping card.

Step 4: Stamps a selection of words from the Retro Stamp Sets and cut out. Mat them onto Black card using Tacky Glue.

Step 5: Use the 3D glue gel to secure your sentiments in Place on the card.

And here is your finished card.

Thank you for joining me today, I hope you have enjoyed the tutorial today. Just another reminder about the Graceful Striplet Die,There are very few left and there are lot of people who have them in their baskets. I don't have enough for each person who has it in the basket, so if you do want it, please check out, I feel like I am going on and on, but I really dont want anyone to miss out and they are going to. 

For now, Take care and Happy Crafting.xxx