Sunday, 2 December 2018

Dreams Come True at Christmas

Morning, I know some of you are making your Christmas Cards by now and a lot of you have probably done them all. Here is a Christmas card I have made using Leonie Pujol's collection of stamps and dies.I am sure you have seen them, there are some beautiful Entwining Dies along with her famous coordinating stamp sets. The collection works well on it's own to achieve a myriad of special designs, or alternatively used with anything you already have in your collection.

The finished card measures 8 x 7''. To start, I cut out 3 identical rectangles from burgundy Silk Art card. I used the outer cutting edge from one of Sue Wilson's mini striplets, it measures 1 3/4 x 5 3/4'' approximately.

Next from gold Silk Art card I used 'Frost' from the 'Entwined Christmas Tree' set, I cut 6 of these.

I arranged them onto my rectangles to create the backdrop and to add interest. I wanted to use the dies in a completely different way to what they were made for. I stuck these into place using Cosmic Shimmer Glue, then trimmed off the excess from behind.

Next, Taking piece of burgundy card and using a Versamark Ink Pad, I stamped a cartouche from Leonie's coordinating stamps. I also positioned one of the sentiments inside and embossed using burnished gold fine detail embossing powder.

To create my card base I took a sheet of burgundy card measuring 7 1/2 x 6 1/2 and layered this onto a sheet of burnished gold card and left a small boarder around the edge.

I then positioned my decorated rectangles onto the card, secured them with foam tape and 3D glue gel to raise them from the base. I cut the corners of my sentiment with an inverted corner punch and backed with gold card to match.


On a sheet of Super Smooth card, I stamped some of the coordinating stamps, some holly, berries and pine sprigs.

I coloured these using Mowed Lawn and Fired Brick Distress ink and then cut them out with scissors.

I shaped the greenery and berries on a foam mat with a ball tool, then arranged them onto the card and secured with 3D glue gel. Finally to complete the look, I added a gold satin bow, again securing it with 3D glue gel.

Thank you ever so much for taking the time to visit, I do hope you have enjoyed the tutorial and the finished card. 

My collection is still available at a wonderful offer price on Hochanda with Freedom Discount and Flexi Buy on the full collection. HOCHANDA LINK. There isn't a lot left, I doubt I can order any more either due to the minimum order amounts so please be quick. I also have the collection available at my CRAFTASCOPE ETSY SHOP.

If you did miss my very first Hochanda show and the launch of my collection, it is still available on Rewind, via the Hochanda Website, it was last aired on Tuesday 20th November so please be quick.


Another thing, here is a 30% off voucher to use on your first order (anything) from Hochanda, use code FEY5JBP7.

Take care and Happy Crafting.

Saturday, 1 December 2018

The 3 Boys Together

Morning Friends and Crafters. Today I thought I would share a very special page with you all. It's the very first project I made when I my final prototypes arrived, even before the stamps had been delivered. For this page I decided to use the beautiful Typography range from Leonie. I love this font and it was just the right size for this project. Iv'e used all of the front facing stencils so it's 'Three Boys Together.

You will Need:
HB Pencil
6B Pencil
Pergamano Blending Tool
Smoothies
Greasproof Paper or Similar for a Mask
Distress Inks Mermaid Lagoon and Seedless Preserves
IndigoBlu Banana Custard
A3 Watercolour Card or Good Quality A3 White card.
Stencils
Bubble Wrap
Stick n Spray

Step 1: Work out where you want your faces to be positioned. I did the front to first and then added 'Bailey' Behind. For this one I have used all of the outside lines of the stencils. Remove the stencils and roughly go over the lines with the 6B pencil, before adding your shading with the Pergamano Blending tool. I hope to share a video with you very shortly, but for now pleased refer to my show demo. This is still on Hochanda via rewind as it was repeated on Tuesday 20th November (CLICK HERE FOR THE SHOW).

Step 2: Cut out the required letter for your sentiment or heading, here I have used Leonie's wonderful Typography collection. I positioned them to make sure they would fit, these were all cut from black card.

Step 3: Use Greasproof paper or similar to make a mask to protect your drawings while adding your background. First I took Mermaid Lagoon Distress Ink and applied to the project by pouncing the colour with a heavy and lighter pressure to get the different sizes of circle. I also used the first and second generation colour to give shade.

Step 4: Next I repeated the process with Seedless Preserves. To add more texture, I added Banana Custard Acrylic paint through a stencil. I would have continued and used the Bubble wrap as well but I didn't want to detract to much from the boys.  I cut out the letters again in yellow to bring out the stenciling, securing them to the black letters for more depth. Finally securing them to the project with Tacky glue.

It's been such a wonderful journey for me from the first marks on my paper to originally design my collection to this first project, then to the show. But the most rewarding thing for me has been the projects I have seen created with my collection and the wonderful comments that I have received since. This is just something that money cant buy and I am really touched, so thank you to you all for making it such an amazing experience. 

My collection is still available via my Craftascope Etsy Shop or from Hochanda, while stock is still available. If you dont have it already I do hope you will have a go.

Many thanks for joining me today, I do hope you have enjoyed this tutorial and the finished project. For now Take care and Happy Crafting.xxx


Friday, 30 November 2018

Grace

Morning Friends and Crafters. Today I am sharing a card that is just perfect for Batch making. Great for making for charities and fund raisers as well as raising funds for yourself too. These would wonderful boxed as a set, maybe a selection make in different colours. They make wonderful Thank You cards and as mentioned, changing the look is as easy as changing the colour strip. This uses just a few stamps from Sara's wonderful Enchanted Forest range along with a stamp from my collection and just 3 Distress Oxides. I hope you enjoy the tutorial.

You will Need:
Enchanted Forest 'Dandelion' Die and Stamp Collection
Enchanted Forest Peg Stamps
Distress Oxides: Candied Apple, Squeezed Lemonade and Blueprint Sketch
Copier Paper
Stick n Spray
Versafine Black Ink Pad
White Stamping Card 8 x 6'' Approx
Mat Black Card 8 1/4 x 6 1/4'' Approx
Centura Pearl Card Base Silver/White 8 1/2 x 6 1/2

Step 1: Tear your paper to give you a slightly wobbly line. Secure to your card using a little Stick n Spray.

Step 2: Use the oxides to apply the colours either side of your card first, then add the center colour overlapping the one either side to give a nice blend. Remove the copier paper mask and then remove any excess adhesive with a piece of kitchen roll.

Step 3: Position and stamp the large 'Grace' stamp with the black ink. It has a really nice open text, that really lets the colour shine through, tying it together with the background. Next stamp your beautiful dandelions, elongating the centre stem. To do this mask off the dandelion with copier paper, all but the lower part of the stem, ink up your stamp and join it at the base. Add the little seed heads, blowing in the wind, make sure to stamp some off the page.

Step 4: Measure your black matt to make sure it leaves a narrow border around you topper, dont secure just yet.

Step 5: Gut this layer using any of your dies, not only does this save a lot of card, it reduces waste and postage, saves money and can be used for another project.

Step 6: Layer this onto your base card with tacky glue.

Step 7: Add your 'Grace' Topper to your card, it makes a beautiful card for any occasion, there are plenty more wonderful and uplifting words and phrases in my collection. See my live show link below.

My collection is still available at a wonderful offer price on Hochanda with Freedom Discount and Flexi Buy on the full collection. HOCHANDA LINK. I also have the collection available at my CRAFTASCOPE ETSY SHOP.

If you did miss my very first Hochanda show and the launch of my collection, it is still available on Rewind, via the Hochanda Website, it was last aired on Tuesday 20th November so please be quick.


Just a little extra here: If you have not shopped with Hochanda before, here is a voucher code giving you 30% off your first purchase (FEY5JBP7) it can be used for any purchase, feel free to share it.

Thank you ever so much for popping by today, I do hope you enjoyed the tutorial along with the finished card. I hope you will stop by again to see what else I have to share. For now Take care and Happy Crafting.xxx

Thursday, 29 November 2018

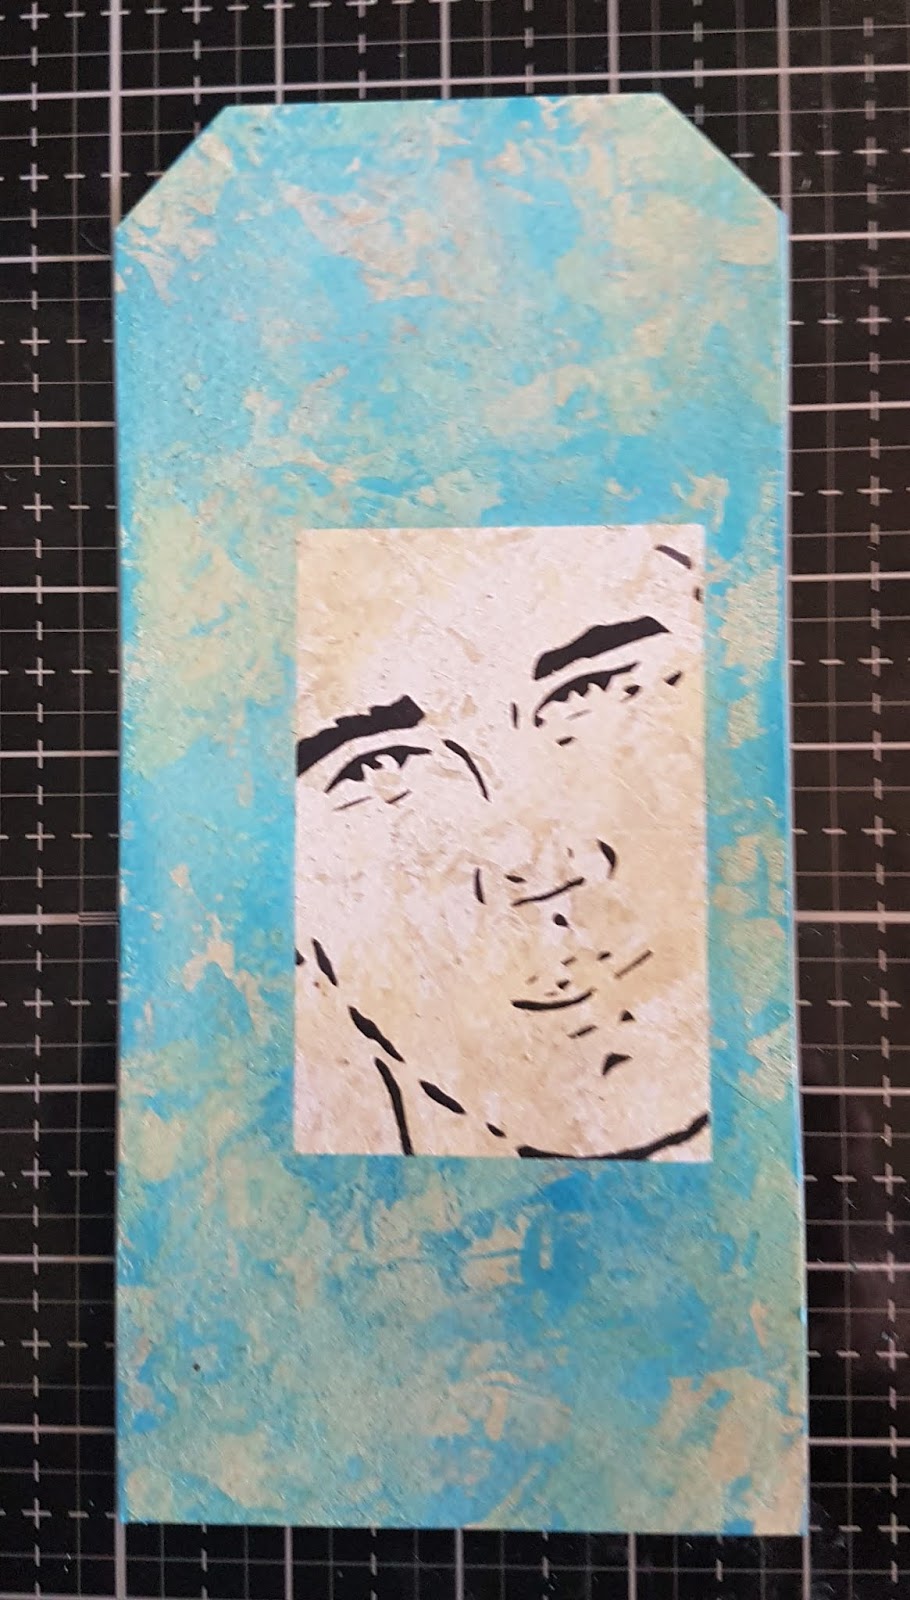
Tough Tag

Morning Friends and Crafters. I had such a wonderful time at Hochanda. It was such a great show, Matt made me feel as relaxed as possible. The whole team at Hochanda made me feel right at home, very welcome and did everything they could to make it perfect. The set was staged to perfection, I met 'Magic Hands' in real life, I didn't even know they were attached to a person,lol Today, I thought I would share a tutorial for one of the show demos.

You will Need: 
Craftascope 'Trent' A5 Media Stencil
Craftascope 'Profile' A5 Media Stamp Collection 2
Eco Green Acrylic Paint Mulch and Clamshell or Similar  (Cream and Beige)
Brayer
Glass Mat or Gel Printing Plate 8 x 10''
8 x 4'' Tag
Crafters Companion Spray n Shine
Basic Rectangle Die (Approx 4 x 3'')
Mermaid Lagoon Distress Ink
Versafine Black Ink
Black Fine Liner
White Gel or Posca Pen
Black Card

Step 1: Create the background. Use a Brayer to spread a little of one colour onto your matt or plate. Scrunch up some copier paper and remove some of the colour to create a pattern. The add your tag face down and smooth the back, peel away to lift the print. Do this with your second colour, you really dont need much paint for this at all, leave to dry. Cut your rectangle from copier paper, keep both parts. Spray with a little Stick n Spray and position onto your tag.

Step 2: Use a smoothie or similar to add the Distress Ink  all over the tag. The colour will highlight the texture from the acrylic resist. Rub over with a clean cloth or kitchen roll to remove any excess ink.

Step 3: Carefully position the outer rectangle and remove the inner. Next position the stencil and ink through with the black ink. Leave this to dry for 10 to 15 minutes to avoid any smudges.

Step 4: Remove the stencil to reveal.

Step 5: Remove the outer rectangle, make sure its dry, then remove any excess adhesive with a kitchen roll or similar.

Step 6: Use your black fine liner to add a deckled edge around the rectangle, highlighting the image.

Step 7: Mount your tag onto Black card, Stamp your words onto white card and cut them out individually. Rather than mount these, take your black and white pens and add some detail around them. The tag is now complete, it's great on it's own but would also look great added to a card or other project.

If you would like to get your hands of the last few of my collection they are only available at Hochanda or via my Etsy site, a link is at the top of my blog (CRAFTSCOPE ETSY SHOP).

Just a little extra here: If you have not shopped with Hochanda before, here is a voucher code giving you 30% off your first purchase (FEY5JBP7) it can be used for any purchase, feel free to share it.

Thank you ever so much for joining me today. I do hope you have enjoyed the tutorial along with the finished project I have shared. I hope you will join me again very soon to see what else I have to share. For now Take care and Happy Crafting.xxx


Wednesday, 28 November 2018

Mica Face

Morning Friends and Crafters, so pleased you are joining me again today. I thought I would share something easy, but really striking and effective. It would make a really fun card for a guy or any occasion really, depending on what you add or the sentiment you choose.For the background layer I have used the script stamp from Leonie, it's an amazing stamp to create backgrounds or add texture, interest or dimension to any project, it's out in my craft room constantly.

You will Need:
Selection of Mica Powders
Versamark Ink Pad
Anti Static Pad
Soft Brush
Crafters Companion 'Spray n Shine'
Black Gloss Card
Purple Centura Pearl card
White Card
Black Card Base
Collall Tacky Glue
Collall 3D Glue Gel

Step 1: Wipe over your card with the anti static bag, position your stencil and ink through with the Versamark ink pad.

Step 2: Remove the stencil and sprinkle your chosen colours of mica.

Step 3: Use a very soft brush to remove the excess powder and lightly polish the card with the brush. Spray a very light mist of the Spray n Shine to set the mice in place.

Step 4: Repeat the process, this time using the script stamp to create your next layer. Mount your design onto the script background then onto the purple layer before adding it to your card base. Don't forget to gut your card layers with a basic die to save weight and card for other projects.

Step 5:On another piece of gloss card, stamp your sentiment as before and coat with the mica. Brush away the excess and polish with the soft brush, Once again spray with the Spray n Shine. Trim each of the words and mount them onto white card with Tacky Glue.

Step 6: Use 3D Glue Gel to position and secure the words in place on your finished card.


I do hope you have enjoyed the tutorial today and the finished project. I hope to see you here very soon to see what else I have to share with you. Don't forget to visit my Etsy shop if you would like any of the items from my collection, the link is at the top of the blog page. For now Take care and Happy Crafting.xxx


Tuesday, 27 November 2018

The real Facebook Live Video

Hi Friends and Crafters. I have now got a copy of the real Facebook live video, that I did before my first Hochanda show on the 1st November 2018. Just a little preview of a small selection of the samples I made for the launch of very my first collection.

It was repeated a few times and most recently on Tuesday 20th November so it is still available on Rewind via the Hochanda Website.


My collection is only available on my Craftascope Etsy Shop and on the Hochanda Craftascope Shop. Do take a look if you would like any of the range, while stock is still available. Take care and Happy Crafting.xx

Media Canvas

Morning Friends and Crafters, I will be sharing a few more posts with you this week and then I will be having a break for a little while. So today I m sharing a media canvas that I made using one of my A5 Media Stencils,here I have used 'Bailey'. I hope you enjoy the tutorial.

You will need:
Selection of Daler Rowney System 3 Acrylics
Amsterdam Acrylics (They go a long way)
Canvas Board 8 x 8
White Gesso
Black Fine Liner 1.0
HB Pencil
Selection of Acrylic Brushes
Palette Knife

Step 1: Mix some of the Blue Acrylic with some white Gesso to thin it, use this to prime your canvas board. Use the fine liner and stencil to add the face to your canvas. This is just a guide at the moment. (dont forget you only need one edge to make the face no the full shape) choosing either the inside, outside or mixture of the lines with give you a different look. Stat building up your colours and textures, This project is all about layering, which will show through to give you the depth.

Step 2: Next start adding you lighter blues, whites and more of the warmer tones for the face. Maybe add some splatters as well, I find these are easiest with a fan brush, always wash it out straight away. Leave this to dry before replacing the stencil and roughly adding the details with an HB pencil. Again this is mainly a guide for you.

Step 3:  Continue adding more depth and texture to the background, start adding shadowing and shaping the face, you might prefer to use a finger or brush for this. Use a small brush to add some definition to the features. The lips are best not so defined as it can make them look unnatural but we can subdue them later.

Step 4: Now add more dimension to the face, bringing in even more of the warmer tones to add the illusion of the facial curves. Use deeper tones of the cooler colours to add shadows under the jawline and chin.

Step 5: Now it's just a case of fine tuning until you re happy with the result, Start dulling won the lips to blend them in more. Oncce again, dont forget it's not finished until you are happy with it. You can always add more to it, it's your artwork and creation, this is not a portrait, but your expression of one.

I hope you have enjoyed the tutorial I have shared with you today, along with the finished project. I do hope you will have  ago yourself, especially if it's something you've not tried before, it's all about having fun, dont forget.

Please take a look at my Etsy shop, the link is at the top of my blog. If you do want anything I will only be sending out until the end of  the week unless I can arrange something, if not the shop will close until my return. For now Take care and Happy Crafting.xxx