Morning Friends and Crafters, the project I am sharing with you today is all about layering, it was really fun to do. Lots of stamping with all sorts of items, adding texture and lots of different layers to give the pages a real feel of dimension. The Funky Tree from Leonie makes another appearance as do some of the other stamps from her collections, as well as some statement stamps from AllandCreate. There's lots of colour used in this one from Indigoblu, Amsterdam Acrylics & Eco Green.
You will need:
AALL&Create stamp selection
Leonie Pujol Stamps Selection, including Funky Tree.
Selection of Texture Stamps
Eco Green Acrylics
Amsterdam Acrylics
Indigoblu Acrylics
Gelly Roll Pens
Friendly Plastic
Pebeo Silver Gilding Wax
Selection of Rice Papers
Versafine Black Ink
Small, Medium and Large Bubble Wrap
Selection of lids (Different Sizes)
Brayer
White & Black Gesso
Round Epiphany Tool and Acrylic Cap or glossy accents
Step 1: HAVE FUN!!! Choose a selection of colours you like, here I've used Eco Acrylics in Blueberry, Mulberry, Light Blue and White. Add blobs across the pages and using an old store card or card, fingers or some sort of spreading tool, create swirls, spread out to make lovely patterns. On your glass mat, mix Blueberry with a little amount of black to deepen the colour. Dip your lids in this to create a series of circles around your pages in different sizes. Use a brush to give an edge to your page coming in from the edges in a sweeping motion to create some sort of frames project, (See Photo)
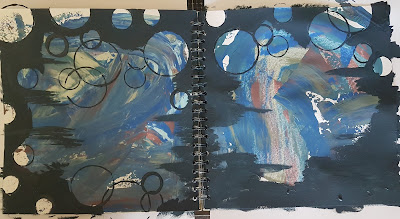
Step 2: Using the same colour as used for the background, now stamp with some texture stamps to add more depth. Take a contrasting colour and a brush to add a rough panel and some crosses or marks on your pages, this keeps the pages united. Deepen the colour a little either using some of the deeper Amsterdam Acrylic Green or a black and soften the lines a little. Don't worry if you go over some of the circles.
Step 3: Add some Indigoblu Townhouse Teal, which really contrasts with the lime green. Use this with the texture stamps as well, to really add to those layers.
Step 4: Take some medium Bubble wrap with the mulberry and blueberry, use a brayer to smooth colour onto the wrap and stamp on your pages one colour at a time. Use the 2nd generation of paint to to really let the underneath show through.
Step 5: Use the small bubble wrap now, in the same way as before but this time with the lighter blue.
Step 6: Take a stencil with even smaller circles and to add a touch of brightness and drama use the oranges from the Amsterdam Acrylics, they really let the background come through but give a lovely look too and give the pages a kick.
Step 7: Now for adding even more interest and layers to the page, this time with some rice paper, This still allows the background to show through slightly too which is great for more depth. Once dry use the bubble wrap and the same colors as before to soften and blend the edges.
Step 8: Next for some stamping, once the last layer is dry of course. Choose a selection that you like, here I have used allandcreate on both pages as a focal image and as a page edger along with some of Leonie's stamps, you really want to arrange your stamped images to draw the eye in and keep it on the page to see and take in all the details, rather than wonder off.
Step 9: Now fill most of the circles with white Gesso, this will make the colours in them pop more later and seem more vibrant. Leave a few that show off the wonderful background patterns made earlier. A little bit like windows.
Step 10: Try to use colours that you have used before to fill the circles, this keeps the page unified and stops it jarring. Once these are dry add some of the inspirational words and phrases, make up your own too by mixing the stamps, like I have here and shortening them for a totally different word. I've used Leonie's scribbled circles stamped on the page and coloured with gelly roll pens. I have stamped into friendly plastic with words and rubbed them over with silver gilding wax. Use a white gel pen to add detail around some of the circles. Finally when dry add 'Trent', position the stencil and ink through with Versafine Black ink.
Step 11: On a separate piece of card use your brayer and a couple of colours used in the pages to make a background.
Step 12: Stamp one of the small sentiments onto it and use the Epiphany tool and resin cap to make the cabochon. You could do this with a basic die and add glossy accents if you dont have the tool.
Step 13: Add this resin piece to one of the smaller circles on your page. In another stamp the profile stamp a couple of times. Use some inspiring words in some and some part stencils in some others, again to keep the pages unified and harmonious.
Step 14: To finish your piece add some highlights to your pages using a white gel pen.
Just a little extra here: If you have not shopped with Hochanda before, here is a voucher code giving you 30% off your first purchase (FEY5JBP7) it can be used for any purchase, feel free to share it.
My Collection is still available from Hochanda and they have kept the generous discounts and Flexi but I know there isn't a great deal left. I doubt I can restock due to minimums orders.
It is also available on my Craftascope Etsy Shop, while there is stock available after my Hochanda Show.
As you know I love writing my blog and helping as much as I can, well I would really love for you to add you support by adding me as a favourite blog. All you need to do in that section is choose other and add my blog address nickinbarnsley.blogspot It would be great to get a mention even if I dont come anywhere.
Here is the link to add your support for all of the categories.
https://www.britishcraftawards.com/
I do hope you have enjoyed the tutorial along with the finished pages I have shared with you today, Maybe you will have a go yourself, It would be great to see what you do with my collection. I hope you will pop by soon to see what I have to share with you. For now Take care and Happy Crafting.xxx


