Monday 10 December 2018

My Top 10 Posts of 2018

Hi Friends and Crafty Buddies, Hope you are all well and filled with the Christmas Spirit. It wont be long now, until Father Christmas visits us all. Well it's been very difficult to choose my top 10 from all the posts I have shared this year, but I have now, so here are my choices. I am really looking forward to seeing the choices you have all made. If you haven't already, do choose 5 from 2018 and enter them on the Giveaway post and you could be the lucky person to receive a crafty Goody Bag and a project from me too. Good Luck. I have not put these in any order really as I think that would be far to difficult.

If you click on the name of  card/ project it will take you to the full tutorial:

At Number 1: Fairy House


No 3: Faces


My collection is still available at a wonderful offer price on Hochanda with Freedom Discount and Flexi Buy on the full collection. HOCHANDA LINK. There isn't a lot left, I doubt I can order any more either due to the minimum order amounts so please be quick. I also have the collection available at my CRAFTASCOPE ETSY SHOP.

Another thing, here is a 30% off voucher to use on your first order (anything) from Hochanda, use code FEY5JBP7.
\
Thanks for taking a look at my top 10 for 2018, I am sure everyone's choices will be different and it will be so exciting to take a look at them. I will try and speak to you before the big day but if I don't, I wish you all have the Most Wonderful Christmas and all the best for 2019. Take care and Happy Christmas.xx

Friday 7 December 2018

Top 10 Most viewed Posts of 2018 & A Prize Draw

Hello to all My Friends and Crafting Buddies. Here is a post for you today and a little prize draw to fill us with the Christmas Spirit. So anyway I thought it would be a nice to get you all involved, so I am running this as a little bit of fun, Details at the bottom of the post. But first the top viewed posts of 2018, with links to the original Tutorial posts.


No 4: Grace


In the next week or so I will be adding my personal top 10 posts from this year. It's been a wonderful year of crafting and I think you all for taking the time to join me on the journey. I have to say,I am really chuffed that one of the cards in the most viewed is using my own collection, so thank you for that as well.

All you have to do to be in the draw is add your comment below, listing your top 5 projects from all of my posts this year. Not just from those above, the list above is the top 10 most viewed posts.

It is totally your choice, there are no right or wrong choices. I will then draw a name from all the entries on December 31st. The lucky person will receive a craft goody bag from me, along with a hand made project by me, made especially. This will be sent to the winner as soon as I return home. If you can's comment on this blog then feel free to add your list on the original Facebook post to be included. Please feel free to share with friends for their chance to win.

Take care and Happy Crafting.xxx


Thursday 6 December 2018

Almost Invisable

Morning Friends and Crafters, This will be my last blog post for a little while, I am having a little break and hope to join you again very soon. If I do have the opportunity to share any crafty news then of course I will. Today I am going to share a journal page I made for the launch of my Collection last month. It's a great page as it is but also gives you a wonderful opportunity to add to it later, with embellishments, journalling or decorating any way you choose.

You will Need:
Old Dictionary Pages
Creative Expressions Mat n Seal Decoupage Glue
Clear Texture Paste
White Card for the Sentiment
Distress Ink Pad Black Soot
Pink Pig Journal 11 x 11 (White Paper)
Brayer

Step 1: Select some old dictionary pages, all the better is they have images on them as well as these add so much interest and depth to your page. Use the decoupage glue to secure them to your journal page. If they have aged and yellowing pages all the better and try to keep some of this.

Step 2:  Use a brush, a very small amount of white Gesso and a touch of water. You dont want to obliterate all of the colour and detail, just build layers.

Step 3: Use your Brayer to add the first light layer of Bonfire, it really doesn't take long to dry, then repeat with the Townhouse Teal, which really contrasts well. Build up a couple of layers like this, again dont be too heavy with it, You might want to add a little white if you do happen to add too much colour. Finish with a layer of the bonfire, but use very little paint. This all adds to the depth and texture of your project.

Step 4: With a palette knife to mix a little Townhouse Teal into your clear texture paste. You want the stenciled image to show but not jump off the page at you. Using the same colour in your paste blends it while adding more texture to your page.

Step 5: As the paste dries you will see the image shows much more.


Step 6: On some separate card add a little of the same colours, you can apply it with some scrunched copier paper or similar to give you some texture and tie it in with your page. When dry, stamp your sentiment in place with Versafine Black Ink, Then add a little Black Soot Distress Ink around the edges to make it stand off the page. Secure the sentiment to your page with some Tacky glue or for a little more dimension use the 3D glue gel.

Thank you ever so much for joining me today, and for following my recent Hochanda Journey, which I never thought would ever happen. It's been an amazing experience for me. I would like to thank each and every one of you, who bought the collection. I really hope you are having fun with them. I really would love to see your creations, so pleased o share them in the 'Craftascope Facebook group and pleased leave a review on Hochanda so others can see what you think.

If you would like to get your hands of the last few of my collection they are only available at Hochanda or via my Etsy site, a link is at the top of my blog (CRAFTSCOPE ETSY SHOP).

Just a little extra here: If you have not shopped with Hochanda before, here is a voucher code giving you 30% off your first purchase (FEY5JBP7) it can be used for any purchase, feel free to share it.

I hope you all have the most amazing Christmas with Family or Friends, however you will be spending it. Thats all from me now unless by some chance I do have the opportunity to share something with you. So for now Take care and Happy Crafting. Have fun!!!!


Wednesday 5 December 2018

Dolphin Tangle

Morning everyone, something a little different again today, using the Dolphin Stamps from my collection. I have used them with the wonderful pattern stamps from Leonie to fill them with patterns and create the frame, giving the look of a tangle. I designed my stamps to have the open spaces to allow more ways for them to be used. You can either fill these with stamps or take the time to make your own wonderful Zentangle patterns. I have left this monochrome, but you could easily add colour for a totally different feel to your card.

You will Need:
The 'First Collection' From Leonie
Black Versafine Ink Pad
Black Fine Liner
Copier Paper for Masking 
Low Tack or Washi Tape
Ruler
White Card
Black Card Base

Step 1: First stamp your dolphins  and sentiment in position on your card. Then use a ruler and fine liner to draw a frame around your images.

Step 2: Use copier paper and/or washi tape to mask the frame, then use one of Leonie's stamps to fill the frame you have made.

Step 3: Next use a selection of stamps to fill the various parts of the dolphins. You can easily make a mask by stamping the same dolphins onto copier paper and cutting them out. You can do the same for the inner sections to allow you to stamp within the design. If you tangle by hand, then the masking is not needed.

Step 4: Mount your card onto a black card base with Tacky glue to give you the finished card.

If you would like to get your hands of the last few of my collection they are only available at Hochanda or via my Etsy site, a link is at the top of my blog (CRAFTSCOPE ETSY SHOP).

Just a little extra here: If you have not shopped with Hochanda before, here is a voucher code giving you 30% off your first purchase (FEY5JBP7) it can be used for any purchase, feel free to share it.

Thank you ever so much for stopping by today. I hope you have enjoyed the tutorial along with the finished card. Do stop by again to see what else I have to share. For now Take care and Happy Crafting.xxx


Tuesday 4 December 2018

Double Mixed Media Journal page

Morning Friends and Crafters, the project I am sharing with you today is all about layering, it was really fun to do. Lots of stamping with all sorts of items, adding texture and lots of different layers to give the pages a real feel of dimension. The Funky Tree from Leonie makes another appearance as do some of the other stamps from her collections, as well as some statement stamps from AllandCreate. There's lots of colour used in this one from Indigoblu, Amsterdam Acrylics & Eco Green.

You will need: 
AALL&Create stamp selection
Leonie Pujol Stamps Selection, including Funky Tree.
Selection of Texture Stamps
Eco Green Acrylics
Amsterdam Acrylics
Indigoblu Acrylics
Gelly Roll Pens
Friendly Plastic
Pebeo Silver Gilding Wax
Selection of Rice Papers
Versafine Black Ink
Small, Medium and Large Bubble Wrap
Selection of lids (Different Sizes)
Brayer
White & Black Gesso
Round Epiphany Tool and Acrylic Cap or glossy accents

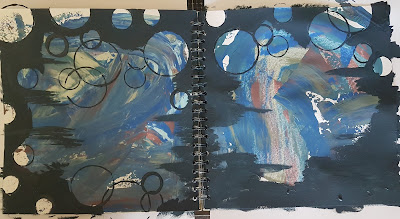
Step 1: HAVE FUN!!! Choose a selection of colours you like, here I've used Eco Acrylics in Blueberry, Mulberry, Light Blue and White. Add blobs across the pages and using an old store card or card, fingers or some sort of spreading tool, create swirls, spread out to make lovely patterns. On your glass mat, mix Blueberry with a little amount of black to deepen the colour. Dip your lids in this to create a series of circles around your pages in different sizes. Use a brush to give an edge to your page coming in from the edges in a sweeping motion to create some sort of frames project, (See Photo)

Step 2: Using the same colour as used for the background, now stamp with some texture stamps to add more depth. Take a contrasting colour and a brush to add a rough panel and some crosses or marks on your pages, this keeps the pages united. Deepen the colour a little either using some of the deeper Amsterdam Acrylic Green or a black and soften the lines a little. Don't worry if you go over some of the circles.

Step 3: Add some Indigoblu Townhouse Teal, which really contrasts with the lime green. Use this with the texture stamps as well, to really add to those layers.

Step 4: Take some medium Bubble wrap with the mulberry and blueberry, use a brayer to smooth colour onto the wrap and stamp on your pages one colour at a time. Use the 2nd generation of paint to to really let the underneath show through.

Step 5: Use the small bubble wrap now, in the same way as before but this time with the lighter blue.

Step 6: Take a stencil with even smaller circles and to add a touch of brightness and drama use the oranges from the Amsterdam Acrylics, they really let the background come through but give a lovely look too and give the pages a kick.

Step 7: Now for adding even more interest and layers to the page, this time with some rice paper, This still allows the background to show through slightly too which is great for more depth. Once dry use the bubble wrap and the same colors as before to soften and blend the edges.

Step 8: Next for some stamping, once the last layer is dry of course. Choose a selection that you like, here I have used allandcreate on both pages as a focal image and as a page edger along with some of Leonie's stamps, you really want to arrange your stamped images to draw the eye in and keep it on the page to see and take in all the details, rather than wonder off.

Step 9: Now fill most of the circles with white Gesso, this will make the colours in them pop more later and seem more vibrant. Leave a few that show off the wonderful background patterns made earlier. A little bit like windows.

Step 10: Try to use colours that you have used before to fill the circles, this keeps the page unified and stops it jarring. Once these are dry add some of the inspirational words and phrases, make up your own too by mixing the stamps, like I have here and shortening them for a totally different word. I've used Leonie's scribbled circles stamped on the page and coloured with gelly roll pens. I have stamped into friendly plastic with words and rubbed them over with silver gilding wax. Use a white gel pen to add detail around some of the circles. Finally when dry add 'Trent', position the stencil and ink through with Versafine Black ink.

Step 11: On a separate piece of card use your brayer and a couple of colours used in the pages to make a background.

Step 12: Stamp one of the small sentiments onto it and use the Epiphany tool and resin cap to make the cabochon. You could do this with a basic die and add glossy accents if you dont have the tool.

Step 13: Add this resin piece to one of the smaller circles on your page. In another stamp the profile stamp a couple of times. Use some inspiring words in some and some part stencils in some others, again to keep the pages unified and harmonious.

Step 14: To finish your piece add some highlights to your pages using a white gel pen.

Just a little extra here: If you have not shopped with Hochanda before, here is a voucher code giving you 30% off your first purchase (FEY5JBP7) it can be used for any purchase, feel free to share it.

My Collection is still available from Hochanda and they have kept the generous discounts and Flexi but I know there isn't a great deal left. I doubt I can restock due to minimums orders. 

It is also available on my Craftascope Etsy Shop, while there is stock available after my Hochanda Show.

As you know I love writing my blog and helping as much as I can, well I would really love for you to add you support by adding me as a favourite blog. All you need to do in that section is choose other and add my blog address nickinbarnsley.blogspot It would be great to get a mention even if I dont come anywhere.

Here is the link to add your support for all of the categories. 
https://www.britishcraftawards.com/

I do hope you have enjoyed the tutorial along with the finished pages I have shared with you today, Maybe you will have a go yourself, It would be great to see what you do with my collection. I hope you will pop by soon to see what I have to share with you. For now Take care and Happy Crafting.xxx

Monday 3 December 2018

Craftascope A5 Stencil Youtube Tutorial

Morning Friends and Crafters, Today I have for you a video tutorial. I promised I would get one done as soon as possible, so here it is. This is just one of the ways that you can use any of the stencils in my collection. I do hope you enjoy it, If it is popular, I will do some more as time allows. I have also included some additional photos for you.

You will need:
Craftascope 'Trent' A5 Media Stencil or any of the others from the collection
Pergamano Blending Pen
Faber Eraser Pencil
HB Pencil
4B  Graphite Pencil

Here is the piece I did on the video. I thought it would be good to show it as a photo as well.

Another couple more from the collection using the same technique.


Hochanda still have some stock of my collection available, and have been good enough to keep their, introductory price with an additional discount for Freedom Members and the Flexi option, so you can get the full collection for just over 20 pounds.There is very low stock of some of the individual items as well, so if you are thinking about it please dont leave it too long. Due to minimum orders, I doubt I will be able to restock these. I do also have a small selection of my collection available on my 'Craftascope' ETSY Store with free postage and Packing to much of the world, the link is at the top of the main blog page.

Just a little extra here: If you have not shopped with Hochanda before, here is a voucher code giving you 30% off your first purchase (FEY5JBP7) it can be used for any purchase, feel free to share it.

Here are another 2 photos, I have altered the hair here, once you feel comfortable with the easy way of completing your face, you can really experiment with different looks. I would love you to share any of your crafty makes in my Facebook Group 'Craftascope' especially if you have made anything with my collection, It's been great to see them all so far.

I hope you have enjoyed the video and more importantly I hope you have found it useful As I said previously, if it proves popular I will make more with the collection as and when time allows. 

In case I don't get the opportunity again, I would like to wish you all a Very Merry Christmas. Take care and Happy Crafting.xx