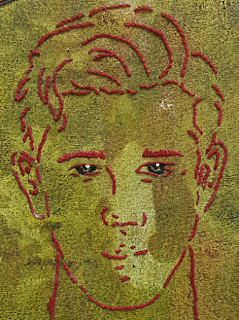
Hi Friends and Crafters. I am sharing a stitched mixed media project with you today. Something a little different to try out with my collection. This uses a simple chain stitch for the outline and a couple of French Knots for the eyes. The background has been made with Calico with the print for the background pulled from the Gel Press from Clarity. It's great fun to use and a great way of making some really interesting backgrounds for any of your crafty makes.
You will Need:
Or The full set which is still on an offer price. and with Flexi and Less.
Versafine Black Ink Pad
Daler Rowney System 3 Cadmium Yellow, Cadmium Red and Ultra Marine.
Brayer
Burgundy/Red Embroidery Thread
Black Card
White Stamping Card
Calico
Step 1: Start with the background on your calico. Add and spread each colour in turn using your Brayer. Use Red, then Blue and finally the yellow. Firmly and evenly smooth the calico over the surface and lift the print. Leave to dry thoroughly.
Step 2: Using the remainder of the ink on your plate, repeat with your card. Lift the print and leave too dry.
Step 3: Position the stencil onto the calico and using either a fine liner or graphite pencil, trace around the outside lines of the whole design. Add the Calico to your hoop and stitch your design use 3 threads and use the chain stitch. This fives a really nice raised result, with dimension and texture while allowing smooth turns around the curves. Use a darker thread for the eyes and a couple of french knots to add life to the eyes. Ray the edges of your cloth to give more interest and texture.
Step 4: Choose a selection of words that appeal to you from across both stamp sets. Use Versafine black ink to stamp onto your gel printed card. Use Tacky glue to mount them onto black card, leaving a narrow border.
Step 5: Mount your fabric onto black card using Collall Tacky Glue. Then use 3D Glue gel to position and secure your words around the face.
As you know I love writing my blog and helping as much as I can, well I would really love for you to add you support by adding me as a favourite blog. All you need to do in that section is choose other and add my blog address nickinbarnsley.blogspot It would be great to get a mention even if I dont come anywhere.
Here is the link to add your support for all of the categories.
Many thanks for joining me today. I hope you have enjoyed the tutorial along with the finished project. It would be great for you try it out especially if it's something you have not done before. This makes a great wall hanging, a page for a journal or scrapbook page and a smaller version would make a lovely stitched card. Why not try it as a partial face with a boarder around it, whatever you do have fun and enjoy what you do. For now Take care and Happy Crafting.xxx


Another amazing project Nick
ReplyDeleteThank you ever so much Jane, I am pleased you like it, another fun project to do and I always like the Gel Printing plate, it's always exciting to see what comes out.
DeleteIt never ceases to amaze me what you manage to think of in the ways of using all your craft products. This is such a clever use of a stencil and I love the finished project.
ReplyDeleteThank you for sharing Nicola x
It surprises me sometimes too Nicola, I have lists all over the place of ideas to try out, some dont work of course, but it's always nice to try them.Thank you ever so much.xx
Delete