Showing posts with label Hot Glue. Show all posts

Sunday, 23 September 2018

Christmas Wreath With Winter Wonderland

Morning Friends and Crafters, there's a funny story behind this project. I was making this in the heat of summer. Very rarely does anyone come past the house being in the middle of nowhere, but the minute I went outside to spray this about 4 lots of people passed, looking puzzled, Very difficult to explain in Bulgarian. I have used grapevines to make the wreath base along with Winter Wonderland a Signature Collection by Sara.

You will Need:
Winter Wonderland Seasonal Sprigs
Winter Wonderland Entwined Holly Embossing Folder
Winter Wonderland Luxury Mirror Card all 3 colours
Winter Wonderland Luxury Glitter Card all 3 colours
Grape vines
Stick n Stay
Spray n Sparkle Silver
Cinnamon Sticks
Matching Satin Blue Ribbon
Hot Glue Gun
Collall Tacky Glue

Step 1: Make a wreath base from Grapevines, it's really easy to do and best of all it's free and looks great.

Step 2: Spray with Stick n Stay, add flowersoft, Mica Flakes and anything sparkly that you have.

Step 3: Spray here and there with Spray and Sparkle.

Step 4: Wrap the cinnamon sticks into bunches with the matching satin ribbon.

Step 5: Cut a selection of Seasonal Sprigs using the  luxury cardstocks.

Step 6: Emboss some of the luxury mirror card.

Step 7: Cut into squares to make some Christmas Gift decorations.

Step 8: Use the tacky glue to secure the boxes shut and tie with the silver twine.

Step 9: Use the hot glue gun to secure all of the elements to decorate the wreath.


Many thanks for joining me today, I do hope you have enjoyed the tutorial along with the finished project. I hope you will join me again very soon to see what else I have to share with you. For now, Take care and Happy Crafting.xxx

Saturday, 4 August 2018

Decorated Foamiran Gift Box)

Hi Friends and Crafters, I do hope you are all well. We all love making blooms from Foamiran from 14 Craft Bar, so I thought it would be a nice idea to share a box I made and decorated to deliver when giving as a gift or even if you sell your flowers. I made a rose and then made the box to fit, so dimensions will depend on your project.

You will need:
Oil Pastels Green and Pale Pink
Florist Wire
Green Florist Tape
Hot Glue Gun
Aluminum Foil
Box Made to Measure with Viewing Window
Pink Satin Ribbon Bows x 2
Small Mulberry Paper Flowers (Roses and Flowers)

Step 1: Cut the foamiran into squares.
For the Pink Rose: Pink 3.5 x 3.5 cm, White 4.5 x 4.5 and 6 x 6 cm
For the White Roses: 3.5 cm and 4.5 x 4.5 cm

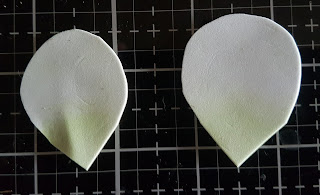
Step 2: Round off 3 of the corners to form a petal shape. I have a video to show this along with Shaping and Colouring on a previous post.

Step 3: Colour all of the petals green at the base. The for the pink rose colour the mid sized one with pink around the edges and the larger petal with a  little pink and some green.

Step 4: Shape all of your petals, heating then twisting and gently stretching them to a petal shape, Finally roll the edges outwards.

Step 5: Form a small come shape with foil, make a hole using a pokey tool and secure the florist wire in place with Hot Glue.

Step 6: Build up your blooms tightly in the center, getting loser as you go.

Step 7: Keep the white rose fairly lose, they want to be small but full.

Step 8: To finish the main rose add a green calyx , a leaf and then wrap with florist tape.

Step 9: Decorate the top of your box with the pink ribbon bows, white foamiran roses as the centerpiece and then some small flowers to create a pleasing effect.


Thank you ever so much for joining me today, I do hope you like the finished piece and found the tutorial and videos helpful. For now Take care and Happy Crafting. 

Wednesday, 11 July 2018

Floral Shaker Card

Hi friends and crafters, I am back today with another project for you. Today I have made a shaker card using dies from 14 Craft Bar along with Foamiran for the floral embellishments. For the base of my shaker I have used dies from Sue Wilson, here the die set is Scattered Leaves background die set.

You will need:
Stamens
Shaker Content
Oil Pastels Dark Red, Light Pink and Mid Green
Sue Wilson Scattered Leaves
Foam Roll
Acetate
Hot Glue Gun
Cream and White Card

Step 1: Cut all of the elements you need to create your base card, using the cream and white card stock.

Step 2: Secure the cream card behind the decorative designs using Tacky glue

Step 3: Secure a piece of acetate behind the window, this will be your shaker section.

Step 4: To position the back panel in place, position it face down in the window, then place your backing card over, this will give you the correct position.

Step 5: Add foam tape, approximately 1'' all around your window, making sure there are no gaps. This will also mean that you need to use less for your shaker. Add your chosen elements and secure to the backing card.

Step 6: Add your chosen sentiment to the card, then secure to your base card.

Step 7: Colour your petals using deep red on the very edges. Then use the pale pink on the front and back edges of your petals. Finally add the green to the center of your smallest petals.

Step 8: Fold the leaves together, twist and manipulate them, then leave them twisted.

Step 9: Gently unroll the petals, they should all now have a bowl shape in the center.

Step 10: Layer the petals and secure with hot glue, add matching stamens to your flowers.

Step 11: Position your flower onto the base card and when you are happy secure them in place.

Here is the finished card:

Thank you for joining me today, I do hope you have liked the tutorial and the finished card. I hope you will join me again very soon. For now take care and Happy Crafting.xx

Sunday, 13 May 2018

A Single Bloom

Morning Everyone, It's a real pleasure to be sharing my first post as part of the 14CraftBar Design Team. I am thrilled as it's a real honour to be part of such a talented team doing something that I really love, anyone who knows me will know that I love Roses. So today I am sharing a Beautiful Single Rose Bloom made with Foamiran from 14CraftBar.


You will need:
Florist Wire
Copper Wire
Green Florist Tape
Glue Gun
Mod Podge Glossy
Oil Pastels Petals: Green, Peach and Pink. Leaves: Dark Green and Deep Red

I have actually done a few sections of video to go with this tutorial,however it was really disappointing as I have a new kitten who was calling for mum, I dont know how to turn the sound off, so I will try again next time.

Step 1: Prepare your petals from squares, rounding off 3 of the corners as shown in the picture. You need 7 - 4 x 4 cm, 7 - 4.5 x 4.5 cm and 12 - 5 x 5 cm.

Step 2: Colour your petals, each of the sized needs green at the base, front and back. Edge the smallest leaves with the pink, then blend pink on the front and back of the petals. For the mid size use very little pink and more peach. For the largest size use a little green and mostly peach.

Step 3: Shape your petals, by concertina folding the top edges and twisting them back and forth, Lightly stretch to give a cupped middle, For the mid and large sizes roll the petal gently outwards.

Step 4: Roll a cone shape and secure to the end of a piece of copper wire. Take the petal and secure around the cone as shown.

Step 5: Repeat on the opposite side as shown.


Step 6: Repeat with all of your smaller petals.


Step 7: Next add your mid size petals, overlapping each over the last. Make sure to secure these slightly loser than before.


Step 8: Cut a selection of leaves from the green Foamiran, also cut a calyx shape.

Step 9: Colour these using dark green oil pastels and areas of red, especially around the edges.

Step 10: Roll a small piece of foil, thread onto the wire and secure at the base of the rose.

Step 11: Add the calyx, secure in place with the glue gun, shape around the foil using a toothpick.

Step 12: Firstly add veins to each leaf using the mold then wire all the leaves and join them to form the classic rose leaf arrangement.

Step 13: Wire the leaves to the stem and cover with florist tape, paint the leaves with glossy Mod Podge or similar.

Step 14: Enjoy your beautiful bloom.


Thank you so much for joining me today. I really hope you enjoyed it and I promise to do a video for the roses in my next post. I would love to have your comments and to hear what you think. For now Take care and Happy Crafting.xx