Showing posts with label White Foamiran. Show all posts

Thursday, 4 October 2018

Foamiran Rose Card

Morning, I am back again with a little inspiration using the wonderful Foamiran from 14 Craft Bar. Today I have used the roses to decorate a beautiful decoupage card from Reddy. They make beautiful decoupage cards and what would be better to embellish it, but with some matching Foamiran roses. They really add that finishing touch.

You will Need:
Scissors
Hot Glue Gun
Blue Oil Pastel
Centura Pearl Precious Metal
Blue Card
Centura Pearl White/Silver Card
Reddy Decoupage
Tacky Glue
3D Glue Gel
Tonic Flourishes Die
Weathered Wood Distress Ink
Stamping Card.

Step 1: Cut out your mat and layers, this will depend on the image or decoupage you have chosen to use. I have picked the colours for this to match the colours in my image.

Step 2: Mount the design onto the first layer with Tacky glue.

Step 3: Add the other layers, then add your decoupage layers with 3D Glue gel.

Step 4: I added another layer to my card and then mounted it onto a Centura Pearl base as I wanted a larger finished card.

Step 5: Cut the flourishes from white stamping card, blend a little Weathered Wood Distress Ink to match the image. I have also used a Sakura gold pen, here and there, again to match the image.

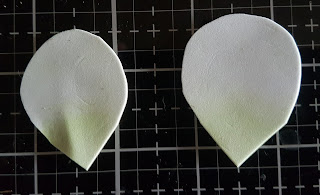
Step 6: From 2.5 cm & 3 cm Foamiran squares cut your petal shapes.

Step 7: Take 4 or 5 petals at a time and edge them with the oil pastel, try to choose a colour to match your image.

Step 8: Warm the Foamiran on an iron, concertina fold and twist back and to. Shape the petals and roll some of the petals outwards. See the video below for the simple white rose.

Step 9: Create your roses, layering the petals and securing with the hot glue.

Step 10: Add the roses to your project. I have used 3D glue gel rather than hot glue as it gives you a longer working time to make sure you are happy with positioning.

Here is the finished card:

Thank you so much for joining me again today. I do hope I have given you a little inspiration, maybe another way of using your beautiful Foamiran flowers. Another thing, here is a 30% off voucher to use on your first order (anything) from Hochanda, use code FEY5JBP7.

I do hope you will join me again very soon, to see what else I have to share with you. For now Take care and Happy Crafting.xxx

Tuesday, 21 August 2018

Foamiran Roses

Morning Friends and Crafters, it seems like a long time since I shared with you all. Anyway, I have received a few messages and comments about making roses with Foamiran, I have made a few videos so far, so in today's blog post I thought I would share the links again rather than a tutorial. My top aim is to have you all enjoying making your foamiran flowers and to be 100% happy with what you are making, so I hope I might be able to help.

Foamiran is such a wonderful medium to use for flowers, it gives especially good results wit roses. I know the first couple can be tricky (we have all been there), but once you have mastered the techniques, you will be producing the most amazing and realistic blooms.

At first, really take your time to add the shape to your petals. It's really worth the effort, once you have that you will become a lot faster and shaping them is such a relaxing pastime, you can really lose yourself.

I'd really like to hear form anyone , so I know where you feel things are going wrong, or where you are having difficulty. Thats way I can try and help or give some advice, it will also help mw to know what sort of video will help the most.

I have included a selection of video within this post, if there are certain areas you would like covered, please let e know in the comments section. My top advice would be to forget all about the colouring to begin with, use either White or Ecru Foamiran until you are happy with your results.

Thank you ever so much for joining me today, I hope you have found this post useful. I hope to be back with you very soon. For now, Take care and Happy Crafting.xx

Saturday, 4 August 2018

Decorated Foamiran Gift Box)

Hi Friends and Crafters, I do hope you are all well. We all love making blooms from Foamiran from 14 Craft Bar, so I thought it would be a nice idea to share a box I made and decorated to deliver when giving as a gift or even if you sell your flowers. I made a rose and then made the box to fit, so dimensions will depend on your project.

You will need:
Oil Pastels Green and Pale Pink
Florist Wire
Green Florist Tape
Hot Glue Gun
Aluminum Foil
Box Made to Measure with Viewing Window
Pink Satin Ribbon Bows x 2
Small Mulberry Paper Flowers (Roses and Flowers)

Step 1: Cut the foamiran into squares.
For the Pink Rose: Pink 3.5 x 3.5 cm, White 4.5 x 4.5 and 6 x 6 cm
For the White Roses: 3.5 cm and 4.5 x 4.5 cm

Step 2: Round off 3 of the corners to form a petal shape. I have a video to show this along with Shaping and Colouring on a previous post.

Step 3: Colour all of the petals green at the base. The for the pink rose colour the mid sized one with pink around the edges and the larger petal with a  little pink and some green.

Step 4: Shape all of your petals, heating then twisting and gently stretching them to a petal shape, Finally roll the edges outwards.

Step 5: Form a small come shape with foil, make a hole using a pokey tool and secure the florist wire in place with Hot Glue.

Step 6: Build up your blooms tightly in the center, getting loser as you go.

Step 7: Keep the white rose fairly lose, they want to be small but full.

Step 8: To finish the main rose add a green calyx , a leaf and then wrap with florist tape.

Step 9: Decorate the top of your box with the pink ribbon bows, white foamiran roses as the centerpiece and then some small flowers to create a pleasing effect.


Thank you ever so much for joining me today, I do hope you like the finished piece and found the tutorial and videos helpful. For now Take care and Happy Crafting. 

Thursday, 28 June 2018

A card For A Friend

Hi Crafters and Friends, I am back with a little more inspiration for you with card for a friend using Foamiran from 14 Craft Bar along with some Sue Wilson Dies. I do hope you are enjoying the good weather and it's not to hot for you all.

You will need:
Oil Pastels Deep Red and Purple
Small, Medium and Large Ball Tools
Foam Mat
Glue Gun
Foliage Dies- Here I have used Verdant Vines from Tonic
Sue Wilson Ornate Rectangles (Noble Collection)
Burgundy Cardstock
Ivory Centura Pearl
3D Glue Gel

Step 1: Prepare your chosen layers using the ivory and burgundy cardstock. (See Photo)

Step 2: Layer onto your base card, made with Ivory Centura Pearl.

Step 3: Place the small design in the center using tacky glue. Raise the decorative layer using 3 mm foam tape or foam tabs.

Step 4: For the small accent flowers, cut 2 cm squares, you will need 5 for each flower. Shape by trimming around the 3 edges. See my previous posts for a video showing cutting and shaping.

Step 5: Repeat this for the red roses, using 3 cm squares and 4 cm squares. You will need 9 small and 4 or 5 large petals for each rose.


Step 6: Colour your petals using dark red and purple oil pastels. Don't use the purple on the larger petals.

Step 7: Use your ball tools to form a cupped petal, use the small for the small petal, medium for the medium and large for the large petal.

Step 8: Shape each of the petals at the edges, frilling and rolling the edges. Please ignore the white petal in the photo, I got carried away, the white petals only need to be cupped.

Step 9: Assemble your roses using a hot glue gun. See my previous video for the technique.

Step 10: Arrange your blooms and foliage and secure to you card using 3D glue gel.

Thanks again for joining me today, I do hope you have enjoyed the tutorial today along with the finished card. Would love to have some of your comments and thoughts, for now take care and Happy Crafting.xx

Wednesday, 13 June 2018

All Occasion Card

Hi Crafters and Friends, Great to be with you again today with a little more inspiration using Foamiran and accessories from 14 Craft Bar. For the past week I have been busy making Christmas Cards, it looks like the colour schemes for this year are going to suit me down to the ground. My card today is made with a colour combination I adore, I just love all shades and tones of blues and combining them with white really set them off. I have included Poinsettias and my favourite roses, I do hope you will take a look. I have deliberately left the card sentiment free, as this card could quite easily suit any occasion.

You will need:
Blue Foamiran 015 Navy  (Also in the Winter Set)
White Foamiran 001 White (Also in the Winter Set)
Dark Green Foamiran 021 (Also in the Irish Set)
Glue Gun
Glitter
PVA Glue
Sue Wilson Lavish Accented Octagon
Sue Wilson Double Stitched Octagon
Sprigs/Twigs dies or similar
Blue Card
White Card

Step 1: Cut a selection of rose petals from 2.5'' x 2.5'' & 3'' x 3'' Squares.


Step 2: Shape you petals, cupping them and frilling the edges as shown in my last video. (Here is the link)

Step 3: Cut a selection of Poinsettias  in blue and white foamiran.

Step 4: Roll and twist them and leave for 10-15 mins.

Step 5: Unfold and straighten very slightly.

Step 6: Assemble your flowers, edge them with PVA and add some clear or AB glitter to give a frosty look.

Step 7: Cut and Mount your chosen card layers.

Step 8: Layer your card pieces onto an 8 x 8 card base. Here I have used Silver white Centura Pearl.

Step 9: Arrange your flowers and secure them in place. Your card is now finished and ready to add your chosen sentiment.
And a close up of the blooms:

Thank you ever so much for joining me today, I have really enjoyed making this card to show you so I hope you have enjoyed the tutorial. Would love to hear from you and any comments or questions. For now Take care and Happy Crafting.xx

Tuesday, 22 May 2018

Simple White Rose With Video's

Hi Crafters, Im having a welcome break from sorting and making sure all is well for Friday. Im sharing my first movies of a simple white Foamiran Rose. I thought it would be best to start simple, to practice my editing skills, or should I say lack of. Well please dont laugh at my first attempts.

For this you will need:
Glue Gun
Florist Wire

Step 1 & 2: Cut squares of White Foamiran, 2.5 x 2.5 - 7, 3 x 3 - 15. Round the edges to form the petal shape. Then shape the petals as shown in the video.

Cutting and Shaping


Next step is to arrange and secure your petals, using the glue gun.

Arranging and securing, full.


Here is a CONDENSED MOVIE, if you'd like to see highlights.

Thank you ever so much for taking the time to take a look at my efforts, I hope it wasn't too dreadful. I would love to have some feedback from you. Anything you did like and anything you didn't like. Please be kind I am learning. Hope you will join me again very soon. Take care and Happy Crafting.xx