Showing posts with label Pebeo 4Artist Markers. Show all posts

Monday, 12 June 2017

Let's Celebrate

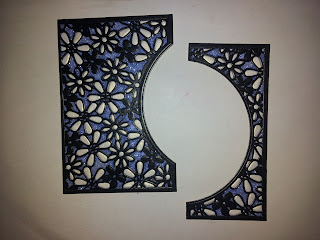
Morning, I have another card to share today that I made for the launch of the Kinetic Card dies by Crafters Companion on Hochanda. This one looks fairly simple, it does take a little more time and effort as the petals from a contrasting card are place within the design before adding the sparkle.

To start with, I cut the card base with the sentiment cut out from the centre using black gloss card.

I next cut the beautiful decorative panels in the same black card and placed a Wonder Sheet behind. I then cut the same panels with Centura Pearl 'Hint of Silver'. These would not be wasted and used for another card. I then took all of the white petals and pieced them into the black card and filled the remaining space with ultra-fine glitter Periwinkle.

A centre circle was cut from Centura Pearl with a wonder sheet cover, I secured this behind the sentiment and infilled with the same glitter.

I edged all of the components with a Pebeo 4Artist marker before assembling the card as in the photos.

That is my last sample from this particular launch so I hope you have enjoyed the cards that I have shared.

Exciting news, Leonie will be showcasing here die collections on the 15th June so I will be sharing the cards I have made for that after the shows, but I hope to share a couple of Sneek Peaks before then. Thank you for taking the time to visit my blog, bye for now, Take care and Happy Crafting.xx

Wednesday, 7 June 2017

Le Cirque

Morning, I have thoroughly enjoyed using the new Kinetic Dies to create these cards. For todays Step by Step I have also used the 'In a Spin' die from Leonie's Mixed Media Collection along with 'Le Cirque' from Graphic 45.

I cut out the 'In a Spin' 4 times and layered together using Tacky Glue. Next I selected images from Le Cirque, cut them to size and secured them in place at the back.

I then cut the base Circle Pop Out card using double sided Black Pearlescent card, along with the 'Thank You' sentiment. I then edged the card base using a Pebeo silver 4Artist marker.

I cut the panels and decorated using a selection of the Graphic 45. I then covered the whole piece using the Crackle Medium from Tonic. Once this was dry, I highlighted the cracks with Gathered Twigs Distress Ink.

I cut the layering panels in the same black card and edged them with the silver. Then layered the decorated panels onto black with Tacky Glue.

I cut a clown from the collection and decoupaged him to give him more depth. I filled the circles with Glossy Accents, giving a domed look. Then I added Pebeo Silver Gilding Wax to texturize the circles. I assembled as in the photos, placing the clown so he was pointing at the sentiment.

Thank you ever so much for taking the time to visit today. I do hope that you have enjoyed the step by step and the finished card. If you do enjoy reading my blog and the things I share then I would love your nomination for best blog in the International Craft Awards, the link is here:
http://www.craftsbeautiful.com/awards/
Take care and Happy Crafting.xx


Thursday, 20 April 2017

Create Magic Step by Step

Morning, Today I'm sharing the Magic Hat card that I made for the Launch of the wonderful Typography Collection by Leonie. It has been such a versatile range to work with, the number of projects it can be used on is simply limitless. Hopefully you managed to watch some of the shows yesterday, if not they will be available on Rewind via Hochanda's website.

To start this project, I drew and coloured a top hat with my alcohol markers in 4 shades of grey, only using black for the darkest areas. At the same time I traced around the hat to make a mask from copier paper, which I would need later.

Next, I created the playing cards by drawing around the embossing folders, this gave a perfect size and rounded corners. This was repeated 5 times before cutting them out.

Using Leonie's Typography dies, I cut out the letters and ordinals that I needed to create the Ace, King, Queen cards.

The last 2 cards were embossed with Create and Magic from the embossing folders that make up the collection.

The next step was to create the background for the hat, this is when the mask was needed to cover the hat. Taking the star stamp from the 'Rag Doll' set I stamped around the card with black Archival ink. The stars were then coloured with Spectrum Aqua Markers in Sunset, Wildflower and Peacock Blue. Lastly using  craft knife I cut a slit in the top hat where I could insert the playing cards later.

The wand was made using a plant stake, cut to 6'', then coloured with a black alcohol marker. The whit tip were added using my white Sharpie Marker.

To create the main background, I randomly stamped half of the hair from the rag doll, as I used the Spectrum Aqua makers it was easy to only colour the area I needed to stamp. Then I added the other half of the hair to create the shape. The colours I used were the same as for the stars.

Having cut mats for the layers from Black card, I edged all of the pieces with a gold 4Artist Marker from Pebeo. I added the gold edging to the playing cards and the embossed cards before assembling my card using Collall Tacky Glue and 3D glue gel.

I really hope you have enjoyed my step by step today along with the finished card. Thank you so much for visiting my blog today, I really hope you will stop by again to see what I am sharing. Take care and Happy Crafting.xxx


Tuesday, 4 October 2016

Cold Outside

Your SEO optimized title page contents
For this card I wanted to use the distressed half of the beautiful Snowflake Centrepiece from the Snowflake Flurry collection that Bev launched on Hochanda recently. It's so beautiful as a whole but so versatile enabling you to get a variety of looks depending on how you use it. I also used one of the Bee Crafty sentiments, they are so unique and suit all sorts of cards for so many occasions too.

My card for this was 8''square, I stamped onto each of the sides of my card, being careful to position it to form a frame for the sentiment I had chosen.

For the background I used the Glitter Pens by Leonie, blending Cobalt, Arctic and Lavender from the top down. When this was dry I stamped the 'Baby It's Cold Outside'  stamp. All of the stamping was done with Black Versafine ink.

I then cut out a heart from Mountboard using on of Leonie's Mixed Media Dies, from the 'Lots of Love' set. I then coloured this with a Pebeo 4 Artist Marker in silver before stamping over the same sentiment. I carefully secured it in place with Collall 3D glue gel to blend with the sentiment underneath which finished my project.

Something exciting tomorrow night, Leonie has a brand new launch on Hochanda at 8 pm, I hope you will be watching. Thank you so much for joining me again today, I hope you like what I have shared along with the step by step. Take care and Happy Crafting.xx