Showing posts with label Wonder Sheet. Show all posts

Monday, 12 June 2017

Let's Celebrate

Morning, I have another card to share today that I made for the launch of the Kinetic Card dies by Crafters Companion on Hochanda. This one looks fairly simple, it does take a little more time and effort as the petals from a contrasting card are place within the design before adding the sparkle.

To start with, I cut the card base with the sentiment cut out from the centre using black gloss card.

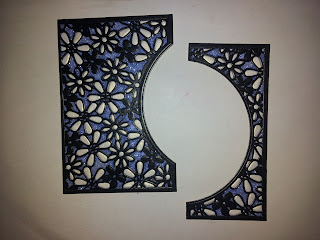
I next cut the beautiful decorative panels in the same black card and placed a Wonder Sheet behind. I then cut the same panels with Centura Pearl 'Hint of Silver'. These would not be wasted and used for another card. I then took all of the white petals and pieced them into the black card and filled the remaining space with ultra-fine glitter Periwinkle.

A centre circle was cut from Centura Pearl with a wonder sheet cover, I secured this behind the sentiment and infilled with the same glitter.

I edged all of the components with a Pebeo 4Artist marker before assembling the card as in the photos.

That is my last sample from this particular launch so I hope you have enjoyed the cards that I have shared.

Exciting news, Leonie will be showcasing here die collections on the 15th June so I will be sharing the cards I have made for that after the shows, but I hope to share a couple of Sneek Peaks before then. Thank you for taking the time to visit my blog, bye for now, Take care and Happy Crafting.xx

Friday, 23 September 2016

Hammered Silver Platter

Hi, Something very different today, Made from cardboard that might otherwise have been thrown away. I also used some Silk Clay from Creative Company, along with the Wonder Crystals and Wonder Tape that Justin & Gordon from Be Creative bring to Hochanda.

Years ago I found a battered silver plated try, which had been hammered, so I wanted to make something similar to that with the Wonder Embossing Crystals and add an emblem in the centre. I started by cutting out a 12' circle from an old cardboard box.

I then cut another identical and this time cut a smaller circle within it. This would form the rim of the tray. I stuck this to the base using Cosmic Shimmer Glue from Creative Expressions.

So there wasn't a step between, I used silk clay to form a slope between the rim and the base.

I covered the whole project using Wonder Tape, then covered it with 'Lodolite Quartz' and 'Picture Jasper' Wonder Embossing Crystals. I made it thicker in some areas to give it an uneven surface. Where it is thinner, the surface is pitted giving it the hammered look.

For the centre emblem, I covered a piece of card with a Wonder Sheet and drew a 6' circle. I then added my design inside the circle and cut out all of the sections.

I then peeled off the backing sheet from each section, using the Wonder Crystals I embossed each piece. The colours I used are:


To finish, I secured the design onto the base of the tray using Cosmic Shimmer Glue.

Thank you so much for taking the time to visit today. I hope you liked the finished project along with the step by step that I have shared. Hope to see you again very soon. Take care and Happy Crafting.xx


Wednesday, 21 September 2016

Poinsettia Wreath

Today's Project was really fun to make and decorate. For this I used the New Wonder Embossing Crystals that Justin & Gordon from Be Creative, launched on Hochanda during the Birthday week. I also used the Winter Die from Leonie along with the Poinsettia dies from Sue Wilson.

The heart shaped wreath was already made. I made  a lot of wreaths last year using the prunings from my grapevines but this one was ready made, so I had the fun part of decorating it. I started by cutting out the Winter die. I had already covered the card I was using with a wonder sheet. I peeled off the backing sheet and coated using the 'Celebration Blue' Wonder Embossing Crystals.

Next, I covered another piece of card with a Wonder Sheet, then I cut out a selection of poinsettias, using dies from Sue Wilson.

At the same time I cut out some foliage. I used 'Celebration Red' and 'Carnelian' Wonder Crystals to colour the poinsettias. Then 'Verdite Green' and 'Pistachio' to emboss the leaves.

I shaped all of the elements by wrapping them around a marker pen. This way the Crystals wont crack as they are really easy to manipulate. I layered  the flowers using Collall 3D glue gel and placed around the wreath using a hot glue gun. I then added the 'Winter' to the right side of the wreath and added the foliage in the same way. To finish the project I added a gold satin bow and it was ready to hang.

Thank you so much for visiting today. I hope you have enjoyed the step by step that I have shared and the finished project. I hope that you will join me again very soon. Take care and Happy Crafting. xx

Wednesday, 14 September 2016

Christmas Joy

Morning, Today's card has been made with papers from the paper pads and the New Wonder Embossing Crystals that Justin & Gordon from Be Creative launched on Hochanda for the Birthday Week.

The paper pads have been great to work with and are such great quality. I took the pine tree sheet from the pad for this card and used the full sheet.

To start with I blended around the edges just to add a little distressing, here I used Faded Jeans, but any of the blues would work well for this particular card depending on your embellishments.

From an identical sheet from the pad I cut 'Joy' from Sue Wilson along with a frame from the same die set. I cut an inner oval on a sheet of plain card which I had already stuck a Wonder Sheet to.

I took another sheet of card which was covered with a Wonder Sheet, from this I cut a selection of poinsettias in different sizes using a die set from Sue Wilson.

Next I added some Faded Jeans Distress Ink to the 'Joy' and the frame.

I stuck the oval Wonder Sheet to the back of my main oval after peeling the coating off, I placed the 'Joy' back inside.

I then poured over 'Midnight Blue' Diamond Sparkles which stuck to the wonder sheet. I also secured the frame using Cosmic Shimmer.

I stamped my sentiment from the new stamp set and layered the card onto cream and blue card.

Using foam tape I raised the 'Joy' topper from the card for dimension.

Having embossed all of the poinsettias using the Celebration Red Wonder Crystals, I shaped them with a ball tool, layered them and secured to my card using Collall 3D glue gel.

I am so pleased that you have stopped by to look at the finished project. I do hope that you have enjoyed the Step by Step. Please stop by again very soon. Take care and Happy Crafting.xx