Tuesday, 26 July 2016

Balloon Escape Wall Hanging

Morning, Today I am sharing a project I made with the New Banksy XL stamps that Bev launched on Hochanda recently. The show was repeated yesterday, so it will still be available on catch via their website. It's a great show full of inspiration and fantastic samples from the Design Team.

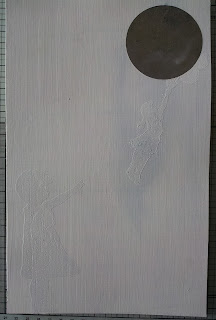
To begin with I painted my board with white gesso, then placed a very large Moon/sun mask in the sky.

Next I took the balloon girl stamp and using versamark ink I stamped her and then used white embossing powder. I wanted to layer her up later to give more dimension.


I then removed the moon mask and stamped the balloon part with black archival ink.

I stamped the little girl using the same white embossing powder, then stamped her on some copier paper to act as a mask. Once she was in place I placed a wall mask over the top.

I filled between the mask with sand texture paste, staggering the wall so it wasn't uniform.


I replaced all of the masks to add colour and clouds to the sky using Shaded Lilac and Faded Jeans Distress Ink. I removed the sun mask and coloured it using Scattered Straw and a little Wild Honey. I coloured the brickwork using a mixture of Gathered Twigs and Hickory Smoke.

I used the Friendship stamp, stamped onto super smooth card and distressed around the edges with Faded Jeans.

Next I stamped the balloon girl in black Archival and the little girl in Cobalt Archival. I then cut them out and decoupaged onto the piece. This added more dimension and perspective to the project, I used 3D glue gel to secure the stamped images.

Thank you so much for taking the time to visit today. I do hope you have enjoyed the step by step and the project I have shared today. I really hope you will join me again next time, I will be sharing some more from Leonie's New Collection tomorrow. Take care xx


Monday, 25 July 2016

Early Christmas Taster

Morning, Today I am sharing another early Christmas Card. I made this with the stamps from Leonie's New Collection that was launched on Hochanda on Friday Evening. If you missed the shows, they are still available on their website via the TV schedule. The shows are well worth watching for more inspiration.

Technically these are not Christmas stamps but as soon as I saw this one stamped, I thought Christmas, so I had to make it then. To start with I cut out a basic square aperture in copier paper to add my scene to my card. Unfortunately the photos I took of these stages seem to have been deleted. I placed the copier paper over my Super Smooth card. I added the landscape using Shaded Lilac Distress ink. I added the whole stamp as my main focal point. Then masked off an area with torn paper so I could stamp part of the tree a little further back. I then used it again right at the back, this time as a path in the mountain. I then added some deer from another stamp collection.

I placed a huge moon mask in the sky because I wanted to build up the blending in the sky giving a darker appearance and wanted the balance. My favourite blend for the sky is Shaded Lilac, Blueprint Sketch, Chipped Sapphire and Dusty Concorde. I blended these from dark to light, leaving a pale halo. Then I added more colour to my landscape. I used foil glue to create baubles and once dry used red foil sheet over this. I also added clear glitter to the trees and hills using a Quickie Glue pen. I then added some snow in the sky using a Sharpie white fine liner pen.

I backed my project onto white Centura Pearl Card (Hint of Silver) and added a frame using Navy Silk Art Card.

I hope you have enjoyed today's step by step and like the card I have shared with you. Have a great day and hope you will pop back to see what I have for tomorrow. Take care xx

Sunday, 24 July 2016

Etched Upon My Face

Morning. I am so proud of this sample and really couldn't wait to share it with you all today. I have to say, I was a little worried as it is so different. The idea started with the heads from Easter Island and the Oscar award, but I wasn't sure I could pull it off. After a lot of playing around with Leonie's Dies, Stamps, slippers and shoes, I came up with the idea and the tester piece worked out well enough. I have used the 'Looking Good' die that Leonie launched on Hochanda in conjunction with the Wonder Embossing Crystals from Justin and Gordon at Be Creative.

To start with, I cut out the 'Looking Good' die 3 times on backing board and stuck together. I took another sheet of board and this time applied a Wonder Sheet to it before cutting out a fourth time and securing it to the ones I had already stuck together. On a separate  piece of board I applied the Wonder sheet and drew my rough shape, after rubbing out a bit I got the shape I wanted.


I cut out the shape and a middle section for a nose. I placed the eyes where I wanted them to go, in order for me to work out how I could divide the main shape and pencilled this in.

I cut along these lines and using the Wonder Embossing Crystals added the vibrant colours. I used Tigers Eye, Leopard Jasper, Red Adventurine, Verdite Green, Turquenite, Carnelian and Goldstone. These are amazing Crystals and gave me just the effect and colour I wanted for this project. I wanted to use a stamp but needed to add it later so I could work out placing.


I shaped and sanded a piece of wood, rounding it in places to make it look like a piece of cut stone or marble. I drilled a hole in the centre and added a large old nail.


I coated the wooden block with Wonder Sheet and Wonder tape, peeled off the backing and covered with Leopard Jasper, melted with my heat gun and added more until it looked like a wonderful piece of polished stone. I covered the base with green felt to protect any surface it would sit on.

Next I took a sheet of copper and stamped using black Stazon ink. I used the 'Etched Upon My Face' from the coordinating stamps, it suits this project down to the ground. I then added some Versamark ink around the edges using my finger and embossed with the Turquenite Wonder Embossing Crystals to give an aged copper look.


To assemble, I cut another 2 of the main shapes, approximately 5 mm smaller than the original. I stuck green felt onto the back of one and set aside. To the other shame I secured the face pieces using Cosmic Shimmer Glue. I then added the facial features with 3D glue gel. I could now position the stamp I wanted to use  from the coordinating stamps sets, under the eye. Once dry I stuck the front and back pieces together using the nail to secure in place.


I really hope you have liked the project I have shared with you today, I am extremely proud of it. I could never have done it or even thought of it without Leonie's new collection or the amazing Wonder Embossing Crystals from Justin and Gordon from Be Creative.

I hope you will join me again tomorrow. Thank you so much for your comments, I wouldn't continue with this blog if it wasn't for your support. xxx


Saturday, 23 July 2016

Leonie Launch Part 2

Morning, I hope you got to watch the launch of Leonie's wonderful new collection of dies and stamps last night. Hochanda do have a catch up facility on their website, via the Television guide. But dont miss any of the shows today at 9 am,12 noon,4 pm and last chance at 7 pm tonight.

This collection has been a real joy to work with, I really have loved every minute of crafting with them.

Whether making simple projects, cards or home decor they will definitely suit a wide range of styles.

They cat a variety of media, including fabric as you will see from the step by steps I will be sharing later.

Please take the time to visit my fellow members of the design team for even more inspiration with projects they have made using this amazing collection.


I hope you will be back tomorrow morning when I will be sharing my samples in more detail including a step by step for them every day. Thank you so much for your support, I would be here without you, I love reading your comments and appreciate you taking the time.

Friday, 22 July 2016

Sample Launch Previews For Leonie's New Collection

Welcome back, How Exciting. I have been itching to share some of the samples I have designed for Leonie's new launch on Hochanda tonight.

It's the age old saying that you shouldn't have favourites, I have loved working with each and everyone of Leonie's collections but this one has been particularly great to work with

My crafting took a totally different direction with some of the designs using this new collection. Not that it cant be used in other ways, but with this one the possibilities really are endless. I usually hate hearing that but I can honestly say it's true with this collection.

Please take some time to visit the other members of the design team to see what they have made from this collection and get even more inspiration.


Thank you so much for stopping by tonight to have a look at a few of the samples I made for the show. I will be sharing some more tomorrow morning followed by more detailed photographs and step by steps. Hope to see you again soon. xx

Leonie Launches Tonight (One Not to Miss)

URGENT UPDATE. LEONIE'S SHOW HAS BEEN MOVED TO 7PM TONIGHT FOR 2 HOURS, NOT 8PM AS SCHEDULED. Morning, Well the day has finally arrived. It's launch day for Leonie's new collection on Hochanda tonight at 8 pm. There will be more live shows tomorrow (Saturday) at 9, 12, 4 and last chance at 7 pm. Please make sure you catch the shows for this amazing collection and plenty of inspiration. Here are a couple of teasers to whet your appetite.

I will be sharing a selection of full samples in my next post this evening and more tomorrow. As usual I will share all of them in much more detail in the following blog posts.


The design team will be running a giveaway via Facebook, so do watch out for details. Take care and see you later. I really hope you enjoy the New Collection from Leonie.xx 

Thursday, 21 July 2016

A Valentine For Him

Leonie will be on Hochanda tomorrow evening at 8 pm to launch a brand new collection. I have to say that I am extremely excited about this launch. I love all of Leonie's products but this has been especially wonderful to craft with, please tune in as I have a feeling these are not going to hang around. I thought it might be nice to make a man's card to share for a change, I know how a lot of people say we are difficult to make for. 


The idea started when I was sorting out some fabrics and I came across some lovely black leather. I cut out the hearts from the 'Lots of Love' set.

Next I took a zip and cut a section of some denim. I wanted the sentiment to be appearing through the open zip.

As I had some denim left over, I decided to cut the hearts from this as well.

For the sentiment, I measured a piece of board which I had covered with white super smooth paper and cut it to 13 1/2 x 7 1/2 cm.

Next I stitched the zip to both sides of the denim making sure it would position over the board okay.

With Archival Black ink, I stamped the handwritten 'Love' stamp.

I blended across this with Shaded Lilac, Faded Jeans and Peacock Feathers. Then I rolled it up to form creases all the way across. I then highlighted the creases with the ink that was left on my blending tool.

To make the corner sentiments, I worked out the size of card I needed and cut the card using a basic square die. I also used one of the accent stamps in the corner. The nice thing about using a strip stamp is that you never end up with any of the words being upside down.

I opened the zip, positioned it over my sentiment and secured in place using Cosmic Shimmer glue.

I blended the same distress inks around the corner sentiments once I had cut out the required centre square die and cut them in two.

I took the leather hearts and splattered the with Red Daler Rowney paint for added interest and texture.

For the background, I took a sheet of tissue paper an inch or so larger than my finished project. I placed this onto my glass mat and spritzed with water until it was totally saturated. I then sprinkled on some Royal Blood Infusions from Paperartsy. I continued spraying with water which made the paper crinkle and the colour puddle into the beautiful pattern. I left this to dry in full sun, which intensifies the effect. When totally dry I carefully peeled it away from the matt.

I used Crafters Companion Stick n Stay to secure it to my card to keep the pattern I had created and to minimise additional wrinkles. I turned the excess to the back and secured with Cosmic Shimmer glue. This gives a much neater edge than using scissors to trim.

I then assemble my card as shown in the finished photo. With the exception of the 'Love Sentiment' everything was secured with Cosmic Shimmer glue. For the sentiment I used 3D glue gel.

I hope you have enjoyed the step by step and the card I have shared with you today. Thank you so much for taking the time to visit and for the lovely comments you leave both on here and on Facebook. I really hop that you will come by again soon.Take care xxx