Showing posts with label alcohol markers. Show all posts

Saturday, 17 November 2018

12 x 12 Journal Page

Morning Friends and crafters, Im a little late today.Hope you are all okay and looking forward to a wonderful weekend. I am sharing a 12 x 12 journal page today using the 'Trent' A5 Media Stencil along with a super collection of AALL&CREATE stamps to give a dramatic and colourful background.. I wanted the portrait to really pop out of the page and using the different media to create layers. You could easily use this idea on a smaller card design as the stencils are designed to work for all size projects.

You will need:
Greasproof Paper
HB & 6B Graphite Pencils
Pergamano Blender Pen
Selection of Watercolours
Versafine Black Ink Pad
12 x 12 Pink Pig Journal
Grey Brusho
Infusions Rusty Car and Royal Blood

Step 1: Start by positioning your stencil on the page. Trace through the outside lines for this one. Use the 6B to roughly go over the lines, not too heavy on the lips (I will do a detailed video when I am back home).Make a mask from Greaseproof paper, see photos 2 & 3. Stamp your selected stamps to build up the background.

Step 2: Repeat to make a mask or leave the previous one in place to add colour to the background.

Step 3: Use Pebeo Drawing gum to mask any detail you want to protect. Then once dry, use a wash made with Grey Brusho and water for the entire background.

Step 4: Lightly spritz areas of your background and sprinkle some areas with the Rusty Car and some with the Royal Blood.

Step 5: Remove the masking fluid and the paper ask from you project.

Step 6: Use your selection of watercolours and alcohol markers to add colour and depth to your project, this really adds another layer of interest.

Just a little extra here: If you have not shopped with Hochanda before, here is a voucher code giving you 30% off your first purchase (FEY5JBP7) it can be used for any purchase, feel free to share it.

As you know I love writing my blog and helping as much as I can, well I would really love for you to add you support by adding me as a favourite blog. All you need to do in that section is choose other and add my blog address nickinbarnsley.blogspot It would be great to get a mention even if I dont come anywhere.

Here is the link to add your support for all of the categories. 

https://www.britishcraftawards.com/

Thank you so much for joining me today, I hope you have enjoyed the tutorial and the finished piece. I hope you will join me again very soon. Take care and Happy Crafting.xxx

Wednesday, 17 October 2018

Spring Harebells 'Treescapes' from Clarity

Morning Friends and Crafters, The lovely Maria is on our screens later today with some super stamps and stencils. The first show is 12 noon, with a second show at 4 pm. I hope you tune in for some excellent demos and lots of inspiration.

You will Need:
Clarity 'Treescape' Stamp
Clarity 'Spring' Stamp
Memento Black Ink
Clarity Club Stencil No 35
Black Fine Liner Water and Copic Proof
Brusho: Lemon, Yellow, Green,
Blue and Green alcohol markers
Drawing Gum
Watercolour Card
Black Soot Distress Oxide
Tacky Glue
Basic Oval Die

Step 1: Secure the stencil to your card and draw round it with a black fine liner.

Step 2: Place the oval over the card and draw around the inside (see photo). Roughly trim out the centre, trim around the flowers, abut 5 mm past the drawn line. The die will cut it out perfectly. Position the die so the flowers are not under the cut line, Run through the machine.

Step 3:Fill in the stencil lines with drawing gum and leave to dry.

Step 4: Spritz the card with water and sprinkle with the Brusho

Step 5: Once dry stamp the spring and remove the Drawing Gum.

Step 6: Take a second piece of card, spritz and colour with the Brusho.

Step 7: When dry stamp the Treescape with the Black Soot Distress Oxide.

Step 8: Trim and mount onto black card with Tacky Glue.

Step 9: Layer a piece of black card onto your base card, after measuring for the right size for your piece.

Step 10: Slide your topper into place underneath one of the flowers, as shown in the photo, you might need to trim along the flower a little more, secure in place with Tacky Glue.

Step 11: Layer the piece onto the base card with Tacky Glue.

Here is the finished card:

Just a little extra here: If you have not shopped with Hochanda before, here is a voucher code giving you 30% off your first purchase (FEY5JBP7) it can be used for any purchase, feel free to share it.

I do hope you have enjoyed the tutorial today along with the finished card. I hope you will join me again very soon to see what else I have to share with you. For now Take care and Happy Crafting.xxx

Monday, 15 October 2018

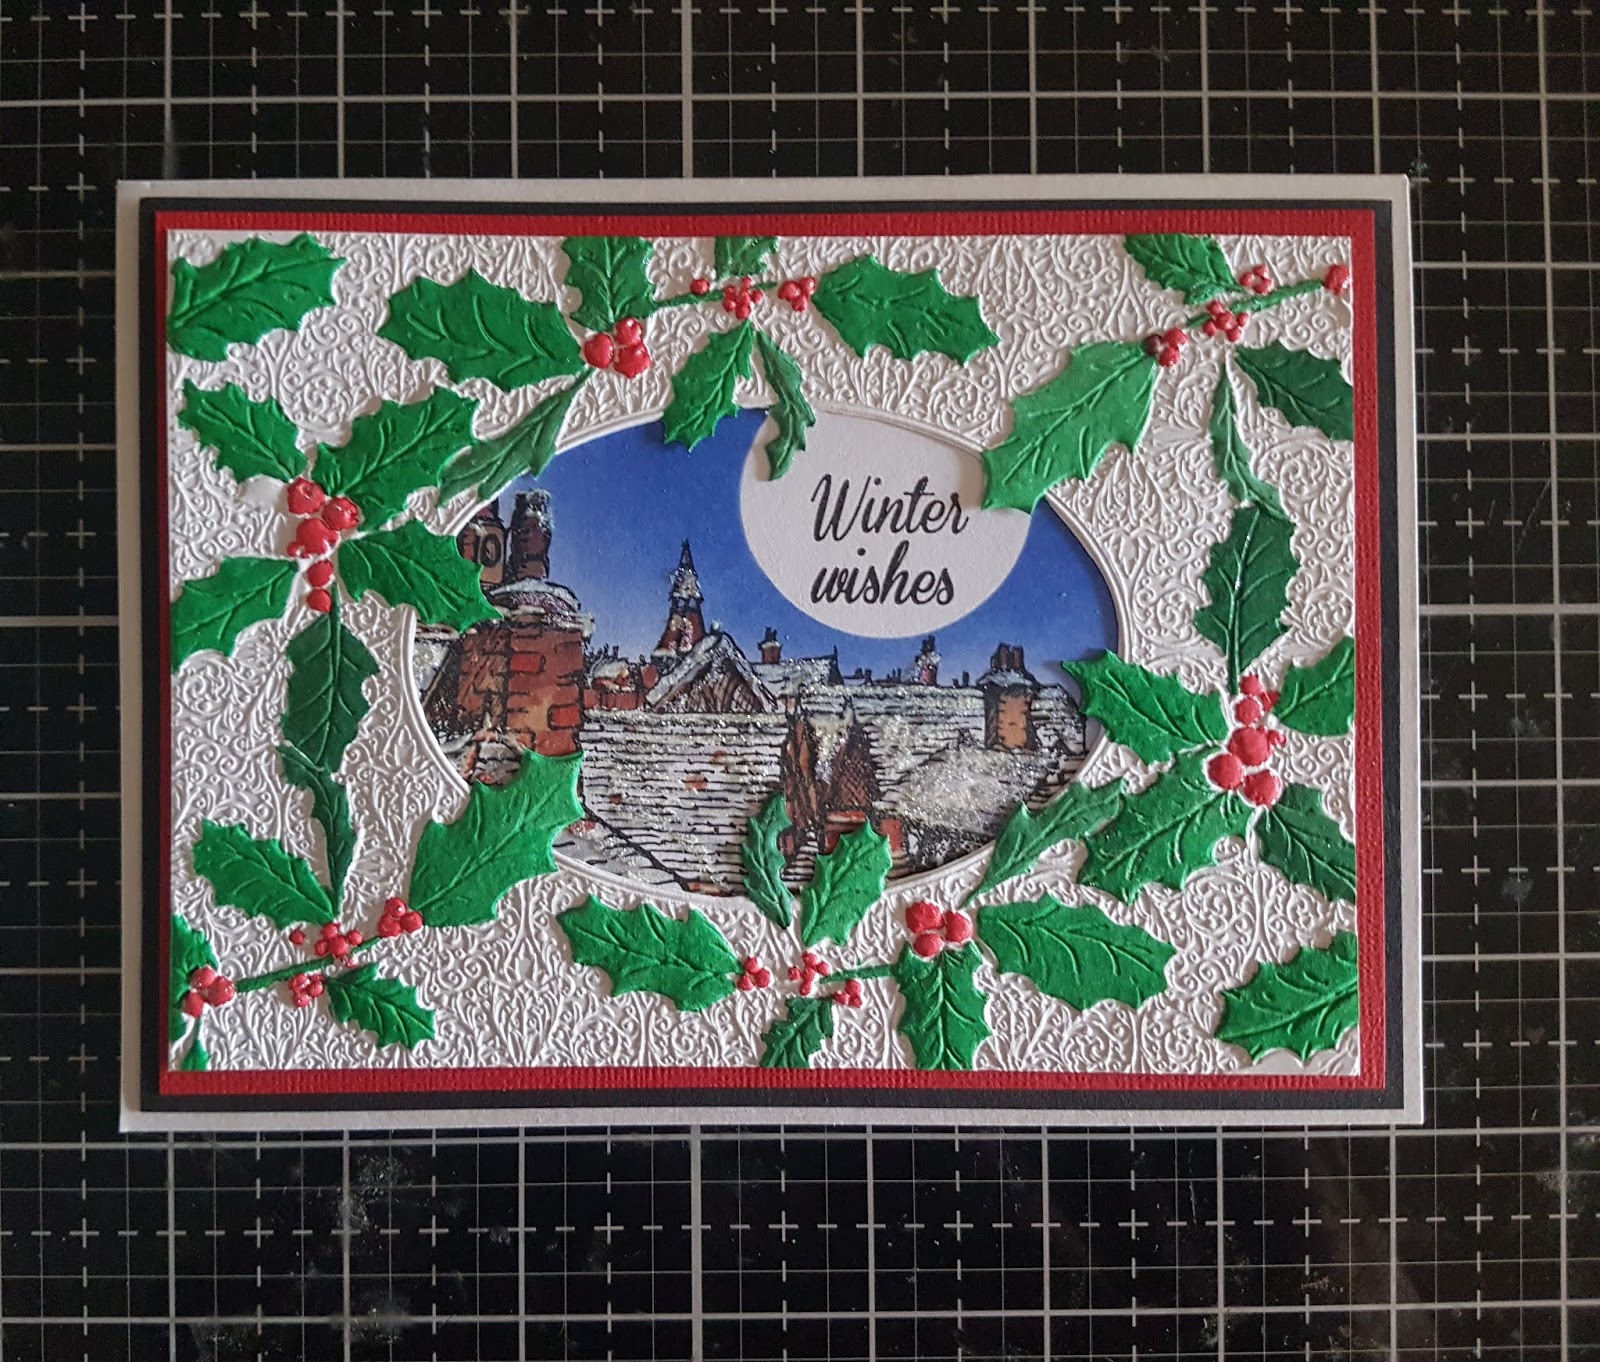
Holly Frame

Hi Everyone, Thank you for popping by today, it's always great to have some company. Writing Blog posts can sometimes feel like your chatting away to yourself. Today's card is using one of the wonderful embossing folders from Crafters Companion. This is a particularly useful folder to use as a frame for any of your festive projects. Here I have used is with a stamp from the 'A Little Bit Festive' Collection by Sheena.

You will Need:
Decorative Holly Embossing Folder
Sheena 'A Little Bit Festive' Stamp
Watercolours
Alcohol Markers
Red & Black Card
Sheena Stamping Card
Centura Pearl Card Base
Tartan Ribbon
Clarity Moon Mask
Collall Tacky Glue

Step 1: Stamp the Sheena Stamp onto your Stamping Card.

Step 2: Colour your image with a selection of Alcohol Markers. Add a Clarity Moon Mask to the sky before blending with your Distress Ink.

Step 3: Emboss your 3D Folder.

Step 4: Pick out the holly and Berries, then colour with your choice of watercolours or markers.

Step 5: Layer your finished onto red and then black card before mounting it onto your base card.

Step 6: Add a matching Tartan bow to finish your card.

Thank you so much for stopping by today. I do hope you have enjoyed the tutorial along with the finished card. Another thing, here is a 30% off voucher to use on your first order (anything) from Hochanda, use code FEY5JBP7.

Would be lovely to see you here again soon, Please dont forget to add your comments if you have time. For now Take care and Happy Crafting.xxx

Sunday, 14 October 2018

Moonlit Bird

Morning Friends and Crafters, I really enjoyed making this card. Blending with Distress inks is such a relaxing process and can give such a dramatic look. Here I have used the Clarity 'Little Bird' stencil that Barbara launched on the 7th October, the shows should still be available on "Rewind" via the Hochanda Website, for more inspiration. I've included a full tutorial on my blog for you, with additional photos.

You will need:
Clarity 'A Little Bird' Stencil
Clarity Garden Birds Stamp & Mask Set
Clarity Moon Mask
Scrap Paper
Washi or Masking Tape
Alcohol Markers
Black Card
White Stamping Card
Black Fine Liner (Copic and Waterproof)
Black Soot Distress Ink Pad
Chipped Sapphire Distress Ink Pad
Blueprint Sketch Distress Ink Pad
Versafine Black Ink

Step 1: Stamp the largest of the garden birds using the Versafine Ink Pad. Cover the bird with the mask which come included with that stamp set. If you don't have one, don't worry you can make one from copier paper.

Step 2: Position your stencil and secure in place with Washi or Masking tape. Also cover the rest of the card with scrap paper to protect it. Add the largest of the Clarity Moon Masks (See Photo).

Step 3: Using the Distress inks, blend your colours, keeping your project lightest around the moon. Use the Black Soot sparingly at the end just around the edges to add more depth to the colour. Remove the moon mask. With a pencil, lightly draw around the stencil, to add the detail that was behind the moon. You could go straight in with your marker if you are confident to do it that way.

Step 4: Remove the stencil and masks.

Step 5: Colour the bird with your alcohol markers, Fill in the moon silhouette with a black marker. Trim your topper to size. Take a ruler and fine liner and draw a frame around the topper.

Step 6: Layer onto black card before mounting onto a white card base.

Thank you for joining me today, I hope you have enjoyed the Tutorial along with the finished card. I hope you will come back very soon to see what else I have to share with you. The next couple of months are going to be very exciting. For now take care and Happy Crafting.xxx 


Wednesday, 12 September 2018

Rose and Fern

Morning Friends and Crafters. For today's card, I have mixed 2 stencils from Be Creative along with one of the stamps to add some interest and texture to the piece. Here is have used the Distress Crackle stamp.

You will Need 
Nouveau Fern Stencil
Rose Bloom Stencil
Distress Crackle Stamp
Versafine Black Ink Pad
Distress Ink Blueprint Sketch, Chipped Sapphire and Black Soot
Alcohol Markers
Black Fine Liner, Alcohol and Waterproof
Pebeo Drawing Gum
White Stamping Card 6 x 6''
Red Card 6 1/2 x 6 1/2''
Black Card Base 7 x 7 ''

Step 1:Take your white stamping card and position your rose, draw through with your fine liner. Next overlay your fern stencil and repeat but dont go over any of your previous lines. Mask of your design with Pebeo Drawing Gum. Starting with Blueprint Sketch, blend in from the edge of your card.

Step 2: Continue blending with Chipped Sapphire

Step 3: Around the very edges, blend a little with Black Soot 'less is more'. Finally use the distress Crackle stamp all over the design with Versafine black ink.

Step 4: Remove the drawing gum

Step 5: Using a selection of alcohol markers colour your design, adding depth and shade.

Step 6: To finish your card, Layer it onto a red mat to bring out the rose, then mount onto your black card base.

Thank you ever so much for joining me today, I do hope you like the finished card along with the tutorial I have shared. I hope you will join me again when I will be sharing something else with you. For now Take care and Happy Crafting.xx

Thursday, 6 September 2018

Vintage Poppies Stamp

Morning everyone, I have a little bit of a strange post today, I am sharing a card I made with the Vintage Poppies Stamp from Be Creative. This is definitely one of those stamps that could be used for batch card making, whether it's for charity or fund raising. You could stamp out a pile of them and then spend an evening colouring to your hearts content.

You will need:
Memento Black Ink
Alcohol Markers
Black Card Base
White Stamping card, 1/2 inch larger than the stamp each edge.

Step 1: Stamp your design onto the stamping card, by having the card larger than the stamp you have a faux layer ad keep the wonderful edge of the stamp, rather than a hard line.

Step 2: Colour with Alcohol Markers. You can use any medium, if you choose another make sure you use the correct Ink pad to avoid any smudges.

Step 3: Mount your project onto a black card base and it's finished.

Well see what I mean about a strange post. I think it's the shortest post I have ever done. I didn't take photos as I thought it would be very boring looking at the same photo over and over. Anyway, I hope you have enjoyed the finished piece along with the write up. As I said before this is a perfect stamp if you want to batch make and love colouring as I do. Take care and Happy Crafting, Hoe you will stop by again for some more sharing.xx

Wednesday, 14 March 2018

Stand Out From The Crowd!!

Morning Crafters. Today I am sharing another of the samples I made for the launch of Jungle Dreams from Michelle. Once again, it's been created using only one of the many images in the collection along with a couple of the sentiments to create the card and insert. Welcome to today's tutorial, I hope you enjoy it along with the finished card.

You Will Need:
Jungle Dreams Collection
Distress Inks: Faded Jeans, Blueprint Sketch,Chipped Sapphire and Black Soot.
Alcohol Markers: Yellows, Oranges and Red
Pebeo Drawing Gum
Sheena Stamping Card
Small Paint Brush
Adhesives and Base Card

Step 1: Print out your chosen image onto Sheena Stamping Card.

Step 2: Choose your sentiment. Tip: Print a page of sentiments, it save card and you will have the for other projects.

Step 3: Create and print your insert onto super smooth paper.

Step 4: Fill the image with Pebeo Drawing Gum, create a few splats by tapping your loaded brush onto a pen or ruler above the piece.

Step 5: Start your background, using Faded Jeans around your image, blending outwards.

Step 6: Next blend from the edges with Blueprint Sketch towards the middle.

Step 7: Repeat with Chipped Sapphire, always fading towards your image.

Step 8: Repeat with Black Soot, to really deepen the richness of the colour. Go easy here. Once the inks are dry, remove the drawing gum. Cut out your sentiment and bled around the edges.

Step 9: With your Alcohol markers, colour your image, blending from red to yellow.

Step 10: Assemble your card as shown in the photo.

Thank you so much for taking the time to visit today, I do hope you have liked the tutorial and the finished piece. Hope to see you very soon. Take care and Happy Crafting.xxx