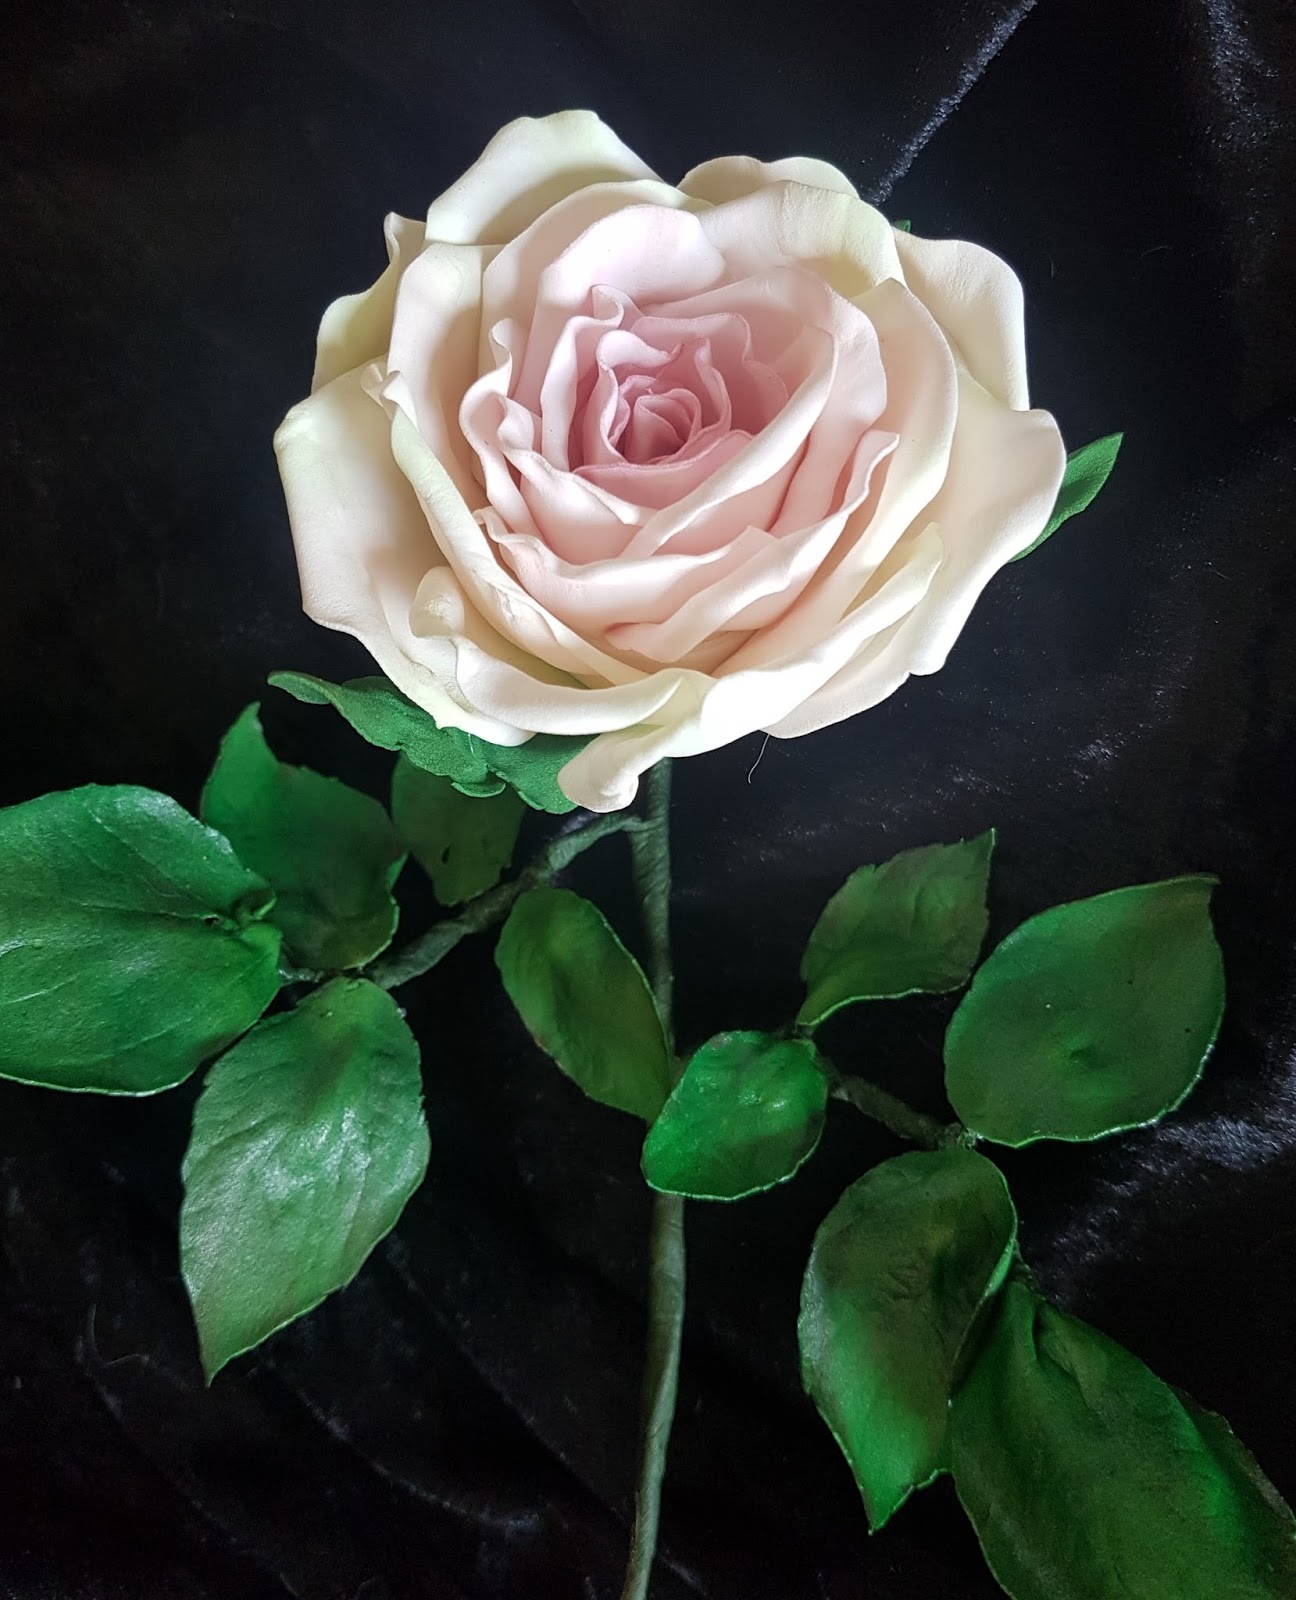
Morning Everyone, It's a real pleasure to be sharing my first post as part of the 14CraftBar Design Team. I am thrilled as it's a real honour to be part of such a talented team doing something that I really love, anyone who knows me will know that I love Roses. So today I am sharing a Beautiful Single Rose Bloom made with Foamiran from 14CraftBar.

You will need:
Florist Wire
Copper Wire
Green Florist Tape
Glue Gun
Mod Podge Glossy
Oil Pastels Petals: Green, Peach and Pink. Leaves: Dark Green and Deep Red
I have actually done a few sections of video to go with this tutorial,however it was really disappointing as I have a new kitten who was calling for mum, I dont know how to turn the sound off, so I will try again next time.
Step 1: Prepare your petals from squares, rounding off 3 of the corners as shown in the picture. You need 7 - 4 x 4 cm, 7 - 4.5 x 4.5 cm and 12 - 5 x 5 cm.

Step 2: Colour your petals, each of the sized needs green at the base, front and back. Edge the smallest leaves with the pink, then blend pink on the front and back of the petals. For the mid size use very little pink and more peach. For the largest size use a little green and mostly peach.

Step 3: Shape your petals, by concertina folding the top edges and twisting them back and forth, Lightly stretch to give a cupped middle, For the mid and large sizes roll the petal gently outwards.

Step 4: Roll a cone shape and secure to the end of a piece of copper wire. Take the petal and secure around the cone as shown.


Step 5: Repeat on the opposite side as shown.


Step 6: Repeat with all of your smaller petals.


Step 7: Next add your mid size petals, overlapping each over the last. Make sure to secure these slightly loser than before.


Step 8: Cut a selection of leaves from the green Foamiran, also cut a calyx shape.

Step 9: Colour these using dark green oil pastels and areas of red, especially around the edges.

Step 10: Roll a small piece of foil, thread onto the wire and secure at the base of the rose.

Step 11: Add the calyx, secure in place with the glue gun, shape around the foil using a toothpick.

Step 12: Firstly add veins to each leaf using the mold then wire all the leaves and join them to form the classic rose leaf arrangement.

Step 13: Wire the leaves to the stem and cover with florist tape, paint the leaves with glossy Mod Podge or similar.

Step 14: Enjoy your beautiful bloom.


Thank you so much for joining me today. I really hope you enjoyed it and I promise to do a video for the roses in my next post. I would love to have your comments and to hear what you think. For now Take care and Happy Crafting.xx
Absolutely stunning
ReplyDeleteThank you Linda, I love making these so much so it's really great that you like it.xx
DeleteКрасиво, добре поднесено и полезно!!!Благодаря!
ReplyDeleteБлагодаря ви много за прекрасния си коментар.
DeleteАз съм толкова щастлив, че ви харесва това и урока.
Amazing Nick. It is so realistic that it is hard to believe that you have made the rose. Thank you for all the extra photos this time which really help to show the process that you have gone through to make it. Sorry that your new fur baby spoiled the video
ReplyDeleteThank you for sharing Nicola x
Thank you so much Nicola, I love making the roses with Foamiran, the detail you can get is really amazing and they also feel so real. It was a shame about the video but have made a few since then. Thank you ever so much.xx
DeleteWow wow wow that’s all I can say Nick. It looks soooooo real. I hope I can make some and that they look half as good as yours, I will be pleased with that. Keep up the good work, can’t wait for the video. Good luck in your new adventure xx
ReplyDeleteOh Sue, thank you I am so pleased you think so. I am more than confident that you will have no trouble at all. Once you have made the first one you will be totally addicted. It's so nice to have roses in a vase all year round, knowing they wont die. Thank you so much.xx
DeleteHi Nick, this is fabulous. Did you have to heat the foamiran as they do on TV or does it just mold. I have some but not dared to try it yet. Again time is the age old problem. Hopefully once I move house and have my own studio I will be able to get more done.
ReplyDelete