Showing posts with label Ice Diamonds. Show all posts

Sunday, 24 September 2017

Aurora Borealis

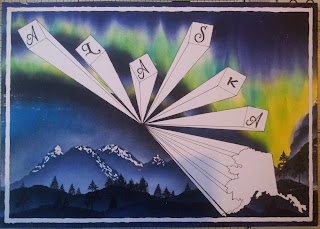
Hi, I am sharing the design I produced for the AALL and CREATE Challenge 5, The Americas. This has been inspired by my time in Alaska, such a wonderful place, with it's many different facets. While there I was lucky enough to see the Northern Lights. What I saw, will never be forgotten, it was truly magical. I wanted to capture the dancing lights in this artwork, using shades of green and yellow as well as put across the wow I felt at the time.

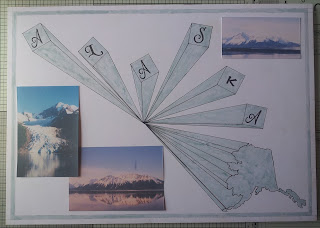
I wanted to include photos in my project, so after positioning them, I added my elements. The boxes would have the letters inside 'Alaska'. I also added the outline map of Alaska.

Next I added the letters using my mixed font stamp set from Clarity.

Using a ruler and a black Copic multiliner, I added lines to a selected point, to give the illusion that these were shooting from the page, this would be my extra large format feature.

I created a frame around the page, which would remain white on completion. Using Pebeo Drawing Gum I masked each element on the page.

I had a final mock up with the photos I had selected to work out my next steps.

I started with a landscape, using Blueprint Sketch, Chipped Sapphire and Black soot. This would have to be a lot darker than normal in order to achieve the results I wanted.

On the left hand side of my piece, I added splats of Drawing Gum to the mountain tops to suggest snow, before adding the mountains with distress inks. The colour here was lighter than the hills as I was stamping trees later and wanted it to appear as if light from the Aurora was shining from behind them.

Next I started the task of creating the 'Northern Lights', I had practiced multiple times to try to get the dancing effect rather than flat colour with many types of media. Eventually I chose to use Distress inks with shades of green, also adding blues and yellows, which gave further shades of green where they mixed.

I then started building up the dark sky behind, carefully trying to keep the ghostly effect, bringing the sky to life, as if it were dancing across the sky.

I then removed all of the drawing gum carefully.

Using alcohol markers I coloured my design. The outline of the map of Alaska was deeper, as I was covering that later. I also decided to leave the letterboxes white, so as not to detract from the sky.

Using Cosmic Shimmer glue, I covered Alaska with 'Ice Diamond' a Crushes Glass product, giving a frosty and sparkling appearance while allowing the colour to shine through.

Here is my finished piece.


Thank you ever so much for popping by to see my post today. I hope you like the finished piece, the photos along with the step by step. Take care and Happy Crafting.


Saturday, 8 October 2016

Magic Of Christmas

Morning, I wanted to share this incredibly simple card made with the 'Baubelicious' Embossing Folder that Leonie launched on Hochanda. It shows just how simply folders can help you create quite a striking look, especially useful for batch making at Christmas.

Taking a Black Versafine Ink pad and a Brayer, I thoroughly inked up the embossing folder being careful to ensure the ink was evenly distributed across the surface. I then took my card, approximately 5 1/4 x 7 1/4' and passed it through my machine. I cut a base in Grey 8 x 6''  and stamped the corners using one of the lovely sentiments.

I edged the Grey card with Cosmic Shimmer Glue and covered with 'Ice Diamonds' I wrapped a red satin ribbon around the edge of the embossed card before securing to my base card using foam for a lift. Finally I added a matching bow to finish the card.

I hope you have enjoyed the step by step today and the finished card. I hope you will come back again soon.

Thank you for your lovely comments both here and on Facebook, I really do appreciate hearing from you. Take care and Happy Crafting.xx 


Thursday, 1 September 2016

Magical Christmas

Morning, The collection that Leonie launched on Hochanda has been a real joy and once again she has brought us something different. The gingerbread stamp is wonderful, I had great fun designing with the stamps. Today I have used the gingerbread men.

I took a piece of watercolour card and stamped the first Gingerbread man (left) and masked it off with Pebeo Drawing Gum. Next I stamped the Santa Hat and again asked off so I could position the second. After covering with Drawing Gum, I stamped the middle Gingerbread Man and masked off with gum.

I took one of Sue Wilson's pierced oval dies, placed over the design and drew around the edge in pencil. I wanted the gingerbread men to appear part on and part off of the design. I snipped away around their legs, anything that was outside the die and cut about 5 mm around the legs to allow me to position the die and cut.

I then took one of the strip stamps and sentiments from Leonie's last launch and positioned on my design

Taking one of Sue's larger pierced oval dies I cut one from watercolour card to be the background.

Before removing the Drawing Gum, I shaded around the design using Shaded Lilac, Blueprint Sketch and Chipped Sapphire Distress Ink. I stamped some of Leonie's snowflakes using the same inks and then removed the gum.I coloured the Gingerbread men with the Copper from the 'Evergreen' Set. Using very little colour and varying amounts of water to create different tones. I used the copper neat to colour the buttons and eyes. For the other areas, I used a selection of the colours across the collection.

For the back oval, I used Shaded Lilac and stamped snowflakes using Blueprint Sketch Distress Ink. I backed the whole design onto Blue Pearl card. Around the edge of the card I used Cosmic Shimmer glue and covered with Ice Diamond crystals to give an icy feel.

Thank you for joining me today. I do hope you have enjoyed the step by step I have shared with you and that you like the finished card. Please come by again. Take care and Happy Crafting.