Friday, 16 June 2017

Rainbow Mosaic

Morning, I really think this project would look great as a piece of wall art. I used the 'Mosaic' Mixed Media Dies by Leonie, along with the coordinating stamps. I do hope you got to see the shows Leonie had on Hochanda yesterday, if you missed them they will be available on 'Rewind' via their website.

To begin with, I blended a selection of Distress inks onto watercolour card. I did a selection of blends in order to achieve the ones I needed to create the graduation of colour and a more seamless blend across the piece. The colours I used here were: Fired Brick,Rusty Hinge, Fossilised Amber, Chipped Sapphire, Dusty Concorde, Blueprint Sketch, Mowed Lawn and Faded Jeans.

Once they were dry, I cut the pieces using the 'Mosaic' dies, then separated them into colour stories.


I arranged the pieces on to black matt card, from red through orange, yellow, green then to blues. I matted this onto white card leaving a space beneath for the sentiment, which was also matted onto black card. I coated all of the mosaic tiles with Glossy Accents, when these had set I secured the piece to a black background to keep a very simple and clean look.

Thank you so much for taking the time to visit today. I do hope you like this and the step by step I have included for you. I hope you all have a great weekend and I will be back again on Monday. For now, Take care and Happy Crafting.xxx

Thursday, 15 June 2017

Dreamer

Hi, For this card I have used the Mixed Media collection of dies from Leonie. I made this samples for the shows on Hochanda today. Leonie is live at 8 am, 11 am and again at 3 pm, the shows will be available on 'Rewind' via the Hochanda website once they have been aired.

To start I cut  selection of Hearts and triangles from the 'Mosaic' set of dies from the collection.

Next, using a black fine liner pen, I added detail to these elements ready to colour with my alcohol markers.

From the same Mixed Media collection of dies, I cut some of the leaves and one of the 'Funky Flowers'

I coloured the leaves using Mowed Lawn Distress ink. Then replaced them in the die before applying Walnut Stain. I also added the same ink to the stem of the smaller leaves.

To create my background I used Leonie's lovely sparkle pens. For the sky, I used the 3 shades from the 'Wrapped Up' set. The used the 'Evergreen' set for the landscape, then added some texture with a damp sea sponge.

Finally, I arranged the elements on my background to create my dreamy village, using 3D Collall glue gel. The sentiment I used was from the coordinating stamp set.

Thank you so much for visiting today. I hope you have enjoyed the step by step and the finished card. Please come back for the next one tomorrow. I have some exciting news that I m really looking forward to sharing with you very soon. As my followers will be the first to know, right here on my blog. Take care and Happy Crafting.xx

Wednesday, 14 June 2017

Leonie's Show-Sneak Peek

Hi Everyone, I hope you are all enjoying nice the nice weather. Leonie will be sharing her wonderful designs with us tomorrow. There are 3 shows, one at 8 am , one at 11 am and another at 3 pm, please tune in when Leonie will be presenting some really popular dies, stamps and stencils. Here is a sneak peak of one of the samples I have made for the show.

As always, Leonie will fill her show with Inspiration, demos and samples from the design team. I will share my samples along with step by steps from tomorrow onwards. Thank you so much for visiting. Take care and Happy Crafting.xx

Monday, 12 June 2017

Let's Celebrate

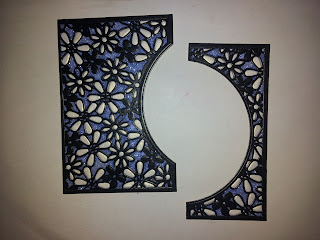
Morning, I have another card to share today that I made for the launch of the Kinetic Card dies by Crafters Companion on Hochanda. This one looks fairly simple, it does take a little more time and effort as the petals from a contrasting card are place within the design before adding the sparkle.

To start with, I cut the card base with the sentiment cut out from the centre using black gloss card.

I next cut the beautiful decorative panels in the same black card and placed a Wonder Sheet behind. I then cut the same panels with Centura Pearl 'Hint of Silver'. These would not be wasted and used for another card. I then took all of the white petals and pieced them into the black card and filled the remaining space with ultra-fine glitter Periwinkle.

A centre circle was cut from Centura Pearl with a wonder sheet cover, I secured this behind the sentiment and infilled with the same glitter.

I edged all of the components with a Pebeo 4Artist marker before assembling the card as in the photos.

That is my last sample from this particular launch so I hope you have enjoyed the cards that I have shared.

Exciting news, Leonie will be showcasing here die collections on the 15th June so I will be sharing the cards I have made for that after the shows, but I hope to share a couple of Sneek Peaks before then. Thank you for taking the time to visit my blog, bye for now, Take care and Happy Crafting.xx

Friday, 9 June 2017

Oriental Parchment

Hi Everyone, This morning I am sharing one of the samples I made for the launch of the Kinetic Cards by Crafters Companion. This one is the Circle Pop Out base, the shows should still be available on 'Rewind' via the Hochanda website.

To start with, I cut some heavyweight parchment, large enough for me to secure behind the outer frame once I had cut it. I then used the stamps from Sheena's Oriental collection to create my design on the parchment using white Stayzon ink. After the white work was compete I coloured the images using Spectrum Noir pencils.

Next using ll of the base dies, I cut the thin frame twice so I could sandwich the parchment between them.

I then cut the 'Sending my Love' sentiment in black and to create the layer I cut some Ivory Centura Pearl covered with a Wonder Sheet with the circle die. I stuck the sentiment in place and then covered the remainder of the sheet with AB glitter. As I had cut so much weight away by removing the centre I stuck a penny behind the sentiment panel so the card would easily stand.

I wrapped a narrow length of pink satin ribbon around the centre and added the sentiment which also covered the ribbon join and inserted the parchment, sandwiched between the black frame.

Thank you ever so much for taking the time to visit today. I do hope that you have enjoyed the step by step and the finished card. If you do enjoy reading my blog and the things I share then I would love your nomination for best blog in the International Craft Awards, the link is here:
http://www.craftsbeautiful.com/awards/
Take care and Happy Crafting.xx

Wednesday, 7 June 2017

Le Cirque

Morning, I have thoroughly enjoyed using the new Kinetic Dies to create these cards. For todays Step by Step I have also used the 'In a Spin' die from Leonie's Mixed Media Collection along with 'Le Cirque' from Graphic 45.

I cut out the 'In a Spin' 4 times and layered together using Tacky Glue. Next I selected images from Le Cirque, cut them to size and secured them in place at the back.

I then cut the base Circle Pop Out card using double sided Black Pearlescent card, along with the 'Thank You' sentiment. I then edged the card base using a Pebeo silver 4Artist marker.

I cut the panels and decorated using a selection of the Graphic 45. I then covered the whole piece using the Crackle Medium from Tonic. Once this was dry, I highlighted the cracks with Gathered Twigs Distress Ink.

I cut the layering panels in the same black card and edged them with the silver. Then layered the decorated panels onto black with Tacky Glue.

I cut a clown from the collection and decoupaged him to give him more depth. I filled the circles with Glossy Accents, giving a domed look. Then I added Pebeo Silver Gilding Wax to texturize the circles. I assembled as in the photos, placing the clown so he was pointing at the sentiment.

Thank you ever so much for taking the time to visit today. I do hope that you have enjoyed the step by step and the finished card. If you do enjoy reading my blog and the things I share then I would love your nomination for best blog in the International Craft Awards, the link is here:
http://www.craftsbeautiful.com/awards/
Take care and Happy Crafting.xx


Monday, 5 June 2017

Special Friend

Morning, Here I have used watercolour card, Brusho and Pixie Powders to create a background to use with the Circle Pop Out Kinetic card dies from Crafters Companion. The shows should still be available via 'Rewind' via the Hochanda website.

I took a sheet of watercolour card and thoroughly saturated it on both sides under the tap. I then sprinkles Violet, Prussian Blue and Ultramarine Brusho. Next I added a very small amount of Bronze Blush and White Pearl Pixie Powders in a few areas across the card before spritzing with a little water. I then left it to dry.

I next cut out the kinetic base in white Centura Pearl, 'Hint of Silver' and 2 of the beautiful floral panels. From one of the panels I cut out the flowers and shaped them. I cut out the background and assembled my card.

To finish, I added the flowers that I had shaped using Collall Tacky Glue. The I used the Blue Cosmic Shimmer PVA to add centres to all of the flowers.

Thank you ever so much for taking the time to visit today. I do hope that you have enjoyed the step by step and the finished card. If you do enjoy reading my blog and the things I share then I would love your nomination for best blog in the International Craft Awards,the link is here:
http://www.craftsbeautiful.com/awards/
Take care and Happy Crafting.xx

Friday, 2 June 2017

French Fancy

Hi all. A French Twist today. Here is a step by step for one of the samples I made for the launch of the Kinetic cards by Crafters Companion. I have also used Stamps from Leonie's 'All the Love' set and Graphic 45 Papers.


I cut the circle pop out base using Ivory Centura Pearl 'Hint of Gold'. On the white side, which would become the front,I used the wonderful script stamp from Leonie. I stamped it over the base using Tattered Rose, Victorian Velvet and Antique Linen Distress Inks.The I blended from the outside in using the same inks, keeping it darker on the edges.

I took a sheet of the script paper from the Graphic 45 'Gilded Lily' paper paper pad and cut it out using the inner panels from the dies set.

From another sheet from the same pad I cut my main image using the circle die, this was for the centre. I also fussy cut a sentiment and some flower bouquets.

I layered the panels onto black card before adding it to the centre circle. I shaped the rose and lily bouquets and secured them with Collall 3D glue gel. The assembled the card as shown.

Thank you ever so much for taking the time to visit today. I do hope that you have enjoyed the step by step and the finished card. If you do enjoy reading my blog and the things I share then I would love your nomination for best blog in the International Craft Awards, the link is here: http://www.craftsbeautiful.com/awards/
Take care and Happy Crafting.xx

Thursday, 1 June 2017

International Craft Awards

Hello again. If you like reading my blog and enjoy the step by steps I share I would love your nomination in the International Craft Awards 2017.


Thank you, Take care and Happy Crafting.xx

Time for a Special Friend.

Morning, Here I am, back with the Step by Steps for the samples I made for the launch of the Circle Pop Out cards by Crafters Companion. These Create a Card dies are super for making statement card bases ready for decorating for any person or occasion.

The first step was to cut out the clock from the 'Time Traveller' collection by Sheena. I cut this out 3 times from mat black cardstock and secured them together with Collall Tacky glue for extra strength.

Next I took the solid decorative panels from the die set, positioned various cogs from the 'Time Traveller' collection. Then to add more depth and texture applied DecoArt Sand and Texture paste to areas and left to dry.

Next I painted the paste with Pebeo Black Gesso.

Having cut out the base card, I cut in the centre 'Special Friend' sentiment, making sure it was on the reverse and would be the right way after completing the design.

I cut a further 3 of the sentiments and layered them up.

When dry, I applied Pebeo Gilding wax, using Silver, Empire Gold and Renaissance Gold before placing it over the cut centre sentiment.

Lastly, I used the same gilding waxes to highlight the design on the panels, finally sticking them in place using Collall Tacky glue.

Thank you so much for joining me today, I hope you have enjoyed the step by step and the finished card I have shared. Please come back soon to see the other things that I am sharing. Take care and Happy Crafting.xx