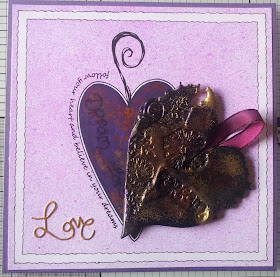
Morning, The project I am sharing with you today is actually using the waste from one of my other projects, along with the Stamp Collection from Leonie Pujol launched On Hochanda. I had been looking at the waste from the Funky Heart ''Lovely Bubbles'' and that's when the idea struck me.
I glued four of the 'Lovely Bubbles' inside die cuts to give me a nice thick piece.
Then I triple embossed with clear UTEE before adding interest using some other embossing powders. Here I used Lilac Black Cosmic Shimmer from Creative Expressions, Brass, Gold and Copper from Sheena's Wow and lastly Aged Mahogany Distress Embossing Powder. While it was still molten, I stamped using the flowers stamp and the word 'Dream' both from Leonie's New Collection.
I cut my card base to 7'' Square, drew a 5 mm Deckled frame around my card and masked with Pebeo Drawing Gum. I stamped the narrow heart stamp onto my card and added a swirl stamp to act as a hanger. Then I took a sentiment strip, shaped it on my block and stamped it around the heart. I painted this with Cosmic Shimmer Iridescent Watercolours from Creative Expressions, so it matched my embossed heart.
I cut out a mask for the heart and sprayed with Colour Chemistry ink from Oak House Studios, I used French Lavender, which I mixed in a spritzer bottle with water.
I removed the drawing Gum and paper mask. Attached some two tone colour ribbon to the back of my embossed heart and secured with 3D Glue Gel. To finish off this piece I cut 'Love' from Satin Gold Cardstock and secured using Cosmic Shimmer glue. I then backed my project with purple Centura Pearl from the brights collection at Crafters Companion.
Thank you so much for coming to see today's project and the step by step that I have included. I hope you like what I have shared so far and will come and see the next project I am sharing tomorrow. I really apriciate your comments and always enjoy reading them. Take care and see you soon. xxx


A beautiful and very different card.
ReplyDeleteThank you for sharing. Nicola x
Thank you Nicola, this is a card I had great fun making. I loved plying with the UTEE, it was lovely playing with all of those colours xx
DeleteYour cards have do much detail Nick! I have to look at them over and over in case I have missed something. Great work!!! X
ReplyDeleteThank you Dawn. I try to make them interesting, Thanks you for your comments and for visitingxxx
DeleteYou never cease to amaze me with your designs. Think you need to be on TV demonstrating too! Love Jean xxx
ReplyDeleteThank you Jean, I am glad you like what I share. I would love to demonstrate if I knew I wouldn't go to pieces.LOL xxx
DeleteIt is just amazing Nick I like the UTTE embossing colours together.
ReplyDeleteHugs Janet xxx
Thank you Janet, I had great fun with the UTEE, Love all those molten colours.xx
DeleteWhat a clever idea, this is beautiful.
ReplyDeleteThank you Susan. Thank you so much for leaving your comments xxx
DeleteThis is beautiful Nick. Thank you for sharing. These are lovely dies and stamps which I would really like to have bit I cannot see I would be able to use them.
ReplyDeleteI am sure you would get a lot of use out of them. I always sit down and mess around with them and try to think of something different to what I think other people might make. Thank you so much for leaving your comments and your continued support for the blog, it really means a lot to me.xx
DeleteNick, this is lovely, just a few elements but what an amazing finished article, your's & Leonie's ideas really compliment one another, my favourite colour too! Love it! xx
ReplyDeleteThank you Sandy you are so kind. I would like to thank you for taking the time to visit and for leaving your lovely comments. xx
Delete