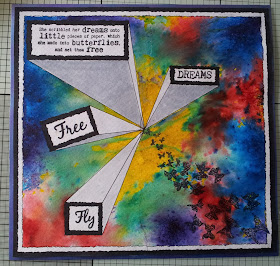
Hello and thank you for stopping by to take a look at the projects I have been creating using Leonie Pujol's New Collection of Stamps. I hope you have been enjoying the step by steps I have been sharing.
On a piece of 8 1/4'' square of watercolour card, I stamped the sentiment from Leonie, in the top left hand corner, about 1 cm from the edge of the card. Directly opposite, I stamped the Kaleidoscope of flying butterfly scribbles. I then chose 3 words from across the collection that fitted in with the theme.
Very lightly with a pencil and ruler I drew a double box around the sentiment and all of the words. Also I drew a box at about 5 mm and 1 cm in from the edge of the card to create a double frame. I then went around all of these with a Black fine liner creating a deckled edge.
Before masking off with Pebeo drawing gum, I joined the boxes I had created to a dot that I had made in the centre of the card. The gum was put all around the edge of the card, all the boxes and drawn lines.
When dry, I wet the card with water and a brush around the centre and added yellow ink. I let it spread out, also blew it around the card and left to dry.
I repeated with green Brushos and again left to dry. Finally I sprayed the remaining white card with water and sprinkled Crimson, Blue and Violet Brushos using a dry brush.
I coloured the cubes and lines in 2 shades of grey. The very outer edge of the card I coloured with a black alcohol marker and the same for the frames around the words. I set this aside before mounting to allow it to dry thoroughly and for the card to flatten.
Later, I decided I didn't like it and tore it in half, I think I was a tad stressed at the time. I made an alternative card, which I will share another day. Anyway as the day went on I decided that I really liked this one, so I tried to fix it. Not too badly either, I think so I mounted it on white card which I had coloured using Mediterranean Blue Cosmic Shimmer Gilding Polish.
Hopefully you have enjoyed this share along with the step by step. Thank you so much for visiting and for your support. It means a lot to me and without you I wouldn't have continued with my blog. Take care and hope to see you soon.


I love these 3D art works of yours,they are really eye catching. Beautiful bright colours. Why did you fall out with it? Anyway so glad you put it back together,you would merger know that it was in two pieces or not from the photo anyway! Not surprised that you were stressed at trying to get some samples done in the very short time you were given!
ReplyDeleteThank you for sharing,again really good step by step. Nicola x
Thank you Nicola. I'm not really sure what it was I didn't like, I suppose it didn't come out as I had planned. By the time it had sat around in 2 pieces I had changed my mind. I am so glad I was able to repair it. I do like the effect and I am playing around with other ideas at the moment.Take care xx
ReplyDeleteLove your Explosion cards and the fabulous vibrant colours once again a super step by step tutorial.
ReplyDeleteHugs Janet xxx
Thank you so much Janet, I used to be really scared of the colour bursts but it's great to let your hair down, so to speak.xx
DeleteLove your Explosion cards and the fabulous vibrant colours once again a super step by step tutorial.
ReplyDeleteHugs Janet xxx
Thank you Janetxx
DeleteWow this is gorgeous Nick. Thank you for sharing.
ReplyDeleteThank you very much, Glad that you enjoy the step by steps.Take care xx
DeleteStunning g a real masterpiece x
ReplyDeleteThank you so much Elaine.xx
Delete