Thursday 30 June 2016

Leonie Launch Previews Part One

Hello and a very warm welcome to Part One of my post to preview the Brand New Launch tonight from Leonie on Hochanda. Tonight she has not only brought us another wonderful collection of Stamps but she has also introduced her own range of Embossing folders.


There are six sets of stamps in the new collection: Everlasting Love, Doodle Hearts, Floral Tapestry, Love Hearts and last but not least All the Love. These will mix and match beautifully with all of the ranges that Leonie has brought us as well as anything else you have in your crafty stash.


There are also 6 Embossing folders in Leonie's first range. They are: Love Lines, Growing Love, Entwined Love, Bubble Explosion, Forever Swirls and Dotty Heart. These match really nicely with the Die Collection that Leonie released at the beginning of the month, but they are also really nice to use independently.


Thank you ever so much for taking the time to come and see a  small selection of the samples I have made for the launch tonight. I will be sharing some more tomorrow morning and from Saturday I will be sharing each one individually in more detail with step by steps, for all of you who would like to see how they were made.


Please do take the time to visit the rest of Leonie's Design Team. They all do some fantastic work and it's great being in the team with them. They are:


Let It Snow

Morning, So much Excitement for one day. I hope you are all set for an amazing day on Hochanda. Leonie is Launching her brand new One Day Special at 8pm. I will be sharing some of my samples on my blog at launch, so I hope you will take a look later. Before that we have Sue Wilson back on Hochanda too. I always love Sue's dies and her demos are always a great source of inspiration. Today, The card I m sharing was made yesterday using Sue's Christmas Dies from last year.

To work out the card I needed, I took the square die I was planning to use for my aperture and the side panels. I allowed a 5 mm border around all of the elements. I wanted approximately 1/4'' border at the top and a 1 1/2'' border at the bottom. So my card size was 7 x 9 1/2''. I then cut the square in some navy Silk Art card using a die, it measured approximately 5 1/4'' square.


Having the aperture, it made it easy to work out the position of the image I was creating for the card. I made a stencil in copier paper using a large Spellbinder bauble die. I positioned this over my super smooth card. I then tore a strip of copier paper to make my snowy landscape and blended the hills using Shade Lilac and Faded Jeans Distress Ink, making some lighter and some darker, always fading towards the bottom to give dimension.

Next I added some deer and trees to my snowy scene, here I used the 'Snow Scene Set' from Clarity Stamps. I paced the round moon mask in the sky, then blended using Blueprint Sketch and Chipped Sapphire, leaving it lighter towards the middle. I then added some snowflakes using Chipped Sapphire. Finally I added some mini snow flakes using a white Sharpie fine liner pen.

Then I removed the masks and outline stencil and set aside.

I cut 2 of Sue Wilson's Snowflake Striplets with the outer cutting die from Navy Silk Art card.

Using the outer cutting die again, I cut to rectangles from red Silk Art card and covered them with double sided adhesive sheet. Then I covered a little bit of the same card with the adhesive sheet and cut out Sue's 'Let It Snow' Die.

I peeled off the backing and stuck the red card behind my die cut striplets.

Next I covered all of the adhesive areas with Clear Micro Beads on the striplets and the 'Let It Snow' sentiment. Then set aside.


I positioned my snow scene within the square to plan and stamp some lighter snowflakes within the aperture, I used Shade Lilac Distress Ink for this. Then using foam tape I secured the snowy scene behind my main card, ensuring that the image was in the correct place.

I then cut some snowflakes using a punch, this was on shaded blue cardstock.

I secured the striplets either side of my image, using two layers of foam tape to really lift them from the card. I positioned the 'Let It Snow' sentiment directly below. Then arranged the snowflakes around the bottom using 3D glue gel and trimmed the excess so they were coming off the page. Finally I layered the finished piece onto a matching red base card.
It's time for nominations in the Craft Awards. They have a category for best blog too. It would be lovely to be nominated. I know I probably haven't got a hope in hell but if you haven't voted for all your favourite crafters yet and you think my blog is worthy of a nomination I would be very proud and happy for your support. This is a link: International Craft Awards.

Thank you ever so much for taking the time to look at what I am sharing today. It really does mean a lot to know that you are enjoying my blog and the things I am sharing with you.

I'd also like to thank everyone who leaves a comment I do love to read them and like to hear what you think.

I hope that you will come by later to see some of the samples I have made for the shows. Thank you so much and Take care xx

Wednesday 29 June 2016

Four Seasons

Morning, Sorry for the missing post on Monday, I am afraid I was under the weather and just couldn't manage to post. Today I wanted to share a colourful card to spread a little cheer. I love this sentiment from Bee Crafty and along with the additional words from the textures stamps from Crafters Companion, I think it says it all.

To start with I cut 4 squares approximately 3 1/4'' using a basic square die. Then with Black Archival Ink I stamped the tree from the 'Tree and Branch' set from Bee Crafty, I stamped part of it on all of the squares, two on the right hand side and two on the left hand side of the squares. Then I stamped the words at the bottom of each of the squares using the same ink.

I then cut out a rectangle,using a basic die approximately 3 1/4 x 2 3/4'', then using Black Archival I stamped the lovely sentiment from Bee Crafty.

Taking each square in turn, I used distress inks to blend colour from dark to light from the edges. I used Mowed Lawn, Scattered Straw, Rusty Hinge and Faded Jeans.

Then I took the sentiment rectangle and blended the colours from the bottom left hand corner, using Scattered Straw about 2 thirds of the way up, then Rusty Hinge and finally Fired Brick. Then from the top right I blended with Blueprint Sketch part way into the Scattered Straw to give the green. I edged the sentiment by stamping part of the tree tops around the edge using Archival black ink.

For the background I took a selection of Brusho's, Cobalt Blue, Prussian Blue, Violet and Ultra Marine. I also added a little Lava Red Pixie Powders from Creative Expressions before spritzing with water. I wanted a spotty ook rather than swathes of colour so was careful not to flood the card.

I layered all of the elements onto black card and secured with Cosmic Shimmer Glue from Creative Expressions.

I also layered the background card onto black and secured with Cosmic Shimmer glue.

I arranged the squares around the corners of my card, leaving a 5 mm gap and used 3D glue gel to secure so I could raise this from the card. I then secured the sentiment in the centre, also using 3D glue gel to lift this from the squares.

I hope you have enjoyed my step by step today and the finished card. Tomorrow will be very exciting s Leonie will be Launching her Brand New One Day Special on Hochanda at 8pm. I will be sharing some of the cards I have made in my preview post tomorrow evening at launch. Would love you to come and see them. Many thanks and take care xx


Tuesday 28 June 2016

Wintry Leaves

Morning, I am sharing a wintry card today, that could easily be made into a Christmas themed card. I have used the amazing stamps drawn by Sam along with the stencils and masks from Bee Crafty. The shows were great, if you missed them on Friday you can still watch them on Catch Up on the Hochanda Website, via the TV schedule.


To begin with I secured the largest of the Maple Leaf masks onto my 8'' square card. Here I used velvet cardstock. I left about a 1 cm gap between the mask and the edge of the card.


Next using Distress Inks I built up a landscape, here I used Shaded Lilac, for the land, blending it darker at the top to nearly white where the hill join. For the sky, I blended Blueprint Sketch and Chipped Sapphire darker around the edges, blending to give a halo above the land.


To add the tree, I masked off part of the stamp with washi tape, inked it up and removed the tape before stamping into place.. I overlapped the moon slightly with the tree. I then blended around the page and mask with Shaded Lilac.


I removed the masks and stencil, then placed a negative of the moon so I could add some colour inside it. I wanted the moon to show outside the leaf, while not spoiling the leaf outline. Then I replaced the moon mask and the maple leaf mask, I put scrap paper around the edge of the square I had created and sponged Shaded Lilac inside to give a more wintry look and add atmosphere.


I stamped a selection of the smaller Maple and Oak leaf onto another sheet of card and coloured them with matching Distress inks. Shaded Lilac and Blueprint Sketch.

Then cut them out with scissors.

I stamped my sentiment, shaped the leaves and arranged them around my design, I then used 3D glue gel to adhere them to the card.

I took some white card to layer the project onto and used Mediterranean Blue Gilding Polish around the edges before securing it with Cosmic Shimmer Glue.

Thank you so much for joining me again today, I do hope you have enjoyed the step by step I have shared and the finished project. I really hope you will come back again soon. Take care and bye for now xx

Sunday 26 June 2016

Flower Vase

Morning, Only a couple more days to go until Leonie will be launching some brand new crafty goodies. Her One Day Special will be on Hochanda at 8pm on Thursday evening, I hope you will be able to tune in. It's going to be very exciting as always. I will be sharing some previews on the night so I hope you will take a look. Today I am sharing a card with the lovely stamps Leonie brought us earlier in the month.

To start with, I cut out a vase shape in copier paper to act as a mask and stencil and inked through it using Faded Jeans Distress Ink. I concentrated the colour at the edges to give a rounded look.

Then I took one of the strip stamps from the collection and curved it on my block before stamping it onto the vase with black Archival ink. This gave a more realistic look and made the vase look even more 3D.

I removed the stencil to reveal the vase.

Next I used the flowers with stems from the collection to build up and fill the vase. I also added ore leaves and the flourish stamp to extend the flowers to other areas of the design.


Next I added some of the larger blooms from Leonie's collection using a mask so they appeared from behind the other flowers. I then added some of the larger leaves. Then I added my chosen sentiment, here I used one from Bee Crafty along with some butterflies from HOTP 'Dancing Wildflowers'

I then coloured my design with a selection of alcohol markers.

Finally to finish the card I backed the piece onto some light blue 'Centura Pearl' from the brights selection from Crafters Companion with some Cosmic Shimmer Glue.

Thank you for taking the time to visit my blog today. I have to apologise for not replying to the comments, It has been extremely busy. I do appreciate you leaving the comments and I do take the time to read them all.


Saturday 25 June 2016

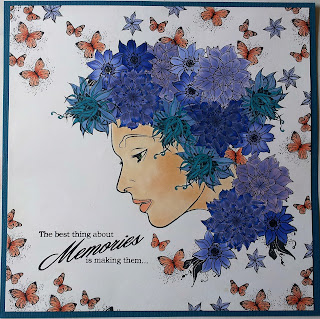
Making Memories

Morning, I so enjoyed making my 'Autumn Lady' project and I had so many wonderful comments that I decided to make a variation to share with you. On Hochanda a few weeks ago Leonie brought us some wonderful stamps from HOTP on her 'Let Leonie Loose' show. The set I am using is called 'Dancing Flowers',for this project I have coupled them up with the 'Ladies Profile' from Bee Crafty. This is such a versatile stamp and can be used for so many different looks.


To create the look, I needed some masks, to ensure that the flowers didn't overlap. I stamped these onto copier paper and cut them out. These stamps are quite detailed, so it's best just to choose a few of the larger one, too many and it can soon look messy.


I took a sheet of Super Smooth card measuring 8'' square and stamped the profile using Memento Black Ink.

I chose my sentiment and arranged the larger stamps around her head using my masks. To soften the edges of the card I used the mall group of butterflies and some of the smaller flowers.

I coloured the main flowers using a selection of blue and teal alcohol markers. Then for the butterflies I chose apricot and peach. For the face I used fairly light skin tones from my alcohol markers. Once again I felt that the white background worked best for this design rather than shading the card with distress inks.

To finish, I layered the piece onto teal/blue Coredinations cardstock to compliment the colours in the image. I tried various colours and this one worked the best.

Thank you so much for visiting today, hopefully you have lie the project I have shared and the step by step I have included for you. I hope that you will visit again very soon.Take care xx